TLG - Windows Server 2012 Hyper-V: Hosting the Contoso Branch Office Test Lab
Infrastructure
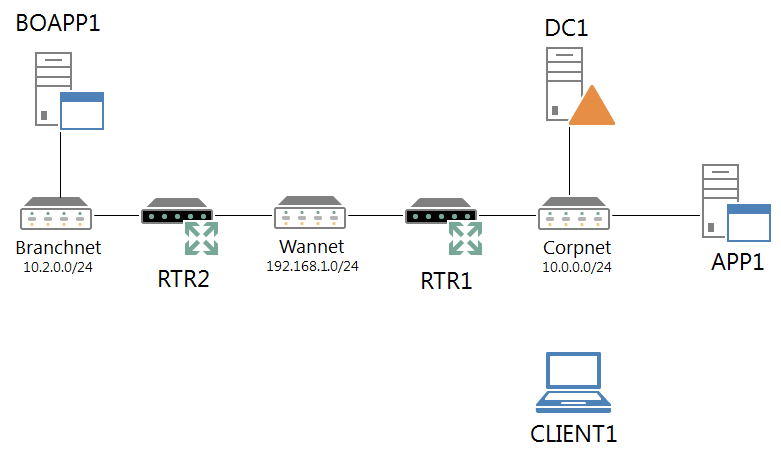
The Contoso branch office test lab consists of six computers on three separate subnets:
- The Corpnet subnet contains the DC1, APP1, and RTR1 computers
- The WANNet subnet contains the RTR1 and RTR2 computers
- The Branchnet subnet contains the RTR2 and BOAPP1 computers
Client 1
The CLIENT1 computer can connect to the Corpnet or Branchnet subnets.
Subnets
This figure shows the computers and their connections to the subnets using a hub or switch. You can implement this configuration using physical computers and switches, virtual computers and switches, or a combination of physical and virtual components.
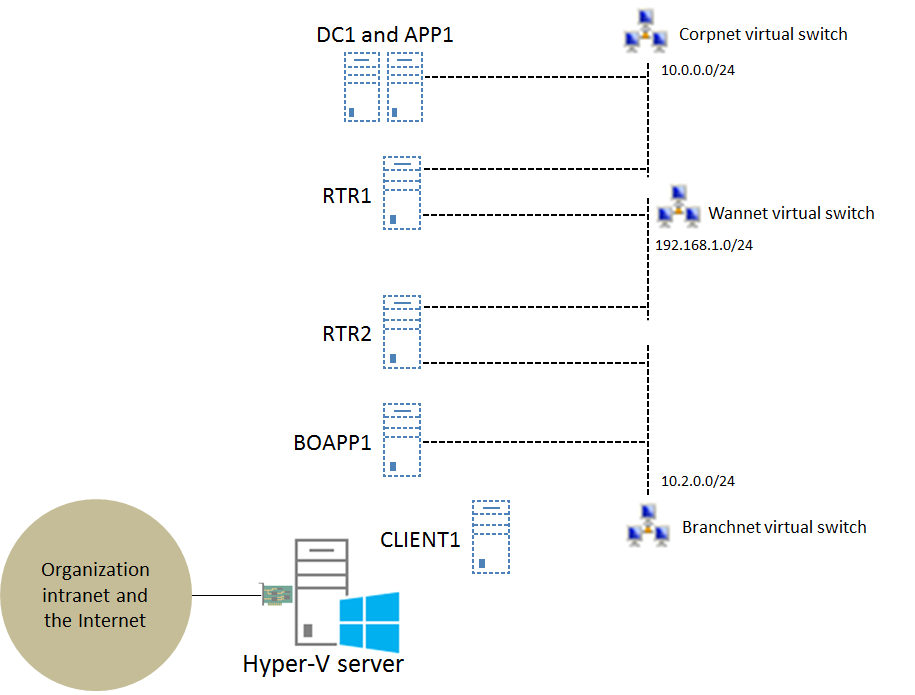
If you are using Windows Server 2012 and the Hyper-V server role for your virtualization solution, you can configure the Contoso branch office in Hyper-V on a single server as shown in the following figure (click on it for a larger version):
Key Elements
The key elements of this configuration are the following:
- All six computers (DC1, APP1, CLIENT1, RTR1, RTR2, and BOAPP1) are virtual machines running on the Hyper-V server.
- The Corpnet subnet is implemented as the Corpnet virtual switch.
- DC1, APP1, and RTR1 are connected to the Corpnet virtual switch.
- The WANNet subnet is implemented as the WANNet virtual switch.
- RTR1 and RTR2 are connected to the WANNet virtual switch.
- The Branchnet subnet is implemented as the Branchnet virtual switch.
- RTR2 and BOAPP1 are connected to the Branchnet virtual switch.
- CLIENT1 can be connected to either the Corpnet or Branchnet virtual switches.
- The Hyper-V server has at least one physical network adapter that connects to your organization intranet and the Internet. You can use this connection to connect a branch office test lab computer to the real Internet, for example to install software or updates. For more information, see How do I get my base configuration computers on the Internet?
If you have not already done so, build out the Corpnet subnet in Windows Server 2012 Hyper-V with the following:
- Create a private virtual switch named Corpnet. For the steps to do this, see Creating a new virtual switch.
- Create a new virtual machine named DC1 with a single network adapter that is connected to the Corpnet virtual switch. For the steps to do this, see Creating a new virtual machine.
- Create a new virtual machine named APP1 with a single network adapter that is connected to the Corpnet virtual switch.
- Create a new virtual machine named CLIENT1 with a single network adapter that is connected to the Corpnet virtual switch.
- Follow the instructions in the “Steps for Configuring the Corpnet Subnet” section of the Test Lab Guide: Windows Server 2012 Base Configuration. To install Windows Server 2012, Windows Server 2008 R2, Windows 8, or Windows 7 on a virtual machine, see Installing an operating system on a new virtual machine.
PowerShell
The following Windows PowerShell cmdlet or cmdlets perform the same function as steps 1-4 of the preceding procedure. You must supply values for the –MemoryStartupBytes and -NewVHDSizeBytes parameters for each virtual machine. Enter each cmdlet on a single line, even though they may appear word-wrapped across several lines here because of formatting constraints.
New-VmSwitch -Name Corpnet -SwitchType PrivateNew-VM –Name DC1 –MemoryStartupBytes <MemorySize> -NewVHDSizeBytes <DiskSize> –SwitchName Corpnet
New-VM –Name APP1 –MemoryStartupBytes <MemorySize> -NewVHDSizeBytes <DiskSize> –SwitchName Corpnet
New-VM –Name CLIENT1 –MemoryStartupBytes <MemorySize> -NewVHDSizeBytes <DiskSize> –SwitchName Corpnet
Build networks
To build out the WANNet and Branchnet subnets in Windows Server 2012 Hyper-V, do the following:
- Create a private virtual switch named WANNet.
- Create a private virtual switch named Branchnet.
- Create a new virtual machine named RTR1 that is connected to the Corpnet virtual switch.
- Add a network adapter to RTR1 that is connected to the WANNet virtual switch. For the steps to do this, see Adding a network adapter to a new virtual machine.
- Create a new virtual machine named RTR2 that is connected to the WANNet virtual switch.
- Add a network adapter to RTR2 that is connected to the Branchnet virtual switch.
- Create a new virtual machine named BOAPP1 that is connected to the Branchnet virtual switch.
- Follow the instructions in the Test Lab Guide: Configure the Contoso Branch Office, starting with step 2.
-
- Step 2 installs and configures RTR1.
- Step 3 installs and configures RTR2.
- Step 4 installs and configures BOAPP1.
- Step 5 demonstrates connectivity from the branch office.
PowerShell (Networking)
The following Windows PowerShell cmdlet or cmdlets perform the same function as steps 1-7 of the preceding procedure. You must supply values for the –MemoryStartupBytes and -NewVHDSizeBytes parameters for each virtual machine.** **Enter each cmdlet on a single line, even though they may appear word-wrapped across several lines here because of formatting constraints.
New-VmSwitch -Name WANNet -SwitchType Private
New-VmSwitch -Name Branchnet -SwitchType Private
New-VM –Name RTR1 –MemoryStartupBytes <MemorySize> -NewVHDSizeBytes <DiskSize> –SwitchName Corpnet
Add-VMNetworkAdapter –VMName RTR1 –SwitchName WANNet
New-VM –Name RTR2 –MemoryStartupBytes <MemorySize> -NewVHDSizeBytes <DiskSize> –SwitchName WANNet
Add-VMNetworkAdapter –VMName RTR2 –SwitchName Branchnet
New-VM –Name BOAPP1 –MemoryStartupBytes <MemorySize> -NewVHDSizeBytes <DiskSize> –SwitchName Branchnet
For additional information about configuring test labs with Windows Server 2012 Hyper-V, see Hosting Test Lab Guide environments in Windows Server 2012 Hyper-V.
For more information, see Test Lab Guides.
For the latest developments in the Test Lab Guides initiative, see the Microsoft Test Lab Guides blog.

