Small Basic Curriculum: Lesson 1.1: Introduction
Small Basic > Curriculum >** **Online > Lesson 1.1: Introduction
Estimated time to complete this lesson: 30 minutes. (Budget more time to practice delivery and familiarize yourself with the lesson.)
Introduction to Small Basic
In this lesson, you will learn how to:
- Describe Small Basic;
- Explore the Small Basic environment;
- Install Small Basic;
- Write a Small Basic program;
- Use IntelliSense technology;
- Save your program; and
- Share your program.
What Is Small Basic?
A program is a set of instructions that a computer can understand. To write that set of instructions, you use a programming language.
Small Basic is a programming language that makes computer programming extremely approachable, easy, and fun!
Small Basic - A Programming Language for Beginners
In the beginning, only a few programming languages existed, and they were easy to learn. However, these languages became more and more complex, such as the Microsoft Visual C# development tool, the Microsoft Visual Basic development environment, and Java.
This complexity discouraged people who wanted to learn how to program computers.
Small Basic removes this complexity barrier and serves as a stepping stone for all beginners to the world of programming!
The Small Basic Environment
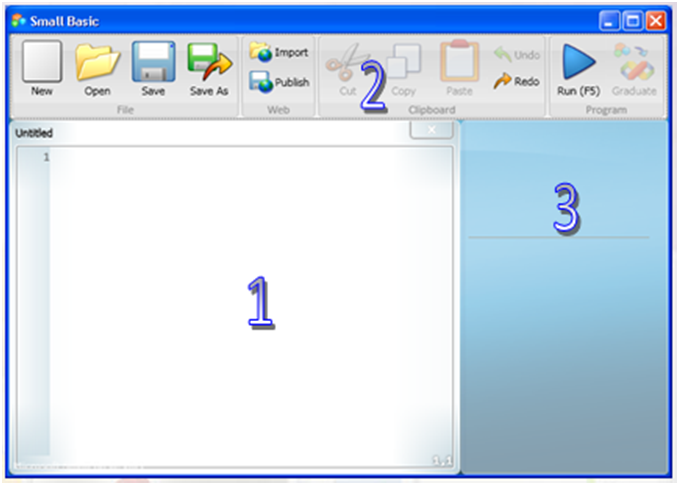
Small Basic provides you with an extremely simple yet powerful development environment with features like instant context-sensitive help.
- You write your Small Basic programs in the Editor.
- You can run various commands by clicking buttons on the Toolbar.
- As you write code, you can find information about commands in the Help window.
Let’s explore the different elements of the environment where you write and run your Small Basic programs.
- You can open and work with multiple Editor windows at one time.
- The Editor window that contains the program you are currently working with is the active Editor.
- You can indent your program code more consistently by highlighting it, right-clicking it, and then clicking Format Program.
Install Small Basic
First, make sure you have .NET Framework 3.5.1 installed and turned on. Otherwise, you may see an error message that announces Small Basic cannot be started.
Download and install Microsoft .NET Framework version 3.5.1 here:
NOTE: It's okay to have later versions of .NET installed BUT you must also have .NET Framework 3.5.1 installed and turned on.
You can download the latest version of .NET Framework here:
Next, click here to download Small Basic:
http://smallbasic.com/img/downloadbutton2.png
This window will appear:
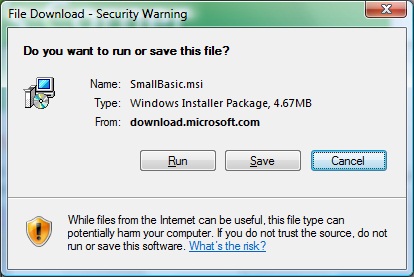
Click Run to begin the download. Afterward, you'll see a similar window:

Then click Run again to open the Setup Wizard.
Click Next to start the installation process. Accept the licensing agreement. Then, for each screen afterward, you can accept the default choice by clicking Next. When done, you should see the Installation Complete screen. Click Close.
Your First Program
Now that you’re familiar with the environment, you are ready to start programming!
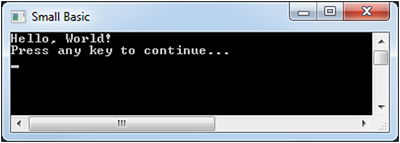
As you know, the Editor is where you write your programs. So, let’s write the following line in the Editor: TextWindow.WriteLine(“Hello, World!")
TextWindow.WriteLine("Hello, World!")
You have created your first program, and now you can run it and check the result!
You can run your program either by clicking Run on the Toolbar or by pressing F5 on the keyboard.
In the next lesson, you will analyze a program in detail to learn more about it.
Click the button on the Toolbar.
This is the output you will see:
IntelliSense - Making It Easy
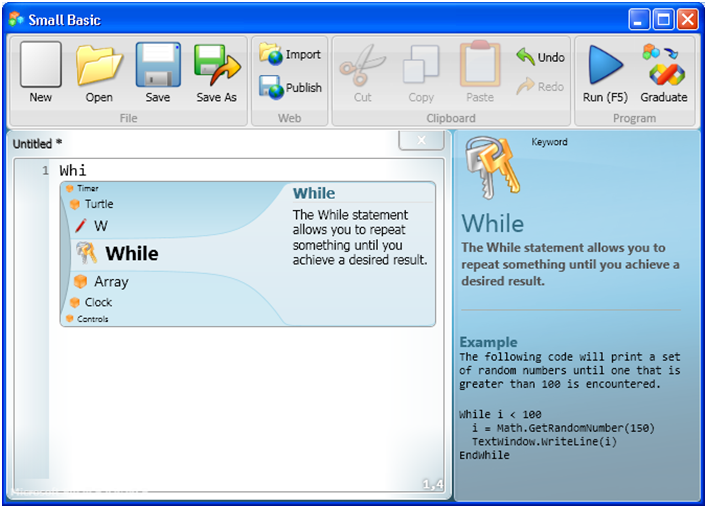
While you were typing, did you notice that a list of items appeared with their explanations?
These items are part of an “IntelliSense” list, which you can use to type your programs faster.
An IntelliSense list contains commands that you can type. You can scroll through the list by pressing the UP and DOWN arrows on your keyboard, and you can press ENTER to insert the highlighted command into your code.

Saving Your Program
After you write a program, you must save it if you want to change or run it later.
To save your program, you can click Save on the Toolbar, or you can hold down the CTRL key on the keyboard while you press the “S” key.
You should save your program frequently so that you do not lose your work if the power fails or your computer suddenly shuts down.
Sharing Your Program
The easiest way to share your program with friends or the Small Basic community is to click Publish on the Toolbar. You will need to be connected to the internet.
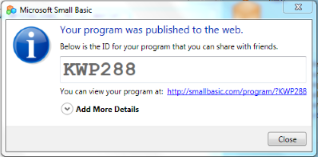
After clicking Publish a dialogue box will appear that has a Program ID for your program.
Before clicking the Close button keep a Copy of this ID number e.g. "KWP288" so you can share it, OR you can click on the link provided, e.g. "http://smallbasic.com/program/?KWP288" and this will display your program in the browser. You can also keep and Share a copy of the link from your browser.
To View and Run a Published program click Import then type or paste the Program ID into the dialogue box as prompted. Click OK and the code will load into your editor.
Let’s Summarize…
Congratulations!
Now you know how to:
- Define Small Basic;
- Explore the Small Basic environment;
- Install Small Basic;
- Write a Small Basic program;
- Use IntelliSense;
- Save your program; and
- Share your program.
Show What You Know
Now that you know some facts about Small Basic, you can demonstrate what you've learned by answering the following questions:
- What is Small Basic?
- Which feature of Small Basic helps you type your program faster?
- How do you run your Small Basic program?
- Write and run a program that writes "Hello World!" in the Text Window. Save your program, Publish it and then Import it.
To see the answers to these questions, go to the Answer Key page.
PowerPoint Downloads
- Lesson 1.1: Introduction to Small Basic (PowerPoint Web)
- All Lesson 1 PowerPoint Decks
- Get all decks
