Sync Framework: SQL Server to Windows Azure SQL Database Synchronization
In this article I will show how to use the 2.1 version of the Sync Framework to write a console application to synchronize Windows Azure SQL Database with on-premises SQL Servers. The Sync Framework takes care of all the messy details for you, leaving you just tying the pieces together in very few lines of code. This article is building on top of Liam’s blog post and video.
The Databases
This example will show how to synchronize SQL Database with an on-premises SQL Server database. This means that the on-premise SQL Server will be the source database for setting up the synchronization, and the SQL Database will be the destination. When the databases are setup and sync’d for the first time, both databases will have the same data and the synchronization will be bi-directional. Writes can be done on either database, and synchronization will move the changes to make sure both databases are identical.
For this example, I am going to use the Adventure Works database (which can be downloaded here) and synchronize just a subset of the tables: the Customer and Product tables.
I also need a SQL Database account and an allocated server to synchronize too. On the SQL Database server I am going to start with an empty database, the console application will do the initial synchronization to setup the table schema on SQL Database. Once you have created the database on the SQL Database server you will have to create the SalesLT schema that the Product and Customer tables are in. You can do this by attaching to SQL Database with SQL Server Management Studio and executing this Transact-SQL statement:
CREATE SCHEMA SalesLT
Download
First thing to do is download and install the Microsoft Sync Framework 2.1 Software Development Kit (SDK). This will install the assemblies on your local machine that you need to reference in order to make your console application run. This SDK doesn’t install any software on your computer, i.e. a running service or a windows application with a user interface. Which means, as long as you ship the required assemblies with the console application in the example, you can transport the console application to another computer.
Creating the Console Application
Next step is to create the console application and references the Sync Framework assemblies. Using Visual Studio I create a simple new console application. Next I need to add the correct Sync Framework references. Which are:
- Microsoft.Synchronization.dll
Found in: C:\Program Files\Microsoft Sync Framework\2.1\Runtime\x86 and the Synchronization Framework providers:
- Microsoft.Synchronization.Data.dll
- Microsoft.Synchronization.Data.Server.dll
- Microsoft.Synchronization.Data.SqlServer.dll
Found in: C:\Program Files\Microsoft Sync Framework\2.1\Runtime\ADO.NET\V3.1\x86
The Code
Inside the console application I am going to call the classes exposed by adding the Sync Framework references to perform two actions: Setup and Synchronization. Setup will only be run once to create the table schema on SQL Database, and Synchronization will be run anytime you want to the two databases to be in sync.
The first part of the code to setup the databases creates two very ordinary ADO.NET SqlConnection objects. It then uses classes from the Sync Framework to name the tables and add them to the Sync scope:
using (SqlConnection sqlServerConn =
new SqlConnection(LocalSQLServerConnectionString))
{
using (SqlConnection sqlAzureConn =
new SqlConnection(RemoteSQLAzureConnectionString))
{
DbSyncScopeDescription myScope =
new DbSyncScopeDescription(scopeName);
DbSyncTableDescription Customer =
SqlSyncDescriptionBuilder.GetDescriptionForTable("SalesLT.Customer", sqlServerConn);
DbSyncTableDescription Product =
SqlSyncDescriptionBuilder.GetDescriptionForTable("SalesLT.Product", sqlServerConn);
// Add the tables from above to the scope
myScope.Tables.Add(Customer);
myScope.Tables.Add(Product);
The next section of code sets up the local on-premise SQL Server for provisioning. If the SQL Server already contains the table schemas and data then what does it have to do? The Synchronization Framework uses both databases as data storage to store configuration information, and state information about the current status of the synchronization. So the provisioning creates tables on your local SQL Server to store this information.
// Setup SQL Server for sync
SqlSyncScopeProvisioning sqlServerProv =
new SqlSyncScopeProvisioning(sqlServerConn, myScope);
if (!sqlServerProv.ScopeExists(scopeName))
// Apply the scope provisioning.
sqlServerProv.Apply();
The next section of code does the same thing for the remote SQL Database server. However, it also creates the schemas data tables that it is going to synchronize too, based on the local SQL Server scope. Here is what the code looks like:
// Setup SQL Database for sync
SqlSyncScopeProvisioning sqlAzureProv =
new SqlSyncScopeProvisioning(sqlAzureConn, myScope);
if (!sqlAzureProv.ScopeExists(scopeName))
// Apply the scope provisioning.
sqlAzureProv.Apply();
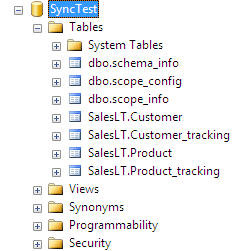
After the Apply() method has run on SQL Database the database looks like this:

To synchronize the databases just run the console application like this:
SyncConsole.exe –setup
Database setup just needs to happen once, however you will might want to synchronize the database multiple, because of this the code is split into two different sections one for setup and one for synchronization.
Synchronization
The code synchronizing the data is just as simple. Here is what it looks like:
using (SqlConnection sqlServerConn = new SqlConnection(LocalSQLServerConnectionString))
{
using (SqlConnection sqlAzureConn = new SqlConnection(RemoteSQLAzureConnectionString))
{
SyncOrchestrator syncOrchestrator = new SyncOrchestrator
{
LocalProvider = new SqlSyncProvider(scopeName, sqlAzureConn),
RemoteProvider = new SqlSyncProvider(scopeName, sqlServerConn),
Direction = SyncDirectionOrder.UploadAndDownload
};
syncOrchestrator.Synchronize();
}
}
In the synchronization code we create two connection and instantiate a sync orchestrator, telling it that we want to upload and download the data. This is considered bi-directional synchronization, writes in either SQL Database or SQL Server to be moved to the other.
To synchronize the databases just run the console application like this:
SyncConsole.exe –sync
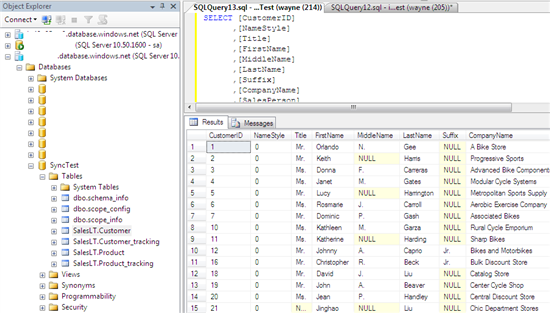
Once the synchronization has completed, we can query the SQL Database and see that the data in is there.

Credit Where Credit Is Due
I borrowed heavily from Liam’s blog post and video, and in posting the code, simplified it by removing the output to the console. For the complete code sample, see Liam’s blog and use the code posted there.
See Also
- [[Windows Azure SQL Database Overview]]
- [[SQL Data Sync Overview]]