BizTalk Server: Transform Text Files (Flat Files) into XML
Introduction
Transformations are one of the most common components in the integration processes. They act as essential translators in the decoupling between the different systems to connect. This article aims to help you understand the process of transforming a text file (also called Flat Files) in an XML document using BizTalk Server Flat File Schemas.
Normally we associate the transformations of documents to BizTalk maps, but the reality is that there are two types of transformations: structure transformation (semantics) and representation transformation (syntax). These latest occurs typically at receiving or sent ports of BizTalk Server.
This article intends to be an introductory note for whom is taking the first steps in this technology.
One of the most ancient and common standards for message representation is to use text files (Flat Files) like: CSV (Comma Separated Values) or TXT files, many of them custom-made for their systems. However over the time, XML became the standard message format because of its widespread use by major corporations and open source development efforts. However do not be fooled and think that these kinds of message are outdated and rarely used, a good example is EDI messages, which is used extensively by large companies, so it is often necessary to transform text files into XML and vice versa.
While tools like Excel can help us interpret such files, this type of process is always iterative and requires few user tips so that software can determine where is need to separate the fields/columns as well the data type of each field. But for a system integration (Enterprise Application Integration) like BizTalk Server, you must reduce any ambiguity, so that these kind of operations can be performed thousands of times with confidence and without having recourse to a manual operator.
Map or Schema Annotation?
As mentioned in the introduction, we can characterize two types of transformations existing in BizTalk:
- Semantic Transformations: This type of transformation usually occurs only in BizTalk maps. Here the document maintains the same syntax that is represented (XML), but changes its semantics (data content). This type of transformation are typically one-way, since that when we added and aggregate small parts of the information, that compose the document into another differently document, we may miss important details for its reconstruction.
- Syntax Transformations: This type of transformations occurs in the receive or send pipelines and aim to transform a document into another representation, e.g. CSV to XML. Here the document maintains the same data (semantics), but changes the syntax that is represented. i.e. we translate the document, but typically we don't modify the structure. Normally, this type of transformation is bidirectional, since we still have the same semantic content, we can apply the same transformation logic and obtain the document in its original format. Common examples of these transformations are also conversions between HL7 and XML, or EDI and XML.
Note: In this article we will talk only of Syntax transformations. If you are looking to learn more about semantic transformations, you can consult the article "BizTalk Server: Basics principles of Maps".
How does the text files (Flat Files) are processed by BizTalk?
Internally, BizTalk "prefers" to use the message type XML. If messages are in XML format BizTalk "offers" numerous automatism that are very useful in these environments, such as: message routing based on a particular field (promoted property); tracking and analysis of multidimensional values and dimensions with BAM (Business Activity Monitoring), or making logical decisions within orchestrations (business processes) using elements of the message.
If messaging is the foundation of BizTalk Server, the message schemas are the bedrock on which messaging is built. Fortunately, BizTalk supports the conversion of text files to XML in a simple and intuitive manner, using for that "Flat File Schemas" that are simple XML schemas (XSD) with specific annotations. At first glance, this may seem strange, because the XML Schemas (XSD) are used to describe XML files, however BizTalk uses them as metadata to describe not only XML documents but also text files (flat file).
The trick is that all the necessary information, such as the delimiter symbols, or the element size in a positional file, i.e. the definition of the rules of parsing (transformation rules) are embedded in the form of annotations in XML Schema (XSD), thereby simplifying the reuse of all these schemes in different parts of the process. At any point, the document can be translated back into flat-file because the definition is declarative and symmetric.
Where the Syntax Transformations can occur?
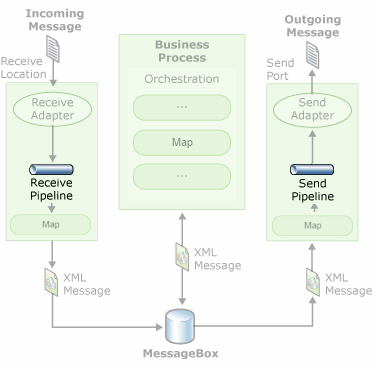
This type of transformations can occur in receive or send pipelines, usually text files (Flat Files) are processed at runtime as follows:
- The Flat Files are received by an adapter associated to a receive location (Folder in File System for example).
- A pipeline configured in the receive location will be responsible for transforming the Flat File into its equivalent XML.
- One or more interested in the message, such as an orchestration will subscribe to the XML document and this message will go through the business process. Note, in a pure messaging scenario there is no need to have orchestrations.
- If and when necessary, BizTalk can send XML messages again as a text files (Flat Files) by using another pipeline in the send ports, which will be responsible for transforming the XML into its equivalent the Flat File.
As the image below shows:
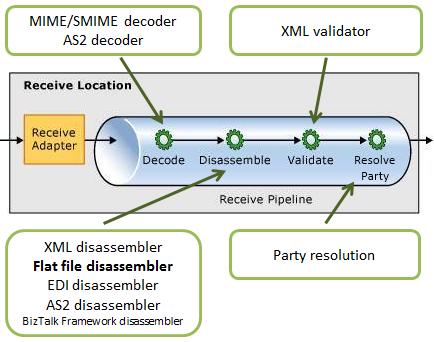
The receive pipeline consists of four stages, being that syntax transformations may occur in two of them:
- Decode Stage: This stage is used for components that decode or decrypt the message. The MIME/SMIME Decoder pipeline component or a custom decoding component should be placed in this stage if the incoming messages need to be decoded from one format to another. The syntax transformations can occur in this stage through a custom component.
- Disassemble Stage: This stage is used for components that parse or disassemble the message. The syntax transformations should occur at this stage. In the example that will be demonstrated in this article, we will use the "Flat file disassembler" to transform a text file into XML.
- Validate Stage: This stage is used for components that validate the message format. A pipeline component processes only messages that conform to the schemas specified in that component. If a pipeline receives a message whose schema is not associated with any component in the pipeline, that message is not processed. Depending on the adapter that submits the message, the message is either suspended or an error is issued to the sender.
- Resolve Party Stage: This stage is a placeholder for the Party Resolution Pipeline Component.
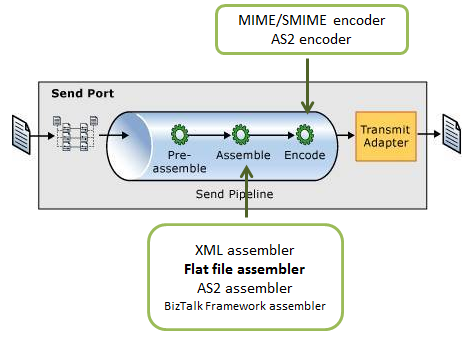
Regarding to the send pipelines, they consist of three stages, being that syntax transformations may occur also in two of them:
- Pre-assemble Stage: This stage is a placeholder for custom components that should perform some action on the message before the message is serialized.
- Assemble Stage: Components in this stage are responsible for assembling or serializing the message and converting it to or from XML. The syntax transformations should occur at this stage.
- Encode Stage: This stage is used for components that encode or encrypt the message. Place the MIME/SMIME Encoder component or a custom encoding component in this stage if message signing is required. The syntax transformations can occur in this stage through a custom component.
Necessary tools and artifacts
As mentioned earlier, to solve this problem we must create two artifacts:
- Flat File Schema: with all the necessary information embedded in the form of annotations in XML Schema (XSD), such as the delimiter symbols, or the element size in a positional file, i.e. the definition of the rules of parsing (transformation rules). This type of artifact can be created manually or with the tool "BizTalk Flat File Schema Wizard".
- Receive (and Send - optional) Pipeline: that will be responsible for processing and transforming the text file (Flat File) into its equivalent XML. This artifact can be created using the BizTalk Pipeline Designer.
Flat File Schema Wizard
BizTalk Flat File Schema Wizard tool, integrated in Visual Studio, which allows us to easily and visually make transformation of text file (Flat File) into its equivalent XML representation. This tool supports two types of text files:
- Positional text files:
HEADERXXXXXXXXXXXXXXXXXXXXXXX
BODYXXXXXXXXXXXXXXXXXXXXXXXXX
BODYXXXXXXXXXXXXXXXXXXXXXXXXX
FOOTERXXXXXXXXXXXXXXXXXXXXXXX
Note: Header is in Portuguese “Cabeçalho”, therefore the text from the image is in Portuguese
- Or delimited by symbols:
1999990;1;P0110;1;1;20110307;
1999990;2;P0529;2;2;20110307;
1999990;3;P0530;3;3;20110307;
BizTalk Pipeline Designer
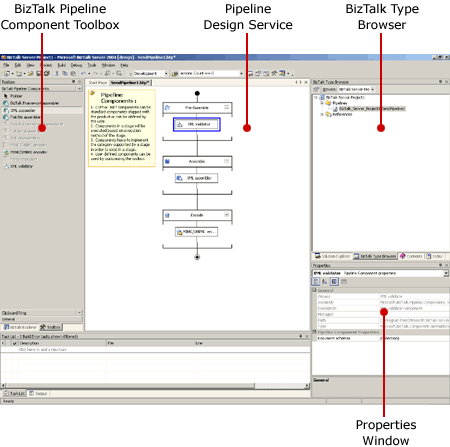
The editor of pipelines, BizTalk Pipeline Designer, allows us to create, visualize and edit pipelines; move pipeline components between the different stages and configure pipelines components.
This editor is integrated into Visual Studio and is mainly composed of 3 modules:
- Properties window: in this window we can see and modify the properties of components in the different stages of the pipeline.
- Toolbox window: is used as a source for the design surface, it provides access to all the components that we use in pipelines.
- Design surface: where components from the Toolbox are dragged and dropped, which allows us to draw a graphical representation of a pipeline by inserting the components, available in the toolbox window, in the different stages of the pipeline.
Constructing a Flat Files Schema – Practical example
For this project we will use the BizTalk Server 2010 and Visual Studio 2010, and explain step by step what needs to be developed. Briefly these are the steps we have to perform:
- Creating an instance of the text file that will serve as a test file for the project.
- Creating the Schema which will recognize the text file.
- Creating the Pipeline that will be responsible for processing and transforming the text file.
- Deploy the BizTalk Server solution.
- Configuring the BizTalk application.
- Run the solution.
The solution of this example, as well all the code, is available on MSDN Code Gallery: http://code.msdn.microsoft.com/BizTalk-Server-Transformar-0abe5767
We begin then by launching Visual Studio 2010 and create a new BizTalk project:
- “File -> New -> Project”, on BizTalk Projects, select the option “Empty BizTalk Server Project”.
- Insert the project name, physical location on the disk and the name of the solution.
Creating an instance of the text file that will serve as a test file for the project
Before we begin our development we need to create an instance, or sample of the text file that will serve as a model for the creation of the Flat File Schema. Therefore we will create the following text file on our file system that will be used in our solution:
- Create a folder “<solution>\TESTFILES” where we will create/put the messages we want to transform. In this article we will use a text file delimited by symbols which will be composed of several lines with the following content:
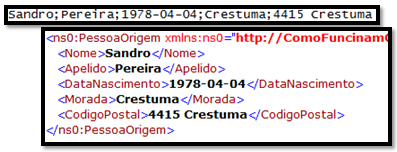
Sandro;Pereira;1978-04-04;Crestuma;4415 Crestuma
Lígia;Tavares;1982-01-21;Seixo-Alvo;451 Seixo-Alvo
José;Silva;1970-09-19;Crestuma;4415 Crestuma
Rui;Barbosa;1975-09-19;Lever;4415 Lever
Each line consists of the following structure: Name (Nome), Surname (Apelido), Birthdate (Data Nascimento), Address (Morada) and Zip Code (Código Postal);
Note: in () is the equivalent in Portuguese found in pictures. The file "PESSOAS.txt" that we use for testing is available in the directory “<solution >\TESTFILES”.
- We will also create two folders that we will configure in the BizTalk Administration Console in order to test the solution.
- Create a folder “<solution >\PORTS\IN” which will serve as the place of entry of Flat File files for conversion.
- Create a folder “<solution >\PORTS\OUT” which will serve as the output location of the files after they have been converted.
Creating the Schema which will recognize the text file
To create the schema which will recognize the text file, we need to go to the BizTalk solution created in Visual Studio and perform the following steps:
- Press the right button on top of the project in Solution Explorer, and select the option “Add -> New Item...”.
- On “Installed Templates” menu in the window “Add New Item”, select the option “Schema Files”, and then select the option “Flat File Schema Wizard”, then provide the name you want to give the scheme in this example: “TXT_to_XML.xsd”.
- By selecting this option, we will be guided automatically by the tool “BizTalk Flat File Schema Wizard” that will help us to create a Flat File Schema and define its data structure (records, elements, attributes ...) based on the text file specified. Select "Next" to continue.
- In the window “Flat File Schema Information” we will have to:
- Select an instance of the text file that will serve as the model of the structure that we want to transform.
- Although it is not necessary, it is good practice to rename the Record name "Root". In this case we will rename it to "People" (Pessoas).
- And finally, assign a "Target namespace" to the scheme and define the encoding of the input file.
- The wizard will load the text file so that we can begin to split it and map it into the desired structure. In this step we need to define how the records or rows are differentiated. The structure of the example is:
Name;Surname;Birthdate;Address;Zip Code{CR}{LF}
(Nome;Apelido; Data Nascimento;Morada;Codigo Postal{CR}{LF})
Since each record "Person" (Pessoa) that we want to create is defined and contained in a line, in the "Select Document Data" we will select all the data portion of the document that will set the record, i.e. the whole first line.
- In the window “Select Record Format” we will define whether we are dealing with a Flat File Delimited by symbols or is positional, in our case we will select the "By delimiter symbol" which is delimited by a return Carriage Return/Line Feed.
- In the window “Delimited Record” we will provide the record delimiter, in this case as we want to define the structure of person (Pessoa), i.e. each row is a person, our limiter is {CR}{LF} (Carriage Return/Line Feed)
- In the window “Child Elements” we will define what kind of element we want to assign to the registry. As we are defining the Person structure and the file contains multiple people, we have to select the "Element Type" as "Repeating record." If we do not perform this step, we will not have the ability to split the record into multiple elements / attributes individual.
- At this stage we successfully created the record Person (Pessoa), i.e. we have just map that each line of the text file corresponds to a record Person. In the "Schema View" select "Next" to continue processing the message.
- At this stage the wizard restarts the whole process described above, but if you noticed, the wizard no longer selects all information contained in the text file, but only what was selected to define the record Person. What we will do now is split the information of record "Person" in different elements, for that, we will select only the information required leaving out the Carriage Return/Line Feed.
- Once again our structure is delimited by symbols (;), then we will select the option "By delimiter symbol".
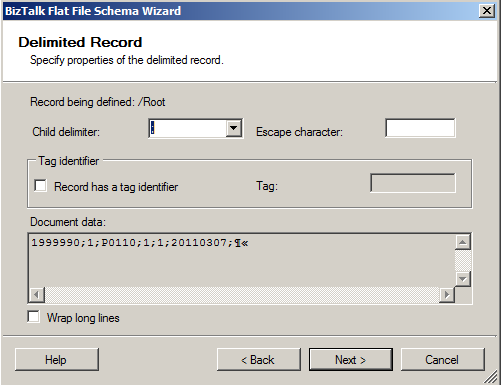
- As we can analyze all the elements are separated by the semicolon (;) that is our delimiter, then in the window "Delimited Record" we must change the value of the "Child delimiter" option to ";".
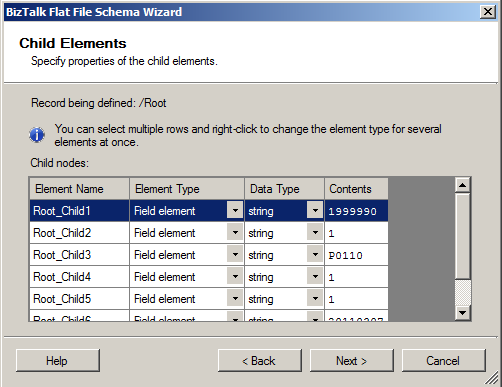
- In this window “Child Elements”, we will define the different elements/attributes of the structure of the record person. This operation is very similar to any XSD, where we can define the different names and data types. Adjust the values according to the image:
- Finally the wizard will show the equivalent XML structure that your text file document will have. Once you select the option "Finish", the scheme will be available for you to use in your BizTalk solution.
After we finalize the creation of the Flat File Schema which will contain the transformation rules of the text file, we can easily test our transformation, without having to get out of our development tool (Visual Studio) and without having to publish our solution.
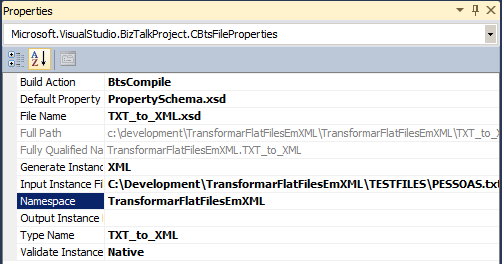
If we select the Flat File Schema that we just created and access to its properties, we can see that by default all properties are preconfigured so that we can perform tests to our message transformation: the input instance file is configured with the file which was used to create the schema; and the correct input (Validate Instance Input Type: Native) and output (Generate Instance Output Type: XML) formats.
To test, you simply select the schema and with the right mouse button select the option “Validate Instance”:
This option will use the configured file and validate all transformation rules defined and subsequently present the final result or occurring errors:
Creating the Pipeline that will be responsible for processing and transforming the text file
To create the Receive Pipeline that will be responsible for processing and transforming the text file, we need to go to the BizTalk solution created in Visual Studio and perform the following steps:
- Press the right button on top of the project in Solution Explorer, and select the option “Add -> New Item...”.
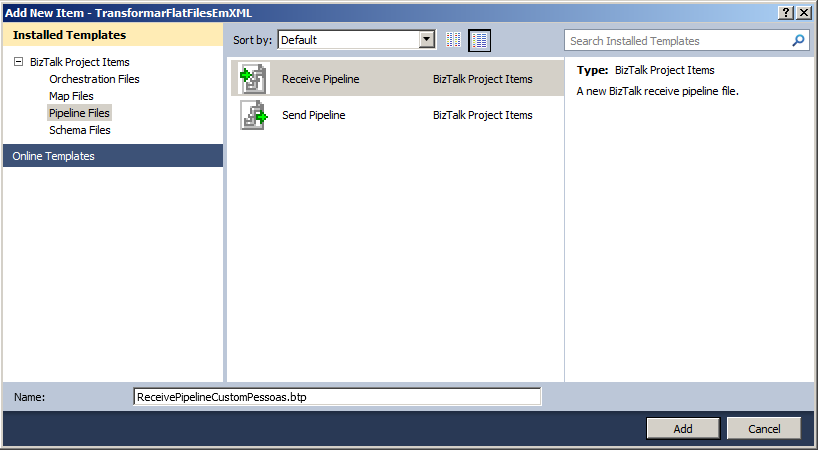
- On “Installed Templates” menu in the window “Add New Item”, select the option “Pipeline Files”, and then select the option “Receive Pipeline”, then provide the name you want to give the pipeline in this example: “ReceivePipelineCustomPessoas.btp”.
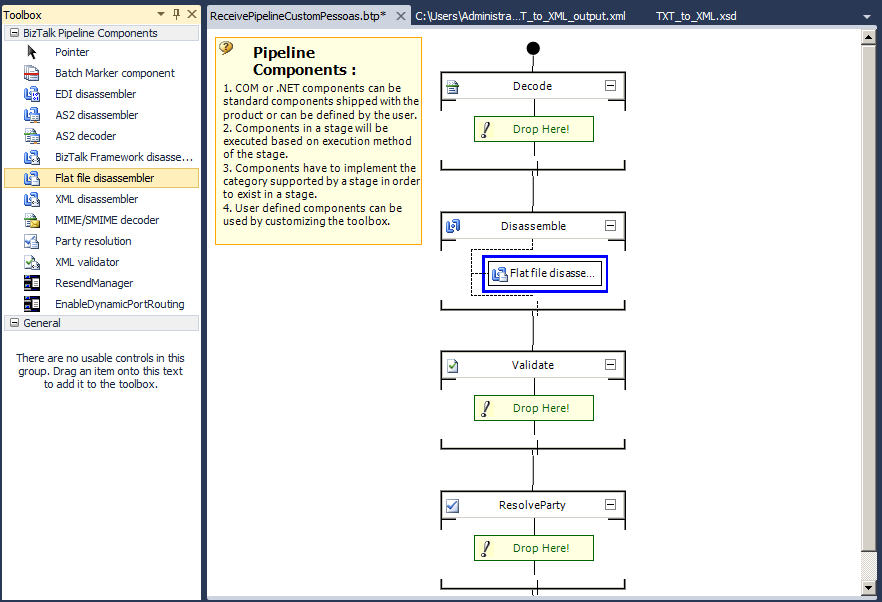
- By selecting the option "Add", the pipeline editor (BizTalk Pipeline Designer) will appear and that will let you view and add components to all the steps associated with receive pipeline: Decode, Disassemble, Validate and ResolveParty. In this case, the pipeline that we will create, will be responsible for receiving a text file through a receive location and convert it to XML. For that, we will use the "Flat File Disassembler" component which is available in the Visual Studio Toolbox window (Ctrl+W, X). Drag it into the Pipeline in step "Disassemble".
- Finally, select the component "Flat file disassembler", go to its properties and on the "Document Schema" option: select the schema created earlier, in case the "TXT_to_XML".
Note: If you want to create a send pipeline in order to transform an XML document into Flat File, we would follow the same steps, the difference is that we would have to drag the component "Flat File Assembler" on stage "Assemble".
Deploy the BizTalk Server solution
All artifacts created yet must be installed on BizTalk Server 2010. However before we can deploy the solution there are some settings we need to do or guarantee:
- Before deploy the Visual Studio solution into a BizTalk application is necessary that all project assemblies are signed with a strong name key, since they must be installed in the global assembly cache (GAC). For this we need:
- In Visual Studio Solution Explorer, right-click on the project name and select "Properties" option.
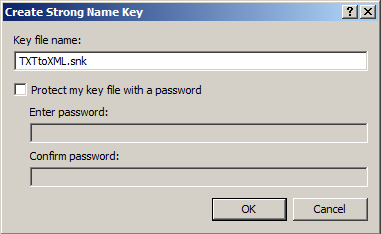
- Select the “Signing” tab and choose "New" in the drop down box "Choose a strong name key file".
- Assign a name, for example "TXTtoXML.snk".
- Likewise, before deploy the Visual Studio solution into a BizTalk application, we need to first define the BizTalk deployment properties, especially the properties of the "BizTalk Group". If the Visual Studio solution contains multiple projects, we need to set the properties for each project separately.
- In Visual Studio Solution Explorer, right-click on the project name and select "Properties" option.
- Select the “Deployment” tab and configure the name you we want to assign to the BizTalk application in the property "Application Name": in our example "TransfFlatFilesEmXML Demo". The remaining properties may stay with the default values.
- To learn more about these properties go to http://msdn.microsoft.com/en-us/library/aa577824.aspx
Finally we can build and deploy the project so that it is published as a BizTalk application inside BizTalk Server:
However in order to publish a BizTalk solution, you must be a member of the group "BizTalk Server Administrators". If the option "Install to Global Assembly Cache" is enabled, on the "Deployment" properties, then you also need permissions to read/write on GAC.
Configuring the BizTalk application
This is the final step of this process. In order to properly test the solution we have been developing in BizTalk Server, we need to configure the application that was created in the publication.
For this, we will access the BizTalk Server Administration console to create and configure the following artifacts:
- One receive port and location to process the input text files.
- One send port to save the processed files in XML format.
Open the BizTalk Server Administration console under “Start -> Programs -> Microsoft BizTalk Server 2010”. On the left tree menu, maximize “BizTalk Server Administration -> BizTalk Group (…) -> Applications”, and look for the application called "TransfFlatFilesEmXML Demo” and maximize also this application.
- Press the right button on top of “Receive Port” menu and select "New -> One-Way Receive Port ..." option.
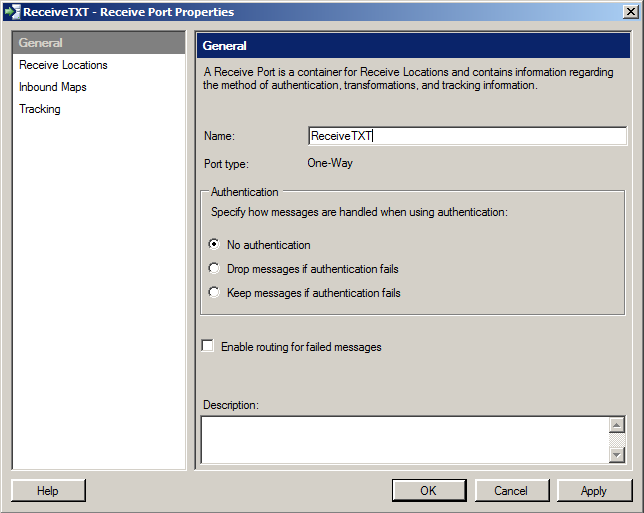
- A new window appears allowing us to define the port properties:
- In the "General" tab, set the name of the receive port: "ReceiveTXT".
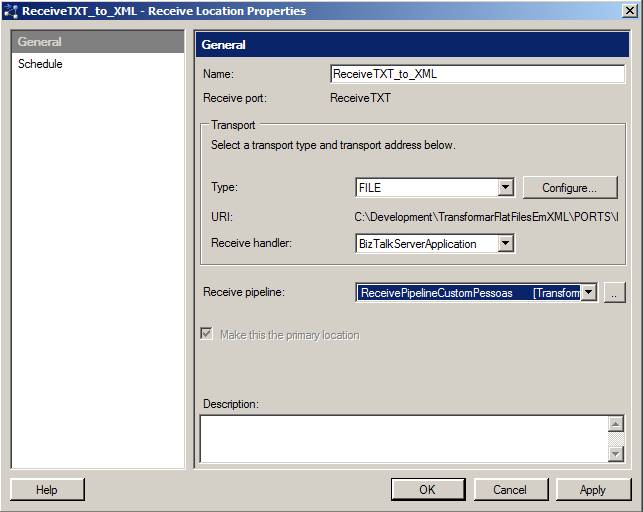
- In the "Receive Locations" tab, select "New" and set the name to your receive location: "ReceiveTXT_to_XML"; in the property "Type" select the option FILE; and in the property "Receive pipeline" select from the drop down box the pipeline we created earlier: "ReceivePipelineCustomPessoas".
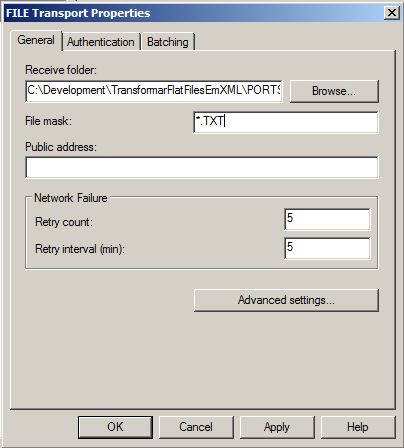
- On the same tab select the "Configure" button. In the "FILE Transport Properties" window, set "Receive Folder" property, with the folder you created earlier "<solution>\PORTS\IN". On property "File Mask" put the following value: "*. txt", setting that will be processed only files with the extension. "txt". Finally select the "Ok" button.
- To finish the process of creating the receive port press "Ok".
The above steps mentioned, were needed to create one Receive Port and its Receive Location. Now we will create a Send Port to save messages on the file system, after they are processed by BizTalk:
- Press the right button on top of “Send Ports” menu and select "New -> Static One-way Send Port...”.
- A new window appears allowing us to define the port properties:
- In the "General" tab, set the name of the send port: "SaveXMLFile".
- In the property "Type" select the option FILE.
- In the property “Send Pipeline” set the pipeline to “XMLTransmit”. This is a native pipeline that is used for processing XML messages.
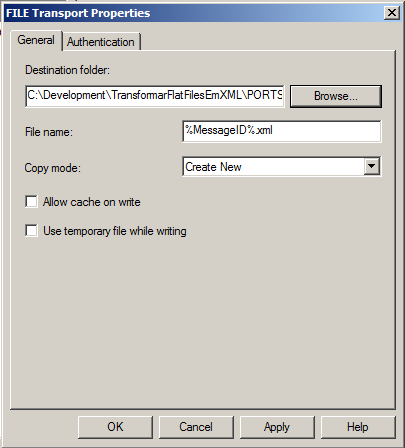
- On the same tab select the "Configure" button. In the "FILE Transport Properties" window, set the “Destination Folder” property, with the folder you created earlier "<solution>\PORTS\OUT”. On property "File Mask" put the following value: “%MessageID%.xml”, this is special tag (BizTalk Macro) that will set the name of each file written on the file system with the unique identifier of the message. Finally select the "Ok" button to return to previous window.
- In order for the Send Port subscribes to all files, we need to set a filter on the tab "Filters" with the following expression: "BTS.ReceivePortName == ReceiveTXT”.
- Note: This setting will force each message in the MessageBox which has originates from the Receive Port: ReceiveTXT, be routed and processed by the Send Port we are finished creating.
- To finish the process of creating the send port press "Ok".
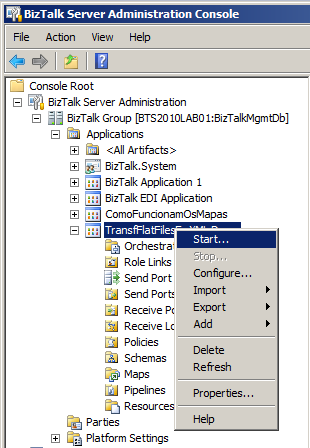
Finally, we need only to start our application. To do that press right button on top of the application name "TransfFlatFilesEmXML Demo" and select "Start ...".
Testing the solution
To test the BizTalk application we only need to copy a text file to the directory that is configured on the receive location: "<solution>\PORTS\IN". The result should appear in the form of an XML document in the folder configured in the send port: "<solution>\PORTS\OUT".
Note: The file disappears automatically from the input folder, so you should avoid doing drag and drop (move) with the test files at the risk of not being able to use it again.
Conclusion
As presented in this article, BizTalk Server helps us to solve many of the existing problems concerning message transformation: semantic and syntax Transformations, only with "out of the box" features within the product, in few steps and most of the time without developing any code.
The fact of all the definitions of the rules of parsing (transformation rules) are embedded in the form of annotations in XML Schema (XSD), such as the delimiter symbols, or the element size in a positional file, simplifies the reuse of all these schemes in different parts of the process. At any point, the document can be translated back into flat-file because the definition is declarative and symmetric, in contrast to what might happen with a "normal" programming language like C#, where we would have to create two components to translate text to XML and vice versa.
The model used by BizTalk schemas, which centralizes all the message definitions in a single artifact, simplifying the maintenance and evolution of the specification and therefore simplifying future reuse and dependencies management. When we set up this type of project, is exactly this kind of guarantees than keeps the systems operating properly for many years, and at the same time, they make life easier to those who one day have to correct and/or develop any of these processes.
Source Code
The solution of this example, as well all the code, is available on MSDN Code Gallery:
Author
Sandro Pereira
DevScope | MVP & MCTS BizTalk Server 2010
http://sandroaspbiztalkblog.wordpress.com/ | @sandro_asp
Other languages
This article is also available in the following languages
See Also
Read suggested related topics:
- BizTalk Server: Basics principles of Maps
- BizTalk Server: How Maps Work
- BizTalk Virtual Mapper VS Custom-XSLT
Another important place to find a huge amount of BizTalk related articles is the TechNet Wiki itself. The best entry point is BizTalk Server Resources on the TechNet Wiki.


