Test Lab Guide Mini-Module: Creating a second forest and domain
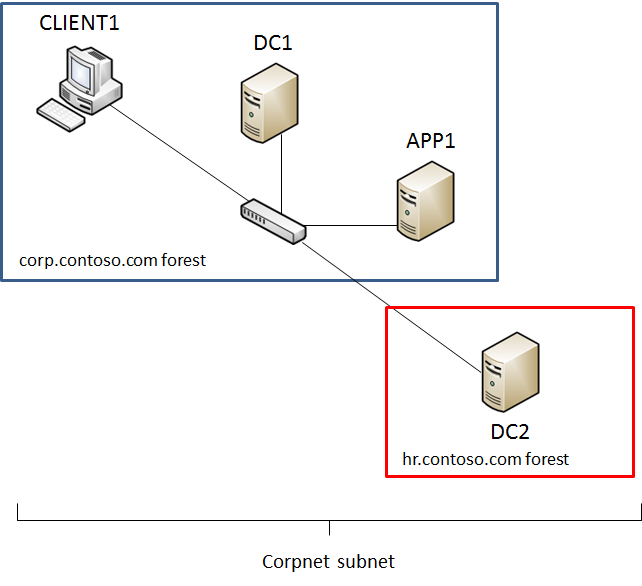
This Test Lab Guide Mini-Module describes how to install an additional Active Directory Domain Services (AD DS) forest on the Corpnet subnet. You add a new computer named DC2 and promote it to act as a domain controller in a new forest named hr.contoso.com. The corp.contoso.com forest and the hr.contoso.com forest do not trust each other. This creates a test lab environment in which you can demonstrate cross-forest scenarios and solutions. The following figure shows the resulting configuration.
If you are running the base configuration test lab in a virtual environment, you can create snapshots of the virtual machines (VMs) for all of the test lab computers before performing the following procedures.
First, create a new hr.contoso.com DNS domain on DC1, which will be acting as a DNS server for the new computer.
- Login to the DC1 computer with the CORP\User1 account.
- Click Start, point to Administrative Tools, and then click DNS.
- In the console tree, open DC1, right-click Forward Lookup Zones, and then click New Zone.
- On the Welcome to the New Zone Wizard page, click Next.
- On the Zone Type page, click Next.
- On the Active Directory Zone Replication Scope page, click Next.
- On the Zone Name page, type hr.contoso.com, and then click Next.
- On the Dynamic Update page, click Allow both nonsecure and secure dynamic updates, and then click Next.
- On the Completing the New Zone Wizard page, click Finish.
- Close the DNS Manager console.
Next, install Windows Server 2008 R2 Enterprise Edition as a standalone server on a new computer.
- Start the installation of Windows Server 2008 R2.
- Follow the instructions to complete the installation, specifying Windows Server 2008 R2 Enterprise Edition (full installation), and a strong password for the local Administrator account. Log on using the local Administrator account.
- Connect DC2 to a network that has Internet access and run Windows Update to install the latest updates for Windows Server 2008 R2.
- Connect DC2 to the Corpnet subnet.
Next, configure the TCP/IP protocol with a static IP address of 10.0.0.250 and the subnet mask of 255.255.255.0.
- In Initial Configuration Tasks, click Configure networking.
- In Network Connections, right-click Local Area Connection, and then click Properties.
- Click Internet Protocol Version 4 (TCP/IPv4), and then click Properties.
- Select Use the following IP address. In IP address, type 10.0.0.250. In Subnet mask, type 255.255.255.0. Select Use the following DNS server addresses. In Preferred DNS server, type 10.0.0.1.
- Click Advanced, and then click the DNS tab.
- In DNS suffix for this connection, type hr.contoso.com, click OK twice, and then click Close.
- Close the Network Connections window.
- In Initial Configuration Tasks, click Provide computer name and domain.
- In System Properties, click Change. In Computer name, type DC2, click OK twice, and then click Close. When you are prompted to restart the computer, click Restart Now.
- After restarting, login using the local administrator account.
- In Initial Configuration Tasks, click Do not show this window at logon, and then click Close.
Next, configure DC2 as a domain controller for the hr.contoso.com domain.
- In the console tree of Server Manager, click Roles. In the details pane, click Add Roles, and then click Next.
- On the Select Server Roles page, click Active Directory Domain Services, click Next twice, and then click Install. When installation is complete, click Close.
- To start the Active Directory Installation Wizard, click Start, type dcpromo, and then press ENTER.
- In the Active Directory Installation Wizard dialog box, click Next twice.
- On the Choose a Deployment Configuration page, click Create a new domain in a new forest, and then click Next.
- On the Name the Forest Root Domain page, type hr.contoso.com, and then click Next.
- On the Set Forest Functional Level page, in Forest Functional Level, click Windows Server 2008 R2, and then click Next.
- On the Additional Domain Controller Options page, clear DNS server, and then click Next. When prompted, click Yes.
- On the Location for Database, Log Files, and SYSVOL page, click Next.
- On the Directory Services Restore Mode Administrator Password page, type a strong password twice, and then click Next.
- On the Summary page, click Next.
- Wait while the wizard completes the configuration of Active Directory, and then click Finish.
- When you are prompted to restart the computer, click Restart Now.
- After the computer restarts, log on with the HR\Administrator account (using the same password as the local Administrator account).
Next, create a HRUser1 account, equivalent to the User1 account in the CORP domain.
- Click Start, point to Administrative Tools, and then click Active Directory Users and Computers.
- In the console tree, open corp.contoso.com, right-click Users, point to New, and then click User.
- In the New Object - User dialog box, in Full name, type HRUser1, and in User logon name, type HRUser1.
- Click Next.
- In Password, type the password that you want to use for this account, and in Confirm password, type the password again.
- Clear User must change password at next logon and select Password never expires.
- Click Next, and then click Finish.
- In the console tree, click Users.
- In the details pane, double-click Domain Admins.
- In the Domain Admins Properties dialog box, click the Members tab, and then click Add.
- Under Enter the object names to select (examples), type HRUser1, and then click OK twice.
- Close the Active Directory Users and Computers console.
- Log off and then log on with the HR\HRUser1 account.
If you are running this test lab in a virtual environment, you can create snapshots of the virtual machines (VMs) for all of the test lab computers to save this configuration.
For additional test lab guide resources, see Test Lab Guides.
