May 2009
Volume 24 Number 05
Basic Instincts - Documenting Your Code With XML Comments
By Lisa Feigenbaum | May 2009
Download the VBXMLDoc.xml file
This article is partly based on a prerelease version of Visual Studio. All information is subject to change.
Contents
XML Comment Basics
Customizing XML Comments
Generating the XML Documentation File
Enhancing Visual Studio with XML Comments
The Advantages of Commenting Someone Else's Code
Tricks from the .NET Framework
Generating Nicer Documentation
XML Comments in Visual Studio 2010
Looking for an easy yet effective way to document your code? XML comments provide a great solution. XML comments for Visual Basic were first introduced in Visual Studio 2005. They can be used to create a documentation file for the project, and provide a rich development environment experience for yourself, your teammates, or other people using your code.
In this article, I will introduce you to XML comments and explain how to use them. I will explore ways in which XML comments can be used to customize your coding environment and to create documentation files from the comments in your code. I will also show you some future Visual Studio features that will create an even better experience for working with XML comments in your code.
XML Comment Basics
XML comments can be used to document almost all definitions except namespaces. This includes types (Class, Module, Interface, Structure, Enum, Delegate), fields (Dim), properties (Property), events (Event), and methods (Sub, Function, Declare, Operator).
XML comments are inserted inline, directly in your source code. This makes it easier to keep them up to date as the code evolves. To insert an XML comment, type three single-quotation marks ('") immediately above the definition, like this:
'''
Function RegKeyExists(ByVal regKey As String) As Boolean
  Dim exists As Boolean = False
  Try
...
Alternatively, you can also type '" at the start of the definition line and press Enter. Visual Studio will insert a skeleton of the XML comment for you to fill in.
''' <summary>
'''
''' </summary>
''' <param name="regKey"></praram>
''' <returns></returns>
''' <remarks></remarks>
Function RegKeyExists(ByVal regKey As String) As Boolean
  Dim exists As Boolean = False
  Try
...
For the purpose of this article, I used a simple function with one parameter to demonstrate the XML comments feature. The XML skeleton varies according to the definition. For example, the XML skeleton for a Function includes a returns element, whereas the skeleton for a Sub does not. The number of param tags for methods will also vary based on the number of parameters.
Please note that although Visual Studio will insert the appropriate XML skeleton for the definition, and will provide some warnings if the comment gets out of sync, it will not automatically correct the comment for you. Therefore, make sure to update the comment as you make changes to the definition.
Once the XML skeleton is inserted, you can tab through the content wells to insert your comments. Visual Studio colorizes the XML content distinctly from the tags. You can also delete elements if you don't need them, such as the remarks element.
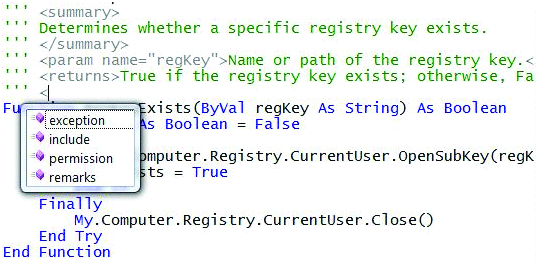
Finally, you can add elements that were not in the original XML skeleton. As you start typing a left angle bracket (<), a list of common tags will appear in an IntelliSense pop-up menu as shown in Figure 1.

Figure 1 XML Comment in IntelliSense
You can add any valid XML to the XML comment. A list of commonly used tags can be found in the article "Recommended XML Tags for Documentation Comments (Visual Basic)." If the comment takes up too much space, you can collapse it to its summary using the +/- controls on the left-hand side of the code editor, as shown in Figure 2.

Figure 2 Collapsed XML Comment
Customizing XML Comments
In the previous example, I made a number of changes to the original XML skeleton. Developers working in an enterprise environment might need to change the default XML comments to match their particular corporate guidelines. To help with these scenarios, Visual Basic provides a way to customize the default XML skeleton.
First download VBXMLDoc.xml which is included as an attachment to this article. Save VBXMLDoc.xml to the appropriate location based on your version of Windows and Visual Studio as shown in Figure 3. In each case, replace <user> in the path with your own user name.
| Figure 3 Where to Save VBXMLDoc.xml |
| Visual Studio 2005 | Visual Studio 2008 | Windows XP | Windows Vista | Path |
| X | X | C:\Documents and Settings\<user>\Application Data\Microsoft\Visual Studio\8.0 | ||
| X | X | C:\Users\<user>\AppData\Roaming\Microsoft\VisualStudio\8.0 | ||
| X | X | C:\Documents and Settings\<user>\Application Data\Microsoft\Visual Studio\9.0 | ||
| X | X | C:\Users\<user>\AppData\Roaming\Microsoft\VisualStudio\9.0 |
Visual Studio has built-in defaults for the XML skeletons that get inserted, but when VBXMLDoc.xml is present upon startup, Visual Studio will use the XML definitions from that file instead. The version of VBXMLDoc.xml provided in the code download contains the default tags that would otherwise be inserted by Visual Studio. To change the defaults, find the code element type you are interested in and edit the XML elements in the file.
As an example, let's change the XML skeleton that gets inserted for Function. Figure 4 shows the default and customized entries for a Function. The Template element's children represent the XML elements that will be inserted in the XML comment skeleton. The CompletionList element's children represent the suggestions that will appear in IntelliSense upon typing a left angle bracket (<) above a Function.
Figure 4 XML Tags for Function
Default XML
<CodeElement type="Function">
  <Template>
    <summary/>
    <param/>
    <returns/>
    <remarks/>
  </Template>
  <CompletionList>
    <exception cref=""/>
    <include file="" path=""/>
    <param name=""/>
    <remarks/>
    <returns/>
    <summary/>
  </CompletionList></CodeElement>
Customized XML
<CodeElement type="Function">
  <Template>
    <summary/>
    <param/>
    <returns/>
    <author/>
  </Template>
  <CompletionList>
    <exception cref=""/>
    <include file="" path=""/>
    <param name=""/>
    <permission cref=""/>
    <returns/>
    <summary/>
    <author/>
    <history/>
  </CompletionList>
</CodeElement>
As you can see in the second part of Figure 4, I made a few simple customizations. First, I removed the remarks element from both the default skeleton and IntelliSense. Also, I added an author element to both the default skeleton and IntelliSense, and I added a history element to IntelliSense.
At this point you will need to close and re-open Visual Studio for the changes in VBXMLDoc.xml to get picked up. After restarting, the XML comments automatically inserted above Function will include an author element instead of remarks:
''' <summary>
'''
''' </summary>
''' <param name="regKey"></praram>
''' <returns></returns>
''' <author></author>
Function RegKeyExists(ByVal regKey As String) As Boolean
  Dim exists As Boolean = False
  Try
...
While it is possible to add XML elements to the template, it is not possible to add XML values. Thus, you can make the IDE insert <author></author> by default, but it is not possible to make it insert <author>Microsoft Corporation</author>.
Generating the XML Documentation File
The Visual Basic compiler generates an XML document for your assembly with all the XML comments defined in the code. The compiler will also resolve symbols used in cref, permission, and name attributes, as well as file references in include elements.
The generated file doesn't show your commented members hierarchically. Rather, it is a flat list. It includes a unique ID string for each definition that allows the comments to be mapped back to their definitions in code (see Figure 5). In this case, the string is M:RegLib.Helpers.RegKeyExists(System.String). M stands for method, RegLib.Helpers specifies the path, RegKeyExists is the method name, and System.String the parameter type.
<?xml version="1.0" ?>
<doc>
<assembly>
<name>RegLib</name>
</assembly>
<members>
...
<member name="M:RegLib.Helpers.RegKeyExists(System.String)">
  <summary>Determines whether a specific registry key exists.</summary>
  <param name="regKey">Name or path of the registry key.</param>
  <returns>True if the registry key exists; otherwise, False.</returns>
  <author>Microsoft Corporation</author>
</member>
...
</members></doc>
You can generate the XML documentation file using either the command-line compiler or through the Visual Studio interface. If you are compiling with the command-line compiler, use options /doc or /doc+. That will generate an XML file by the same name and in the same path as the assembly. To specify a different file name, use /doc:file.
If you are using the Visual Studio interface, there's a setting that controls whether the XML documentation file is generated. To set it, double-click My Project in Solution Explorer to open the Project Designer. Navigate to the Compile tab. Find "Generate XML documentation file" at the bottom of the window, and make sure it is checked. By default this setting is on. It generates an XML file using the same name and path as the assembly.
My example is a class library project called RegLib, so the assembly and XML documentation file will be RegLib.dll and RegLib.xml, respectively. The path where they will be created is listed in the "Build output path" textbox. There must be an explicit build for these files to be produced.
Microsoft uses XML comments to generate documentation for all the Microsoft .NET Framework assemblies. The XML documentation files are placed beside the DLLs they document, and they match in name.
Enhancing Visual Studio with XML Comments
Many Visual Studio features use XML comments to provide a better experience for working with members. Because the Visual Basic compiler is always running in background, Visual Studio can consume XML comments as they are authored, without requiring an explicit build.
The most prevalent place where XML comments are used is IntelliSense. The summary content from the XML comment appears in the tooltip. As the method is used, IntelliSense also displays the param content in what is called a parameter help tooltip (see Figure 6).

Figure 6 Parameter Help Tooltip Using XML Comment
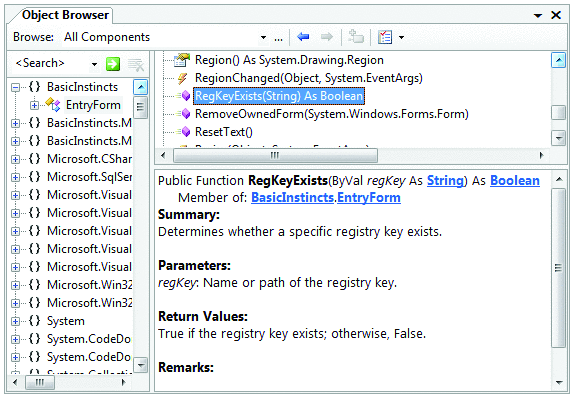
Exploring members in the Object Browser is a much improved experience with XML comments. Object Browser displays summary, param, return, remarks, typeparam, and exception comments when they exist (see Figure 7). Class Designer, Class View, and Object Test Bench also use XML comments when they are available.

Figure 7 Object Browser Using XML Comments
The Advantages of Commenting Someone Else's Code
Earlier I demonstrated how to customize the Visual Studio experience for a function by adding XML comments to its definition. For members defined in referenced assemblies, however, it is not practical to follow the same process since you don't necessarily have access to the source. Fortunately, there is a different process (also involving XML comments) that you can use for referenced members!
There is one key difference. For members in the current solution, Visual Studio features work against an in-memory representation of the XML comments based on the source. In that case, the XML documentation file is purely an output and doesn't even need to be generated for the Visual Studio features to work. On the other hand, in the case of referenced assemblies, the XML documentation files are read as inputs, and do influence behavior within the coding environment.
Let's look at an example. I'll create a new project and reference the assembly that I built earlier (RegLib.dll). The generated XML documentation file (RegLib.xml) must be placed beside the assembly and must have the same name. If I access the RegKeyExists method from the current project, it will appear in IntelliSense. However, I can alter its appearance.
I open RegLib.xml and change the summary content to "Determines whether the registry key exists." The update happens immediately, and the next time I access the member in IntelliSense, I see the new text in the tooltip (see Figure 8).

Figure 8 IntelliSense Tooltip
Tricks from the .NET Framework
The .NET Framework is another example of assemblies that you reference from your projects. Consider Microsoft.VisualBasic.dll, whose XML documentation file can be found here:
C:\Windows\Microsoft.NET\Framework\v2.0.50727\en\Microsoft.VisualBasic.xml
Open the XML file and examine the XML comments. There are some interesting XML elements you'll find in there. For example, Filterpriority determines how a member appears in Visual Basic IntelliSense. A value of 1 means that it should appear in the Common tab, 2 means it should appear in the All tab, and 3 means it should be hidden from IntelliSense completely. This member's filterpriority is set to 1, so it will appear in Common. You could easily change the filterpriority value to 2 and save the XML file so the member appears in the All tab.
Note that, before editing any .NET Framework XML documentation files, it's a good idea to make a copy beforehand. You will also need to open the files in an application that has elevated privileges. Visual Studio is a good option since it will preserve the file format.
You can use the methodology described in this section to influence members in a referenced assembly, as long as you have access to its XML documentation file or you can create one if it doesn't exist. To influence the filterpriority of a member defined in the current assembly, use the System.ComponentModel.EditorBrowsable attribute.
Another interesting element is PermissionSet. This element specifies under what conditions the member is accessible. The content of the element refers to the System.Security.Permissions.SecurityPermission type.
Let's lower our current permission level and see what effect this has on our access to FileWidth. Create a Console or Windows Application. Click on My Program in Solution Explorer to open the Project Designer. Select the Security tab, then check "Enable ClickOnce Security Settings" and "This is a partial trust application."
At this point the required permissions are not available, so FileWidth and neighboring members become grayed out and inaccessible in IntelliSense. This Visual Basic feature is called IntelliSense-In-Zone. The tooltip indicates which permission type is required to use the member.
You can add PermissionSet elements to member XML documentation files and specify the appropriate permission.
Generating Nicer Documentation
The XML generated by the Visual Basic compiler is readable, but not the most user-friendly. A number of tools have been created to create nicer looking documentation that is easier to navigate.
The first tool is called Sandcastle, developed by Microsoft. After installing Sandcastle, collect the assemblies that you will be documenting, their dependencies, and their XML documentation files. Copy all of those materials to the vSandcastle installation folder (typically C:\Program Files\Sandcastle\Examples\sandcastle).
Open an elevated command prompt and navigate to the same directory, then run this command:
build_Sandcastle.bat prototype <your assembly name without the file extension>
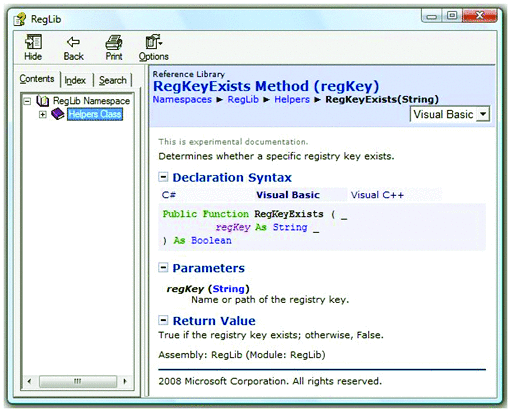
Directories and files will be generated by this operation. Open the .chm directory, and then open the .chm file inside. It should look something like the help in Figure 9.

Figure 9 Sandcastle .chm Output
The tool offers a number of other output formats other than .chm. For more information and further announcements on Sandcastle, please watch the blog at blogs.msdn.com/sandcastle.
NDoc is another popular tool you might consider using, or you could use the powerful XML features in Visual Basic 9 to write your own custom tool!
XML Comments in Visual Studio 2010
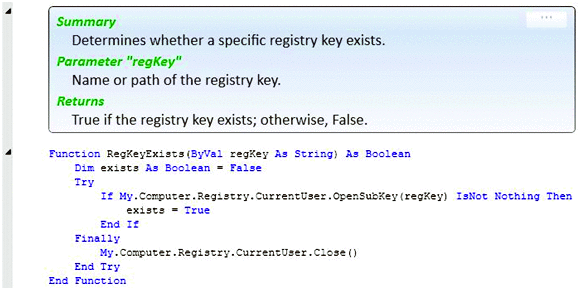
Looking forward, there are new possibilities for the way that you might interact with XML comments in code. The Visual Studio 2010 editor is rewritten using Windows Presentation Foundation (WPF) and allows for rich visualizations. The editor updates also involved moving to a new component system, the Managed Extensibility Framework (MEF), which makes it much easier to register add-ins with Visual Studio. Figure 10 shows an example of an XML comment viewer that was built on top of the new editor and component model.

Figure 10 XML Comment Viewer in Visual Studio 2010
Clicking on the button in the top-right corner switches the display between the WPF control and the original XML. The WPF control certainly provides a much clearer view. It also takes advantage of WPF capabilities such as gradients and round edges. WPF makes it possible to include images or videos, too! This will certainly be a rich area for third-party add-ins to take advantage of in the Visual Studio 2010 release.
Send your questions and comments to instinct@microsoft.com.
Lisa Feigenbaum is the Microsoft Program Manager for the Visual Basic Community. She has been a member of the Visual Basic team since 2004. Before her current role, Lisa was the Program Manager for the Visual Basic Editor and Debugger, working on features such as IntelliSense, edit-and-continue, and code snippets. You can find Lisa at various U.S. and international conferences and user groups, watch her Channel 9 webcasts, or read her posts on the VB team blog at https://blogs.msdn.com/vbteam.