Help me! How do I connect to an ASMX web service?
With the rise of mobile applications (Windows Store and Windows Phone Store apps), the need for remote processing and storage has never been greater. The necessarily-small footprint of these apps, the limited storage capacity of the hardware, and the sometimes need to do really processor-intensive operations makes offloading jobs to remote servers critical to the usefulness of mobile apps. There are multiple ways to connect to remote servers - sockets come in many forms – but services running over HTTP have become one of the most ubiquitous and useful for high-level applications.
As a moderator in the MSDN forums, I’ve had many requests for instructions on how to instantiate, call, and authenticate to web service methods from within Windows Store apps, and with the recent joining of Windows Phone development to the Windows Store Solutions team, from Windows Phone 8 applications. This blog posts covers how to use an ASMX web service from within your mobile app.
ASMX Web Services
ASMX web services have been around a long time and are widely used. They rely on SOAP structures (an XML-based series of messages) to pass information back and forth between client and server over HTTP. The creation of these SOAP structures and the method calls which make them can be complex to write manually, but luckily for us, every version of Visual Studio since .NET was released supports automatic creation of the class proxies necessary to make a call to the methods within the Web Service as easy as making a call to a method created within our own project. It’s a simple few steps to create a reference to an ASMX web service. This procedure is the same for both Store projects and Phone projects:
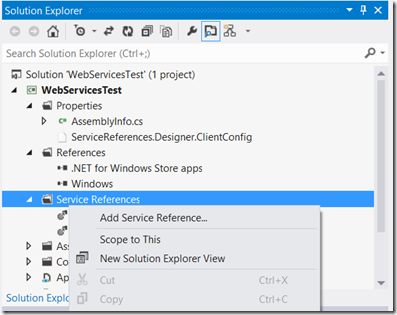
1) From within your Solution Explorer of your project, right-click on “Service References”, then click on “Add Service Reference”:
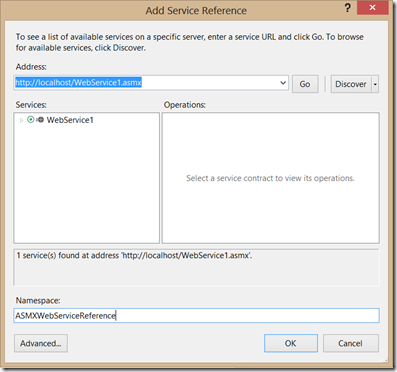
2) The dialog box which appears allows you to put in the URL of your web service. Enter it, then press the “Go” Button”:
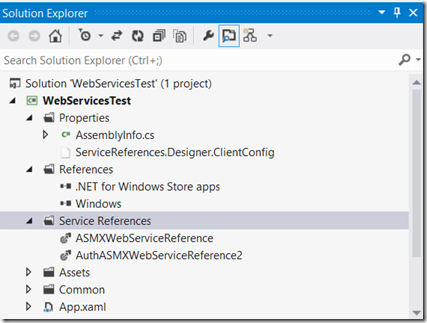
3) You can see that the name of the web service appears in the Services pane. Give your webservice a namespace (anything you like) that will be used to refer to it from within your project. Press the OK button. That namespace will now appear in the list of Service References. As you can see from the list below, I have two namespaces for my project, for each of the two separate ASMX web services I will be demonstrating in this post.
Consuming an ASMX Web Service using Anonymous Authentication from a Windows Store Application
A web service is considered to have anonymous authentication if no specific permission is required to access it. The server is allowed to fulfill every request without regard to the entity who is requesting the information. This is the case for many web services on the internet.
For reference, this is the source code for the method which I will be calling from my Store application:
1: [WebMethod]
2: public List<string> GetStrings(int StartNumber, int EndNumber)
3: {
4: List<string> MyList = new List<string>();
5: for (int i = StartNumber; i <= EndNumber; i++)
6: {
7: MyList.Add("AuthASMXService String #" + i.ToString());
8: }
9: return MyList;
10: }
… and here’s the code that will call the method in the web service instantiated above:
1: private async void ASMXWebServiceInvoke_Click_1(object sender, RoutedEventArgs e)
2: {
  3:     ASMXWebServiceReference.WebService1SoapClient MyASMXWebServiceClient
          = new ASMXWebServiceReference.WebService1SoapClient();
4: ASMXWebServiceReference.GetStringsResponse MyStringsResponse = await
MyASMXWebServiceClient.GetStringsAsync(10, 20);
  5:     ASMXWebServiceReference.ArrayOfString MyStrings =
          MyStringsResponse.Body.GetStringsResult;
6: ASMXGridView.ItemsSource = MyStrings;
7: }
Let’s break this down, line-by-line (lines 3 through 6):
First, we must instantiate an object from the webservice namespace
From the instantiated webservice object, we call the GetStrings method asynchronously, passing the parameters that our webservice expects. We receive a response, but it is not the return type from the webservice. It is composed of all of he information that would be available from a network call, as well as our expected response.
We instantiate an object (MyStrings) to hold the expected response, and then assign that to the actual response.
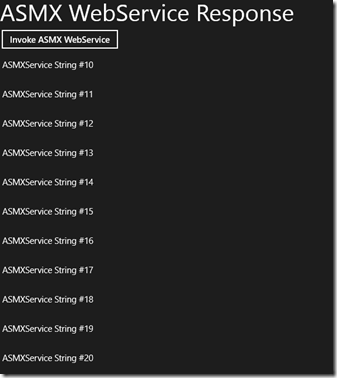
Finally, we can use the response in our gridview. This is what my populated gridview looks like:
Consuming an ASMX Web Service using Windows Authentication from a Windows Store Application
Many webservices, particularly those part of Line-Of-Business applications, require security for their web services. To access these web services, it requires that we pass credentials to the web service. Here’s the code for this process:
1: private async void AuthASMXWebServiceInvoke_Click_1(object sender, RoutedEventArgs e)
2: {
3: bool ShowError = false;
4: System.Exception MyException = new Exception();
5: try
6: {
7:
  8:                 System.ServiceModel.BasicHttpBinding MyHttpBinding =
                      new System.ServiceModel.BasicHttpBinding(
System.ServiceModel.BasicHttpSecurityMode.TransportCredentialOnly);
  9:                 MyHttpBinding.Security.Transport.ClientCredentialType =
                      System.ServiceModel.HttpClientCredentialType.Windows;
10:
  11:                 System.ServiceModel.EndpointAddress MyAuthASMXWebServiceAddress =
                       new System.ServiceModel.EndpointAddress(new Uri(
                       "https://localhost/AuthWebService2.asmx"));
  12:                 AuthASMXWebServiceReference2.AuthWebService2SoapClient
                       MyAuthWebServiceClient = new AuthASMXWebServiceReference2.
                       AuthWebService2SoapClient(MyHttpBinding, MyAuthASMXWebServiceAddress);
  13:                 MyAuthWebServiceClient.ClientCredentials.Windows.ClientCredential.Domain
                       = "localhost";
  14:                 MyAuthWebServiceClient.ClientCredentials.Windows.ClientCredential.UserName
                       = "SpecialUser";
  15:                 MyAuthWebServiceClient.ClientCredentials.Windows.ClientCredential.Password
                       = "Password123";
16:
  17:                 AuthASMXWebServiceReference2.GetStringsResponse MyStringsResponse =
                       await MyAuthWebServiceClient.GetStringsAsync(20, 30);
  18:                 AuthASMXWebServiceReference2.ArrayOfString MyStrings =
                       MyStringsResponse.Body.GetStringsResult;
19: AuthASMXGridView.ItemsSource = MyStrings;
20:
21: }
22: catch (Exception ex)
23: {
24: ShowError = true;
25: MyException = ex;
26: }
27: if (ShowError)
28: {
29: var MyMessageBox = new Windows.UI.Popups.MessageDialog(MyException.Message);
30: await MyMessageBox.ShowAsync();
31: }
32: }
1: private async void AuthASMXWebServiceInvoke_Click_1(object sender, RoutedEventArgs e)
2: {
3: bool ShowError = false;
4: System.Exception MyException = new Exception();
5: try
6: {
7:
  8:                 System.ServiceModel.BasicHttpBinding MyHttpBinding = new
                      System.ServiceModel.BasicHttpBinding
                      (System.ServiceModel.BasicHttpSecurityMode.TransportCredentialOnly);
  9:                 MyHttpBinding.Security.Transport.ClientCredentialType =
                      System.ServiceModel.HttpClientCredentialType.Windows;
10:
  11:                 System.ServiceModel.EndpointAddress MyAuthASMXWebServiceAddress = new
                       System.ServiceModel.EndpointAddress(new Uri(
                       "https://localhost/AuthWebService2.asmx"));
  12:                 AuthASMXWebServiceReference2.AuthWebService2SoapClient
                       MyAuthWebServiceClient = new AuthASMXWebServiceReference2.
                       AuthWebService2SoapClient(MyHttpBinding, MyAuthASMXWebServiceAddress);
  13:                 MyAuthWebServiceClient.ClientCredentials.Windows.ClientCredential.Domain
                       = "localhost";
14: MyAuthWebServiceClient.ClientCredentials.Windows.ClientCredential.UserName
= "SpecialUser";
  15:                 MyAuthWebServiceClient.ClientCredentials.Windows.ClientCredential.Password
                       = "Password123";
16:
  17:                 AuthASMXWebServiceReference2.GetStringsResponse MyStringsResponse
                       = await MyAuthWebServiceClient.GetStringsAsync(20, 30);
  18:                 AuthASMXWebServiceReference2.ArrayOfString MyStrings
                       = MyStringsResponse.Body.GetStringsResult;
19: AuthASMXGridView.ItemsSource = MyStrings;
20:
21: }
22: catch (Exception ex)
23: {
24: ShowError = true;
25: MyException = ex;
26: }
27: if (ShowError)
28: {
29: var MyMessageBox = new Windows.UI.Popups.MessageDialog(MyException.Message);
30: await MyMessageBox.ShowAsync();
31: }
32: }
This method contains an exception handling routine which will capture any failures while communicating with the web service. For example, if I change the password to an incorrect value and attempt to authenticate, I will see this on my screen:
The main difference between this code and the anonymous code is that we have to give the credentials to the calling code.
- Line 8 instantiates an HTTP binding object which will allow us to specify the type of authentication method which will be used. Also, the constructor takes a parameter which tells the binding that it’s ok to not use SSL, but to send the credentials unsecured. It is possible to change this so that SSL is required for the passing of this credential.
- Line 9 sets the authentication type to Windows, also known as Negotiate. Other valid types include Basic, NTLM, Client Certificates, and Digest.
- When passing credentials, it’s important to know where they are going – after all, these are resources which can be used to gain access to secured information. Line 11 lets us set the endpoint destination to our web service URL.
- When instantiating the web service object this time, we will pass in the HTTPBinding object and the Endpoint. This changes the object so it knows to use Windows Authentication when communicating with the web service itself.
- Finally, lines 13, 14 and 15 are where we set the domain, username and password necessary to gain access to the web service.
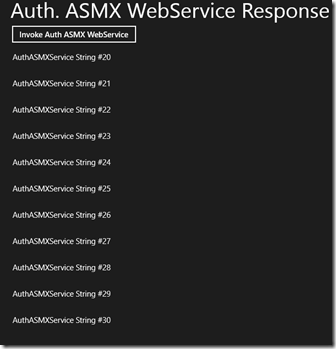
The rest of the web service call is the same as an anonymous call. This is my working web service call:
Conclusion
Accessing web services is an incredibly important part of programming mobile services. I hope that the code presented is useful to you and helps you when designing your application. Please feel free to leave questions in the comments below.
Also, please follow us on Twitter @WSDevSol!
Comments
Anonymous
February 27, 2013
How about a sample code that serializes an image and uploads the object containing the serialized image to an .asmx web service? ThanksAnonymous
May 06, 2013
This was awesome. Thanks for sharing. How about web method that doesn't return anything? Would the ResponseAsync method work in those cases?Anonymous
May 07, 2013
Harish - I believe that it should work, but I haven't tested it.Anonymous
July 22, 2013
Wow Matt, It really helped me............thanks a millionAnonymous
February 05, 2014
Great... This is the best explanation of using Windows Authentication that I could find in hours of searching. 10000 thanks.Anonymous
February 11, 2014
The comment has been removedAnonymous
November 10, 2014
Hi, the following seems related: johnwsaunders3.wordpress.com/.../more-reasons-to-not-use-asmx-services-in-new-code Intro: "Many people continue to use ASMX web services despite my earlier post “Microsoft says: ASMX Web Services are a “Legacy Technology”” and other such warnings. " @Dan Maybe it needs to be configured first or check here msdn.microsoft.com/.../jj991977.aspx (or search 'cannot await void' on Stack overflow) Hope that helps, Sandra.Anonymous
March 08, 2015
How do I call a asmx secured via basic authentication from a Windows phone app? The article only mentions about anonymous authentication scenario? Will WP8 support basic authentication?Anonymous
September 23, 2015
how can add asmx service which is having SSL certificate enabled with Client required option in my VS2013.
