FAQ - TfsBranchTool: How do I customi[s|z]e a TFS Branching scenario plan?
In Quick Response Sample – Command line utility to create TFS Branch Scenarios we introduced the latest Ranger Quick Response Solutions sample, focused on implementing a consistent branching model as part of team project or team creation process, that complies with the VS TFS Branching and Merging Guide.
In this post we will step through the simple process of customizing an existing branch model.
Understanding the model bits
The available Command Line Sample and the imminent VS Extension sample both share the same model artefacts architecture. The only difference is the location of the command line and the VS extension binaries and their associated model artefacts.
Assuming we have deployed the command line tool TfsBranchTool.exe to the folder CommandLine, we will find a folder in the same node named Branch Plans. In this folder, as shown below, we will find a folder for each branch plan. By default the sample ships with Basic, feature and MainOnly branch plan.
If we change the folder to one of the branch plans, for example Feature, we find three files.
- Feature .brachplan … is the heart of the plan, defining all the version control actions needed to implement the plan.
- Feature .html … help file, which is relevant to the VS extension sample.
- Feature .png … image, typically a branch model diagram, , which is relevant to the VS extension sample.
That’s it! Simple!
Customizing a default model
Hypothetical Requirement
 The user would like the branch plan feature to be named valuable and refer to all features as valuables. In addition the user would like to add a mandatory folder to the main folder, which is propagated to the valuable branch.
ROOT
+ MAIN
+ FOLDER X
+ VALUABLE BRANCH
+ FOLDER X
+ … all other folders as per original feature plan.
Customization Steps
First we rename the Feature folder to Valuable, and then the Feature* files to Valuable*. We then edit the image to represent the Valuable model and the Valuable.html help file to document the Valuable model and reference the Valuable.png image file.
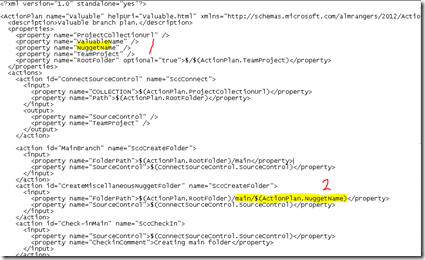
We then move to the “heart” surgery … Valuable .branchplan.
The first change involves renaming all instances of Feature to Valuable.
We then add a new property, called NuggetName (1) . Unlike the RootFolder property we are no adding the optional attribute, making it a mandatory property as defined by the user requirements.
After the creation of the main folder we add new action, that creates a new folder within the main folder. The name of the folder is set by the NuggetName property (2).
That’s it … we think. SAVE all files!
Quick Validation
Run TfsBranchTool.exe /? as the first quick test. Notice that the Feature plan has been replaced with the Valuable plan as expected.
Run TfsBranchTool.exe Valuable /? as the second quick test. Notice that we have a new parameter called NuggetName.
Guess it is time to test our customizations.
Test the Customization
We run the TfsBranchTool specifying Valuable as the plan and passing Cowabunga as the NuggetName parameter. Note the highlighted additional step which creates the folder in main, before we force a check-in.
When we peek into the source control explorer, we notice that the (1) Cowabunga folder was created in the main folder and (2) that the branch from main to TestN valuable branch propagated the folder.


