[MEMO] OSS アプリを Web Application Gallery に登録する (2-2) パッケージのテスト
前回は OSS アプリのパッケージング方法についてご紹介しました。今回は Web Application Gallery への登録手順 3つのうち、2番目の「パッケージのテスト」方法を WordPress 3.1 英語版のパッケージを例にご紹介申し上げます。
■ テストに必要なもの
パッケージのテストには Web Platform Installer のシステム要件を満たす PC が必要です。
また、下記のソフトウェアを予めインストールしてください。
- Web Platform Installer:インストール方法はこちらに記載しています。
- Microsoft File Checksum Integrity Verifier (SHA-1 ハッシュ 生成 プログラム) : こちらからインストールしてください。
■ テスト手順
テストの手順については、下記のように実施してください。
- Web Platform Installer 用カスタムフィードの作成
- カスタムフィードを Web Platform Installer に組み込む
- Web Platform Installer で IIS 環境にインストール
- Web Platform Installer で IIS Express 環境にインストール
- WebMatrix で発行作業の実施
以下、各ステップについてご紹介します。
■ Web Platform Installer 用カスタムフィードの作成
カスタムフィードは、下記のソースをコピー&ペーストしてください。
<?xml version="1.0" encoding="utf-8"?> <feed xmlns="https://www.w3.org/2005/Atom"> <version>1.0.0.0</version> <title>Sample Application for WebPI v3 RTW Feed</title> <updated>2011-03-1T00:000:00Z</updated> <author> <name>Sample Application Builder</name> <uri></uri> </author> <entry type="application"> <productId>sampleapp</productId> <title>Sample Application</title> <id>https://www.microsoft.com/web/webpi/3.0/SampleAppJa</id> <summary>Application Sample</summary> <longSummary>Application Sample</longSummary> <version>1.0</version> <images><icon></icon></images> <updated>2009-10-5T18:30:02Z</updated> <published>2009-10-5T18:30:02Z</published> <author> <name>Sample Application</name> <uri></uri> </author> <keywords> <keywordId>oss</keywordId> <keywordId>PHP</keywordId> <keywordId>MySQL</keywordId> </keywords> <dependency> <and> <dependency idref="PHPApp" /> <dependency> <productId>MySQLConnector</productId> </dependency> <dependency> <productId>StrawberryPerl</productId> </dependency> </and> </dependency> <installers> <installer> <id>1</id> <languageId>ja</languageId> <osList idref="SupportedAppPlatforms" /> <installerFile> <fileSize>10240</fileSize> <installerURL>記載してください </installerURL> <sha1>記載してください</sha1> </installerFile> <helpLink></helpLink> <msDeploy> <startPage></startPage> </msDeploy> </installer> </installers> </entry> <!-- Tabs and Keywords --> <tabs> <tab> <keywordTab> <id>oss</id> <name>Sample App</name> <description>Select from sample applications:</description> <keywords> <keywordId>oss</keywordId> </keywords> </keywordTab> </tab> </tabs> <keywords> <keyword id="oss">OSS Apps</keyword> </keywords> <oses> <os id="PreVistaNoHomeBasic"> <maximumVersion> <osMajorVersion>5</osMajorVersion> </maximumVersion> <osTypes> <Server /> <HomePremium /> <Ultimate /> <Enterprise /> <Business /> </osTypes> </os> <os id="VistaSP1PlusNoHomeBasic"> <minimumVersion> <osMajorVersion>6</osMajorVersion> <osMinorVersion>0</osMinorVersion> <spMajorVersion>1</spMajorVersion> </minimumVersion> <osTypes> <Server /> <HomePremium /> <Ultimate /> <Enterprise /> <Business /> </osTypes> </os> </oses> <osLists> <!-- support xp sp2+ (no server core) --> <osList id="SupportedAppPlatforms"> <os> <minimumVersion> <osMajorVersion>5</osMajorVersion> <osMinorVersion>1</osMinorVersion> <spMajorVersion>2</spMajorVersion> </minimumVersion> <osTypes> <Server /> <Client /> </osTypes> </os> <os idref="PreVistaNoHomeBasic" /> <os idref="VistaSP1PlusNoHomeBasic" /> </osList> </osLists> <dependencies> <!-- We do not support PHP for IIS 5.1 anymore --> <dependency id="IISForPHP"> <or> <!--IIS 6.0--> <dependency> <and> <!--IIS--> <dependency> <productId>IIS60</productId> </dependency> <!--FastCGI--> <dependency> <productId>FastCGIIIS6</productId> </dependency> </and> </dependency> <dependency> <and> <dependency> <productId>StaticContent</productId> </dependency> <dependency> <productId>DefaultDocument</productId> </dependency> <dependency> <productId>DirectoryBrowse</productId> </dependency> <dependency> <productId>HTTPErrors</productId> </dependency> <dependency> <productId>HTTPLogging</productId> </dependency> <dependency> <productId>LoggingTools</productId> </dependency> <dependency> <productId>RequestMonitor</productId> </dependency> <dependency> <productId>RequestFiltering</productId> </dependency> <dependency> <productId>StaticContentCompression</productId> </dependency> <dependency> <productId>IISManagementConsole</productId> </dependency> <dependency> <productId>CGI</productId> </dependency> <!--URL Rewriter--> <dependency> <or> <dependency> <productId>UrlRewrite2</productId> </dependency> <dependency> <productId>UrlRewrite</productId> </dependency> <dependency> <productId>UrlRewrite10</productId> </dependency> <dependency> <productId>UrlRewrite2Beta</productId> </dependency> </or> </dependency> </and> </dependency> </or> </dependency> <dependency id="PHPApp"> <and> <dependency> <or> <dependency> <and> <dependency idref="IISForPHP" /> <dependency> <productId>PHP52</productId> </dependency> <dependency> <productId>WinCache52</productId> </dependency> </and> </dependency> <!-- PHP on IIS Express dependency --> <dependency> <and> <dependency> <or> <dependency> <productId>WebMatrix</productId> </dependency> <dependency> <productId>WebMatrix_v1Refresh</productId> </dependency> </or> </dependency> <dependency> <productId>PHP52ForIISExpress</productId> </dependency> </and> </dependency> </or> </dependency> <dependency> <or> <dependency> <productId>WDeployNOSMO</productId> </dependency> <dependency> <productId>WDeploy_v2</productId> </dependency> <dependency> <productId>WDeploy</productId> </dependency> </or> </dependency> </and> </dependency> </dependencies> </feed> |
カスタムフィードのうち、<installerURL>、<sha1> の値を入力してください。以下に、入力方法を記載します。
- <installerURL>: パッケージの URL、もしくは絶対パス
- <sha1>: SHA-1 ハッシュの値。コマンドプロンプトで Microsoft File Checksum Integrity Verifierを実行してください。
(コマンド) fciv –add [パッケージのパスとファイル名] –sha1
入力が完了しましたら、.xml 形式でファイルを保存します。
■カスタムフィードを Web Platform Installer に組み込む
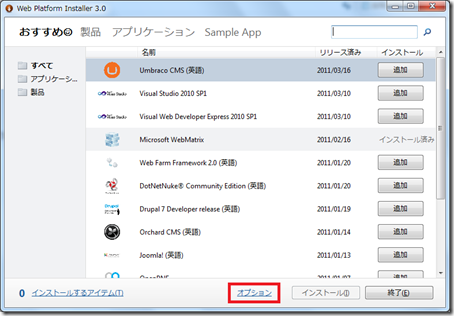
(1) Web Platform Installer を起動し、画面下の[オプション] をクリックしてください。
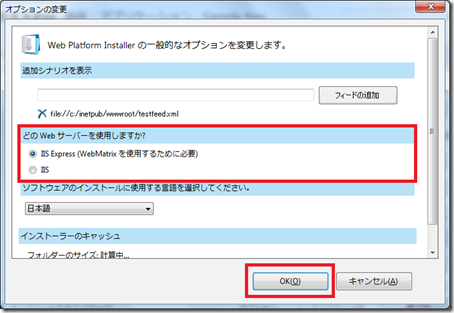
(2) 「追加シナリオを表示」の下にあるテキストボックスにカスタムフィードの URL (file:// の記述も可能) を入力し、[フィードの追加]ボタンをクリックしてください。
(3) 下記の画面のようにカスタムフィードが追加されている事を確認して、[OK] ボタンをクリックしてください。
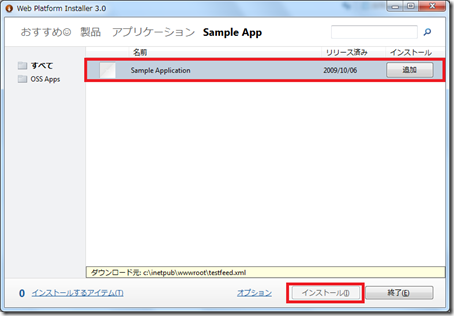
(4) 下記の画面のように画面上部に「Sample App」の文字が表示されれば、カスタムフィードの組み込みは完了です。
■Web Platform Installer で IIS 環境にインストール
(1) Web Platform Installer を起動し、画面下の[オプション] をクリックしてください。
(2) 「どの Web サーバーを利用しますか?」下の [IIS] のラジオボタンをクリックして、[OK] ボタンをクリックしてください。
(3) 画面上部の「Sample App」をクリックしてください。
(4) Sample Application の [追加] ボタンをクリックしてから、[インストール] ボタンをクリックしてください。
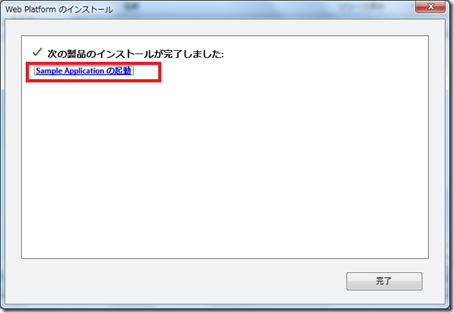
(5) Web Platform Installer に従い、パッケージのインストール作業を完了させてください。インストール完了後、 [Sample Application の起動]をクリックしてください。
(6) OSS アプリのインストーラーが起動しますので、OSS アプリのインストールを完了させてください。
以上で、IIS 環境へのテストは終了です。上手くいかなかった箇所は適宜パッケージを修正してください。
■Web Platform Installer で IIS Express 環境にインストール
(1) Web Platform Installer を起動し、画面下の[オプション] をクリックしてください。
(2) 「どの Web サーバーを利用しますか?」下の [IIS Express] のラジオボタンをクリックして、[OK] ボタンをクリックしてください。
(3) 画面上部の「Sample App」をクリックしてください。
(4) Sample Application の [追加] ボタンをクリックしてから、[インストール] ボタンをクリックしてください。
(5) Web Platform Installer に従い、パッケージのインストール作業を完了させてください。インストール完了後、 [起動]をクリックしてください。
(6) WebMatrix が起動しますので、[実行] ボタンをクリックしてください。
(7) OSS アプリのインストーラーが起動しますので、OSS アプリのインストールを完了させてください。
以上で、IIS Express 環境へのテストは終了です。上手くいかなかった箇所は適宜パッケージを修正してください。
■WebMatrix で発行作業の実施
手順はこちらに記載しておりますので、ご覧ください。発行の後に発行済みサイトからのダウンロードも実施して問題ないことをご確認ください。
- [MEMO] WebMatrix から ExpressWeb に発行方法 ~ Geeklog 編 ~ (1) 発行準備
- [MEMO] WebMatrix から ExpressWeb に発行方法 ~ Geeklog 編 ~ (2) 発行
以上でパッケージのテスト作業は完了です。
武田正樹


