Microsoft Test Runner series – part 2 – Manual Testing
Hi again,
As we discussed in last blog in this series, let’s explore the features & functionalities of Microsoft Test Runner (MTR). The component is used for execution of manual tests.
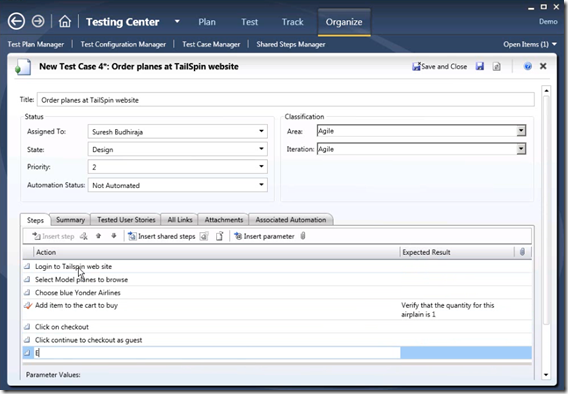
Manual tests can be authored in the MTLM by going to Test Plan activity & choosing to create a new test. User can define the steps they want to follow while testing. The granularity of the step depends on the preferences of the testers. Some testers like to keep it high level, others keep it very granular. One thing that should be kept in mind is that the granularity of fast forwarding & the status reporting will depend on the granularity of the steps. Test author can also specify the expected results. These expected results will be visible to the tester along with the step instruction while performing the tests.
Note that when author specifies an expected result, the corresponding step is marked as a validate step. You will notice a small icon representing this fact. Validate steps are displayed just like any other step in MTR. It is expected that the manual tester will verify that the AUT behaves as expected. If the tester does not mark the validate step, the step is assumed to be “Failed”.
While authoring, an author can also attach files to the test step. These are generally useful to provide extra information to the tester. E.g. the test author can attach screenshots for comparison purpose OR attach a script that tester needs to run before a step & so on … Multiple attachments can be added to a step.
If the same test needs to be tested with different data sets, parameters & corresponding data sets can also be added to a test case. We will get into more details of this in a separate blog on data driving tests.
When the tests are loaded in MTR for testing, tester can choose any test that he/she may want to test first. An overlay shows a checkbox asking if the actions should be recorded. These actions can be used for fast forwarding later.
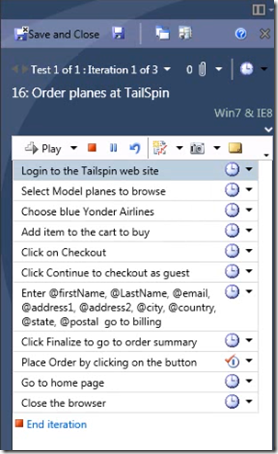
Tester can start the test; the steps are shown. Test case level details (e.g. attachments etc.) are visible in the top section of MTR. Tester can expand the section to see more details. Also the comments can be added for the test case there.
Highlight the step that you are testing & perform the actions on AUT. It is a good idea to mark the step result as pass/fail. As discussed earlier, tester does not need to move the mouse to mark the step results. Just use the global shortcut keys to mark the step as passed & another key to move to next step. Note that the global shortcut keys can be changed in the configuration file to suite your needs. Tester can also add comments to any step if needed (these will be visible from the bug and the test results).
When a step fails, tester can mark the step as failed by using either of the following ways:
- Using the dropdown of the result icon
- Clicking on the result icon two times (as the icon cycles through the pass/fail states).
- Using the global shortcut key
On step failure, the comment section for the step is automatically expanded as it is likely that tester will add some comments on why the step is marked as failed.
Tester can add more details & file bug from MTR (we will see more details when we explore filing actionable bugs).
When the test is completed, tester can end the test result. Note that the tool auto computes the results of the test case based on the step results. Following logic is followed to compute the result:
- If any step is marked as failed the test result is marked as failed.
- If any “Validate” step is not marked, the step is assumed to have failed & hence the test case result is computed as failed.
- If no step was marked as failed & no validate step was left unmarked, the test result is computed as passed.
The result of the test case is visible on the right of the test case name in the test case section at the top. In rare circumstances, if user wants to override the result of the test case, she can change the result by clicking on the test result icon.
User can move between tests using the buttons on the test case section. The left & right buttons load the next/previous test case/iteration available. The dropdown next to the test case name shows all the test cases/iterations loaded & their results so far.
On pressing the end test case (or when explicitly pressing the save button from top toolbar), the test case result & all attachments are stored on the test server.
Tester can also resume back to the full view of MTLM at any time during execution, if the test case was in progress, it is paused. When user comes back to MTR view, the test can be resumed.
Hopefully this gives an idea about the very basic functionality for testing a manual test case. In next blogs, we will talk about some interesting capabilities of the tool.
Other links:
- How test case result is computed in Test runner
- How can I configure MTLM to use my custom bug/test case type
- Video ALM 4 - Create test suites and assign tests to team
- Video ALM 5 - Author test and shared steps
- Video ALM 6 - Perform manual test and file actionable bug
Thanks
Suresh Budhiraja
Sr. Program Manager
Comments
Anonymous
February 10, 2010
Is it any way to download TailSpin demo project?Anonymous
April 26, 2011
I am exploring Microsoft Test Manager Tool. I am trying parametrization. While running the recorded TC, i am getting the error: you have not specified result for this validate step . Please need help.Anonymous
July 18, 2011
How is the Manual Test Runner installed on a client PC? Where is the installer?

