Adding Completed Work to Task work items in the Scrum 2.x template (including Reporting)
An area that I am often asked about relates to the Scrum process template and in particular how the Task work item only measures a single unit of time, Remaining Work.
I personally quite like the focus that having only one measurement has on an Agile project (see https://visualstudiomagazine.com/articles/2011/12/07/are-we-there-yet.aspx), however do appreciate that some teams will like to track additional time fields such as Completed Work and Original Estimate. These fields help monitor in a sprint the actual work expended so far in the sprint and can with Original Estimates can be argued to help measure the team skill in estimation.
My article is not to argue the pros and cons of the measures, however in light of the fact I am asked this so frequently I have decided to show a way to accomplish this. There are some very simple ways to update the out of box Scrum implementation in TFS2012 to incorporate completed work into your burndown reporting and track original estimates. To accomplish this I split this up into two basic areas:
- Modify the existing task work item to incorporate Completed Work and optionally Original Estimate.
- Add a burndown report incorporating Completed Work values
Here goes…
Modify the existing task work item to incorporate Completed Work and optionally Original Estimate.
Firstly we need to add some new fields to our Scrum project via the process template. The simplest way to do this is with the Process Template Editor that is part of the Visual Studio Power Tools (https://visualstudiogallery.msdn.microsoft.com/b1ef7eb2-e084-4cb8-9bc7-06c3bad9148f). With these tools installed open up the Scrum Project you wish to change and pick the TFS Project Collection which holds your project.
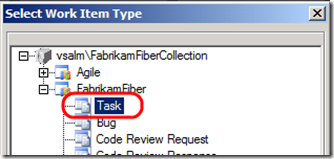
With the project collection selected pick the Task work item from the project you wish to edit.
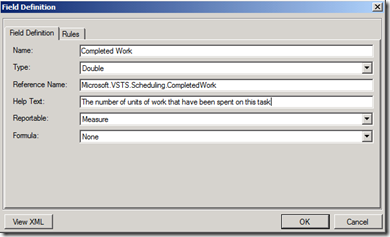
With the Task work item opened select “New” to create one or two new fields to hold Completed Work and optionally Original Estimate
The details for the Completed Work and optionally Original Estimate fields is as below. Ensure all the details are correct as they are crucial later on for our reporting to work correctly. For copy/paste the Reference Name(s) you need are Microsoft.VSTS.Scheduling.CompletedWork and Microsoft.VSTS.Scheduling.OriginalEstimate.
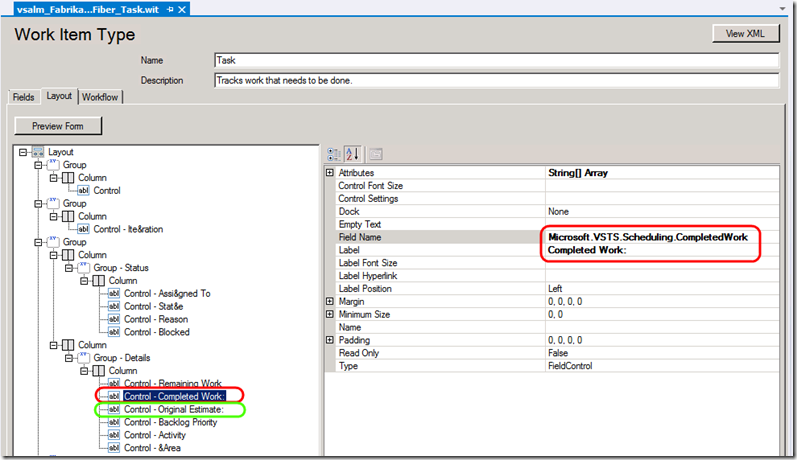
With your new fields created you can change tabs at the top of the Task work item window to move to the Layout tab to add these new fields into the UI for your Task work item. The editor is quite simple. Find the column that you want to add your new fields to and use the context menu on the Column item to add new controls for the fields that you added. The screenshot below shows this for the Completed Work field, but should be repeated for the Original Estimate field if required. (N.B. The new control items added have a context menu to move them up/down the order within the column.)
Simply save the item and you have all the process changes in place to support the new time measures.
Now to sort out our reporting…
Add a burndown report incorporating Completed Work values
I considered making modifications to the default burndown chart in the Scrum template, but decided as all our fields share the same reference names as those from a MSF Agile project we can borrow the implementation in Report Definition Language (RDL) from MSF Agile’s burndown report and use it in the scope of a Scrum project to show complete work.
To do this first export the MSF Process Template to a local location so that you have an instance of the RDL for the report we wish to copy. If you have an MSF Agile 6.x project created in TFS you can simply head to the report manager site from Team Explorer and then export the “Burndown and xy” report and then use Report Manger to import this into your Scrum project. I am going to assume you do not have this in place and go through the steps needed if you have no Agile 6.x projects.
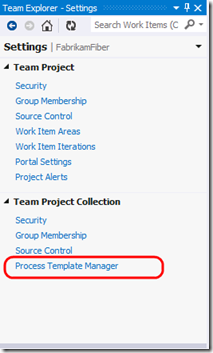
Firstly head into Visual Studio and to the Team Explorer window for any project. Head into “Settings” and then select “Process Template Manager”
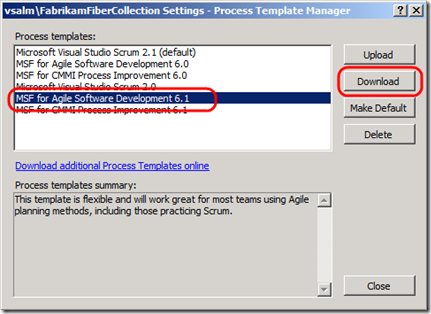
From the Process Template Manager screen find the MSF for Agile Software Development 6.x template and select it. If like my server you have multiple 6.x versions listed I would recommend selecting the highest. (for further information 6.0 was VS2012 RTM, 6.1 was Update 1 etc…). The download will request a folder location on your local disk for you to save the Process Template into.
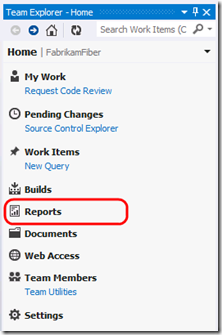
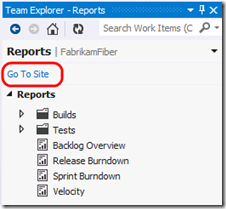
The download will place the Process Template locally on your disk including the Reports Definition Language (RDL) describing the report that we will be needing. Now we need to import this RDL into our Scrum 2.x project. The easiest way to do this is through Report Manager which can be accessed by using Team Explorer in Visual Studio and heading to the “Reports” hub selected from the home hub and then the “Go To Site” option from the Reports hub.
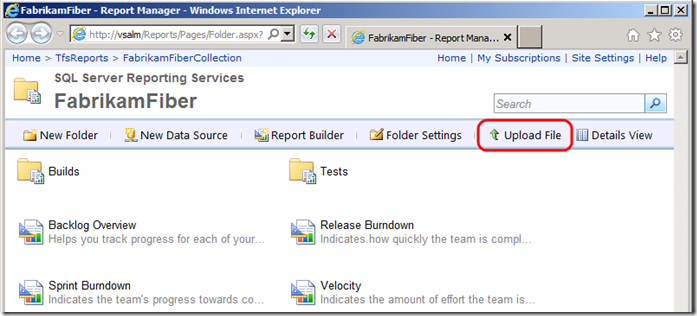
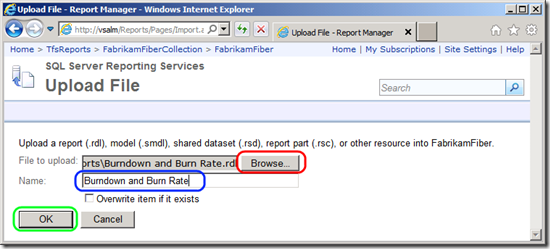
When Report Manager loads up for your Scrum project you can see an “Upload File” option that is used to upload RDL into SQL Reporting Services.
The upload page you need to input the name of the report as below, before browsing for the RDL to upload.
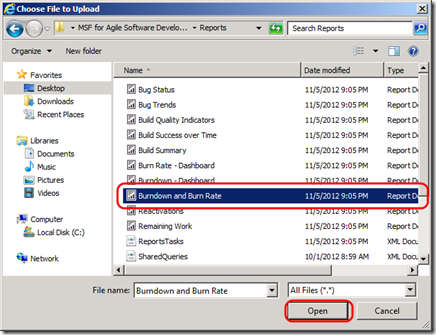
In the Browse…Upload dialog head to the location that you saved the process template to and within this find the Reports folder which holds all the Agile reports, from this list select “Burndown and Burn Rate” report and select “Open”.
Once you have clicked the final “OK” for the upload page you should have a new report listed in Report Manager, however we aren’t done yet. At the moment the report won’t work. We need to connect it up to our data sources and tidy up the parameters. To do this first select the context menu for the newly added report and select “Manage”.
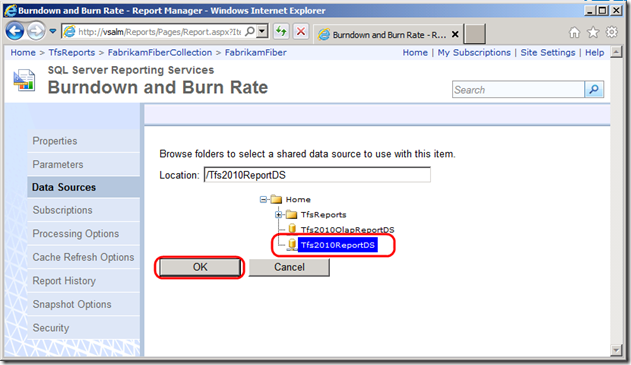
In the “Manage” page we need to first head to the “Data Sources” tab. Here we will see we have two expected data sources that are not bound. To get setup we need to browse to each of these shared data sources and select our TFS data sources. We’ll start with the first TfsReportDS which is our relational data source. If we click browse we can find the right data source.
As we are looking for our relational data source we need to locate Tfs2010ReportDS (yours may be called Tfs2012ReportDS if you never upgraded from a previous release) situated in the root (Home) folder. When we have located this we can “OK” our selection.
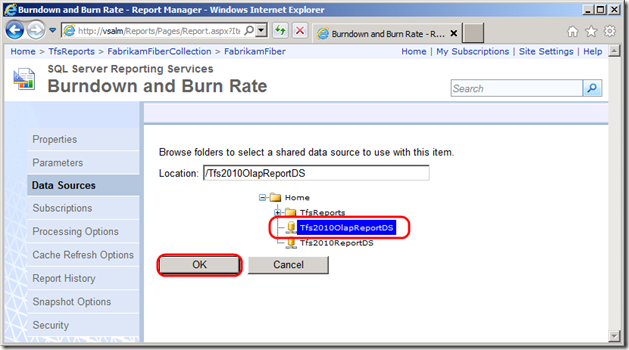
With our first data source selected we need to click “Browse” to find the second data source for TfsOlapReportDS which is our OLAP Analysis Services cube based data source.
This data source will also be found at the root (Home) folder, however it will have Olap in it’s title to be something like Tfs2010OlapReportDS (or Tfs2012OlapReportDS).
With the two data sources set ensure you select the “Apply” button at the bottom of the Data Sources page to make sure these are written into SQL. We’re almost done just one final bit of tidy up on our parameters. Simply move to the “Parameters” tab on the left to change page and then locate the “ExplicitProject” row and select the Hide field. Once again at the bottom of the page you should find and press the “Apply” button to commit our changes and we should be done.
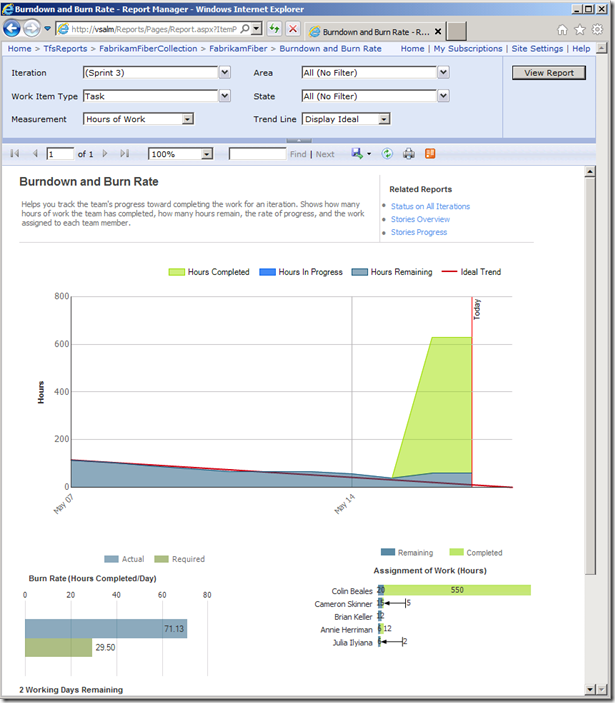
If we now head and select our report we should have it fully functioning. As we complete work we should see these values in our reporting. All our parameters should function and filter our report showing hours remaining burning down in addition to the completed work values we were trying to reflect upon. (apologies my screenshot has bad test data in it – I hope your team has a much smoother trend reflected through real everyday use).
Hope that helped
Colin.
Comments
Anonymous
May 21, 2013
The comment has been removedAnonymous
May 25, 2013
The comment has been removedAnonymous
May 27, 2013
Bahar - Can you please drop me an email at ukvs@microsoft.com and we can go through this. Colin.Anonymous
January 28, 2014
Thank you so much for this tutorial. I'm new to TFS and I couldn't find simple documentation for this customization. Everything else I found hyperlinked to so many other sources, I couldn't come up with the sequence of what I needed. Good writing.Anonymous
February 05, 2014
Thanks for your help. Solved my problem so easily. Btw, if I want to add completed hours & original estimate to other work types like bug, should I repeat all steps including mapping reports database?Anonymous
February 06, 2014
@Prakash I can't say I've tried this for Bugs, but yes in theory the same steps should have you covered. Let me know if you have troubles.Anonymous
February 13, 2014
Thanks for writing this very helpful article! Kind RegardsAnonymous
May 10, 2015
The comment has been removed

