Load Balanced Test Bed Part 2-Networking Setup
Networking Setup
Part 2 of 5: For overall context, please see the introduction to this series
In this procedure, we'll create a static DNS record that will point to the load balanced cluster, giving the cluster a name and IP address. When users hit this address to access your site, they will be automatically balanced between the cluster's servers. We'll also create a domain account to administer the cluster.
To perform this part of the procedure, I logged onto the domain controller for my test domain, which hosts the users, computer accounts, and DNS for the domain.
Create a Static DNS Record for the Cluster
Open the DNS Manager for your domain. To do this, click the Windows Start button and type DNS, and you should see the manager as a choice.
In the DNS Manager right hand navigation tree, open the Forward Lookup Zones branch under the DNS server.
Select the DNS zone that your NLB cluster will be in. Open the Action menu, and click New Host (A or AAAA)…
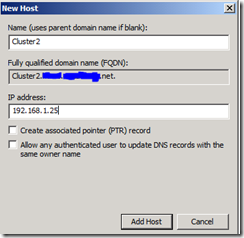
Enter what you’d like to name the cluster in the Name box, and the static IP that you will assign the cluster. These will be used later as the name and IP through which the cluster will accept client traffic. Once you have filled in the name and IP address, click Add Host, and click Done. Below is an example record for a cluster that will be called Cluster2 with a static IP address of 192.168.1.25.
Create a Cluster Administrator Domain Account
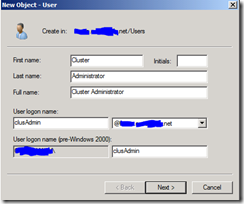
Next start Active Directory Users and Computers to create a cluster administrator user (click Windows Start button and type USER, and you should see Active Directory Users and Computers). Right-click your Users container in your domain tree, click New, and choose User. Below is an example.
Click Next, choose a strong password, and set the password policy check boxes according to your needs. Click Next and then Finish.
You have now made DNS aware of your cluster's name and address. In addition, you have created a domain user that will be used to administer the cluster.

