Going cross-platform with Xamarin–Adding MvvmCross to your solution
This blog post series is a documentation for a talk I give about cross-platform development with Xamarin. This series was co-authored by Johan Lindfors at Coderox. This post talks about how we add the MvvmCross framework to our solution, in preparation for our Android implementation.
Introduction
Before we start our Android implementation, we need to do one more thing. Since we have used the MVVM pattern for the Windows Phone app, we want to continue to do so. This is not a requirement of course, but for the purpose of this article we will. The steps we need to take is to add the NuGet package and modify the code slightly to adhere to the requirements of this framework.
MvvmCross principles
MvvmCross is an intention-based framework, which means that it relies on naming conventions for finding classes to instantiate etc. It is also a view model-first framework, putting the view models in the center and instantiating views from this. MvvmCross also includes it’s own IoC-container which it relies on. IoC stands for Inversion of Control and helps us create classes through a central repository, giving us less code to write and easier to exchange implementations.
Adding MvvmCross to the Portable Class Library
First, let’s install the NuGet package for MvvmCross into the Runner.Core portable class library project. Right-click on the Runner.Core Project, select Manage NuGet packages. Click Online tab and then search for MvvmCross and install the Component as shown below:
Click the Close button and examine your project. Your References now includes MVVM libraries. There is also a new ToDo-MvvmCross folder with instructions on how to port your product to MvvmCross:
If we open the _Core.txt file we can see a checklist with the following items:
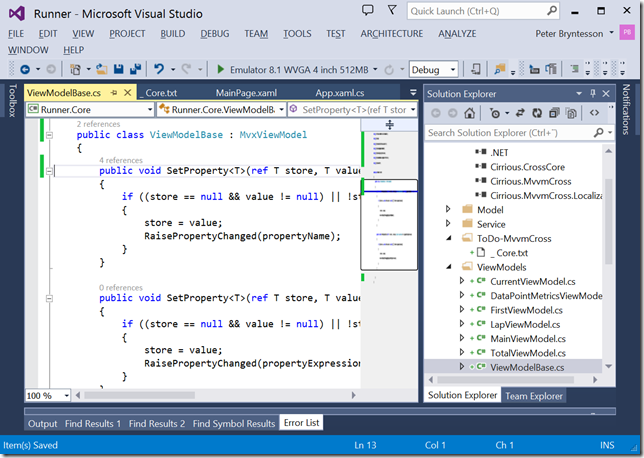
- Create a ViewModels folder and add a view model. We have already done this, although we need to modify the view model. It should derive from MvxViewModel. Since we have a ViewModelBase base class, we modify that. Open ViewModelBase.cs, change it to derive from MvxViewModel and only keep the SetProperty functions. It should look like this:
- Add an App.cs class – inside it place the code to start the app with the main view model. The file has been auto-generated, let’s just replace the name of the view model we want the app to start with. Here’s the content of App.cs:
This code will also register all our *Service.cs classes with the IoC container for automatic creation. More on this later. Now we completed the porting for our library. Let’s port the phone app as well.
Adding MvvmCross to the phone app
We need to go through a similar process here. First, let’s add the NuGet package to the Phone app as well. Right-click on the solution, select Manage NuGet packages for solution… , click Installed Packages, select MvvmCross and click manage:
Click in the checkbox next to Runner.WP as this:
If we look at the Runner.WP Project, it has added a number of references and a ToDo-MvvmCross folder here as well. The steps we need to take now are as follows:
- Add a reference to our portable class library. We already had that.
- The Setup.cs file was automatically created and we leave it as is for know.
- Change App.Xaml.cs so that it creates a 'new Setup(RootFrame)' during its constructor. I add the code the InitializePhoneApplication() function like this:
- Change App.Xaml.cs so that it intercepts the first navigation. The code should look like this:
- Add a Views folder - it must be called "Views" - and in this place a view - xaml.cs and .xaml. It must derive from MvxPhonePage. Important note. The page must also reside in the Views namespace otherwise the IoC container can’t find it. So, in the Views folder remove FirstView.xaml and move MainPage.xaml there. Then edit the MainPage.xaml and MainPage.xaml.cs to reside in the Views sub-namespace and that it derives from MvxPhonePage.
Now, we have completed the steps and when we run the application we can see that it behaves as before. Great! Are we done? No, not yet. Remember that we talked about MvvmCross being a viewmodel-first framework? This means that the view model is created first, and from the view model the correct page is created and properly setup, including setting the viewmodel as the DataContext for the page. But in MainPage.xaml.cs, we implicitly create the MainViewModel in the constructor. Let’s remove this and run again.
Now we get an exception when the view model is created. Turns out the problem is that the MainViewModel takes instances of our services in the constructor, and the IoC container doesn’t know how to create concrete instances of IPeriodicService and IPositionService. We have to provide MvvmCross with a mapping for these two interfaces. We do this in Setup.cs in the phone app like this:
We run again and now the view comes up, but the position changes doesn’t come through. Why? The reason is that now have two singletons, one explicit in App.xaml.cs and one implicit when we registered the mapping in the IoC container. We need to remove our explicit construction and reference the implicit one. In app.xaml.cs, remove all references to our service properties and replace it with the following code in InitializePhoneApplication() :
And update the code in PositionChanged event handler to look like this:
Now, run the program again and see that it works now.
Summary
Here we have shown how to add the MvvmCross framework to your existing application. We have shown some of the caveats you can run into. Now we are properly setup to write the Android version of this app. Let’s go! Blog post is here.


