Understanding Vector Graphics
During multimedia era (Windows 3.1 to Windows 95) I had conducted several talks on different elements of multimedia and vector graphics was one of them. Explanation provided below is tweaked to make sure everyone can understand easily.
What does this sample do?
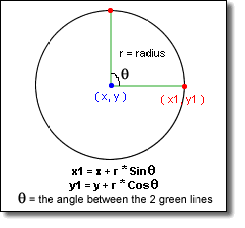
Draw a circle with 100 pixel radius with a mid-point of (200,200)
Non-vector graphics scenario
So in the case of bitmap graphics (bmp/jpg etc) you draw the circle and then save the entire square area pixel-by-pixel (I'm leaving out compression related differences to not make this sample complicated) inside the file. When you zoom the image since it's increasing pixel resolution, so you see the clarity going from good => bad => worse.
Vector Graphics scenario
In the case of Vector graphics, you save (usually) formula and values required for implementing the formula. In our sample
Formula
x1 = x + r * Sin (angle)
y1 = y + r * Cos (angle)
1: //Sample code snippet
2: int centerX = 200;
3: int centerY = 200;
4: int radius = 100;
5:
6: for (int i=0; i< 360;i++) //move point from 0 to 360 degree
7: {
8: int x1 = centerX + radius * sin(i);
9: int y1 = centerY + radius * cos(i);
10:
11: DrawPixel(x1,y1); //drawing pixel on the screen
12: }
So going to XAML and lets see how we can implement this simple sample
This sample rotates a red circle around a circular path defined by "p_rot"
1: <Canvas xmlns="https://schemas.microsoft.com/client/2007"
2: xmlns:x="https://schemas.microsoft.com/winfx/2006/xaml">
3: <Canvas.Triggers>
4: <EventTrigger RoutedEvent="Canvas.Loaded">
5: <EventTrigger.Actions>
6: <BeginStoryboard>
7: <Storyboard BeginTime="0" Duration="Forever">
8: <DoubleAnimation Storyboard.TargetName="p_rot" Storyboard.TargetProperty="Angle" From="0" To="360"
9: BeginTime="0:0:0" Duration="0:0:5" RepeatBehavior="Forever"/>
10: </Storyboard>
11: </BeginStoryboard>
12: </EventTrigger.Actions>
13: </EventTrigger>
14: </Canvas.Triggers>
15: <Canvas>
16: <UIElement.RenderTransform>
17: <TransformGroup>
18: <TransformGroup.Children>
19: <RotateTransform x:Name="p_rot" CenterX="200" CenterY="200" Angle="0"/>
20: </TransformGroup.Children>
21: </TransformGroup>
22: </UIElement.RenderTransform>
23: <Ellipse Canvas.Top="50" Canvas.Left="100" Fill="Red" Width="50" Height="50"/>
24: </Canvas>
25: </Canvas>
You can download the sample in Flash and WPF/E from the following URL
https://www.awesomeideas.net/community/Download/tabid/54/Default.aspx
