Setup Claims using AspNetSqlMembershipProvider
Setting up claims using AspNetSqlMembershipProvider is very similar to this walk-through. However, the provider information would be different and we’ll need to add an additional connection string element to specify the SQL Server and the database that will be providing us with users and roles.
First, we’ll have to setup our user/role repository. For this we can use a tool called “aspnet_regsql” provided by the framework. This tool can be found in the path: C:\Windows\Microsoft.NET\Framework\v2.0.50727 on the server. Below are the steps we need to perform:

Hit Next in the initial screen shown in Image1.

Hit Next in the next screen shown in Image2.

In the next screen shown in Image3, we can verify the server name and provide a custom name for the database that will be created. If no name is specified for the database, the default name “aspnetdb” will be used. We can also run this tool remotely to create this database on a SQL Server. Once we set the values in the screen shown in Image3 per our needs, we hit Next.

Hit Next in the summary screen shown in Image4. After a few quick seconds, we’ll be shown a screen as shown in Image5. Hit Finish to complete creating of the database.

The next step is to add a few users and roles to our database repository. One of the best ways to do this is to use ASP.NET Configuration tool that is provided with Visual Studio. Open up Visual Studio, choose File > New > Web Site. Select ASP.NET Web Site as the template. Provide a name (e.g., SqlMembershipProvider). Now, our New Web Site dialog should look like Image6.

Hit Ok. Open the web.config file and we’ll need to add a <connectionString /> entry within the <configuration><connectionStrings></connectionStrings></configuration> section. Below is a sample connection string.
 <connectionStrings>
     <clear/>
     <add name="LocalSqlServer"
          connectionString="server=spdemo2;database=aspnetdb;Trusted_Connection=true;"/>
   </connectionStrings>
After this, we’ll launch the ASP.NET Configuration tool, by selecting Website from the menu option and choosing ASP.NET Configuration. This will launch the ASP.NET Web Site Administration Tool in an IE window as shown in Image7.

Click Security link and from the next screen select “Select authentication type” link as shown in Image8.

From the next screen, choose “From the internet” radio button as shown in Image9.

And choose “Done”. If all is well, we’ll be redirected to the “Security” tab with “Create User” and “Manage users” options enabled (as shown in Image10) in this tool.

Click the “Create user” link to create an admin user as shown in Image11.

Hit “Create User” button to create this user. Add 5 more users for our test. The users are: backupadmin; user1; user2; user3; user4. We’ll need to create them the same way as we created our administrator user. After this, we can enable roles and assign users to specific roles. We’ll go back to the security tab in the web site administration tool and hit “Enable roles” as shown in Image12.

After roles are enabled, we can click “Create or Manage roles” link (shown in Image13) to create our roles and add our users to specific roles.

Let’s first add an “Administrators” role as shown in Image14. And hit “Add Role”.

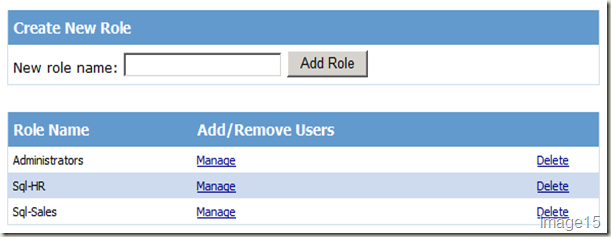
Our administrators role is created now. Let’s also add 2 more roles: Sql-HR and Sql-Sales. The “Create New Role” screen should now look like what’s shown in Image15.
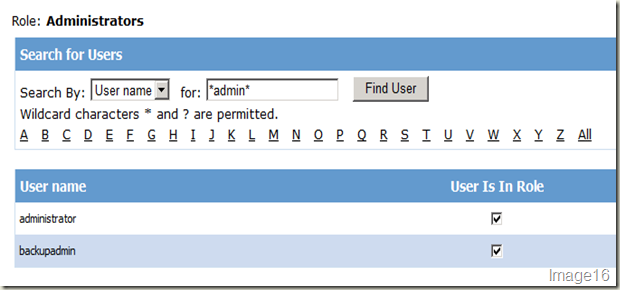
Hit the “Manage” link against Administrators role. And let’s search for the 2 admin users we created by using the search control and hitting the “Find User” button. We’ll then see the admin users we created. Just put a check mark against both our users in the “User Is In Role” column and we are done. The result should look like what’s shown in Image16.
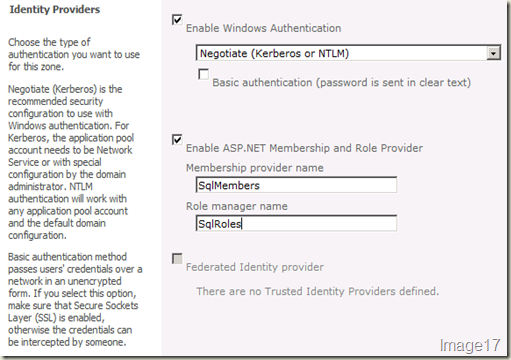
Let’s assign the other 4 users to specific groups. User1, User3 goes to Sql-HR group we created and User2, User4 goes to Sql-Sales group. Now, we are good with our users/roles store. Let’s now get claims configured in our SharePoint 2010 site. First let’s create a web application by setting claims based authentication as its authentication mechanism. For step by step walk-through on this, refer this post. In the “Identity Providers” section, we’ll also need to check the “Enable ASP.NET Membership and Role Provider” check box and provide the name of our membership and role provider. In this case, we’ll use SqlMembers as our membership provider and SqlRoles as our role provider. Refer Image17.
Hit Ok to create our web application. After our web application is created, we’ll need to get our membership and role provider entries into the web.config files of Central Administration site, our web application and STS Application. We’ll also need to add our <connectionString></connectionString> entry in these web.config files. Below is how our membership and role provider entries will look like.
 <membership defaultProvider="SqlMembers">
   <providers>
     <add connectionStringName="SqlConn"
          applicationName="/"
          name="SqlMembers"
          type="System.Web.Security.SqlMembershipProvider, System.Web, Version=2.0.3600.0, Culture=neutral, PublicKeyToken=b03f5f7f11d50a3a" />
   </providers>
 </membership>
 <roleManager enabled="true" defaultProvider="SqlRoles">
   <providers>
     <add connectionStringName="SqlConn"
          applicationName="/"
          name="SqlRoles"
          type="System.Web.Security.SqlRoleProvider, System.Web, Version=2.0.3600.0, Culture=neutral, PublicKeyToken=b03f5f7f11d50a3a"/>
   </providers>
 </roleManager>
And our connectionString will look like.
 <connectionStrings>
   <add name="SqlConn" connectionString="server=spdevmoss;database=aspnetdb;Trusted_Connection=true" />
 </connectionStrings>
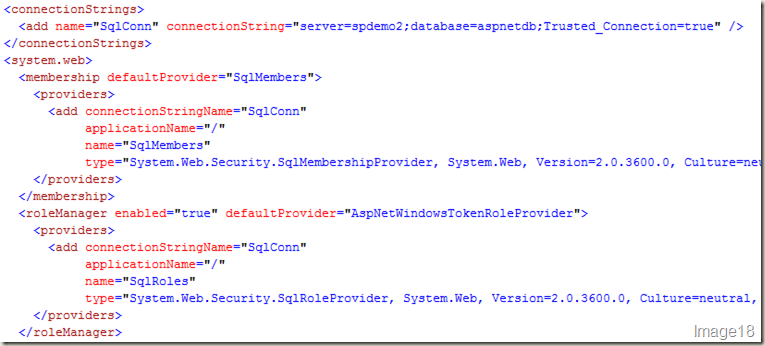
Let’s first add these to the web.config file of our Central Administration site. There’s one important thing to remember when adding the <roleManager> element to the CA’s web.config file. And that is, the default role provider should be “AspNetWindowsTokenRoleProvider”. Also, we must be careful that the <connectionStrings /> element is declared outside of <system.web></system.web> and the membership and role provider declarations are inside of <system.web></system.web> element. After the entries are made in CA’s web.config file, it should resemble Image18.
Additionally, we can also add our membership provider to the <PeoplePickerWildcards> element to make our user repository also searchable. Image19 shows this entry in CA’s web.config file.

Now, let’s get this entry into our web application’s web.config file. Image20 shows the web.config file of our web application after the entries are done. Also, add our membership provider to the <PeoplePickerWildcards/> element in this web.config file. The best way to add this entry is to open the web.config file and search for “<membership”. We’ll see that there’s already a <roleManager/> & <membership/> elements defined. We’ll simply need to “add” our membership and role provider entries. Not to forget, we’ll also need to add our <connectionStrings/> entry as shown in Image20.1.
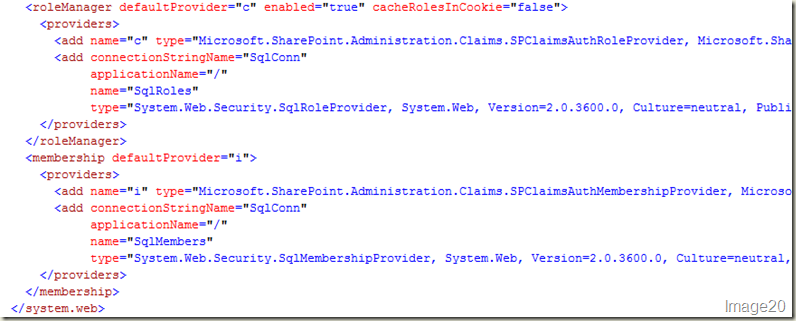

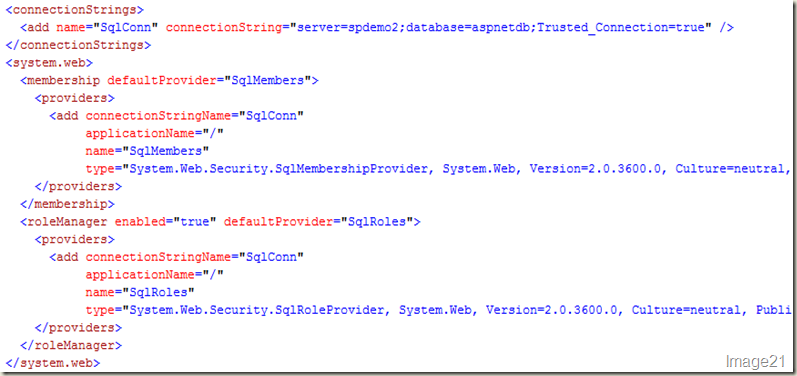
The next thing we need to do is to get our membership/role provider entries and <connectionString/> element into the web.config file of the STS Application. This web.config file should be located at: C:\Program Files\Common Files\Microsoft Shared\Web Server Extensions\14\WebServices\SecurityToken – on the SharePoint 2010 server. There might not be a <system.web> element in this web.config file if we are adding our providers the first time. So, we’ll need to create a <system.web></system.web> element and enter our provider details in it. We also need to add our <connectionString/> information in this web.config file. Image21 shows this web.config file after the entries are complete.
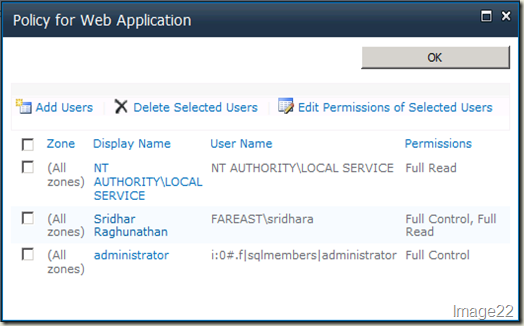
Now, all our components has information about our membership/role providers. We can now do an IISRESET just to be on a safer side. Let’s now add an administrator from our provider to the user policy of our web application with full control. To do this, go to Central Administration site > Manage web applications > select the claims authentication enabled web application > select “User Policy” from the ribbon > click “Add Users” from the “Policy for Web Application” dialog > hit Next > type in the name of our admin user “administrator” (without the quotes) in the “Choose Users” people picker control > use the “Check Names” icon to see if the SQL Membership user gets resolved. If all is well, it should. We can add this user with full control and hit Finish. Now, our “Policy for Web Application” dialog should looks like Image22. Notice, our sqlmembers:administrator user shown in claims format.
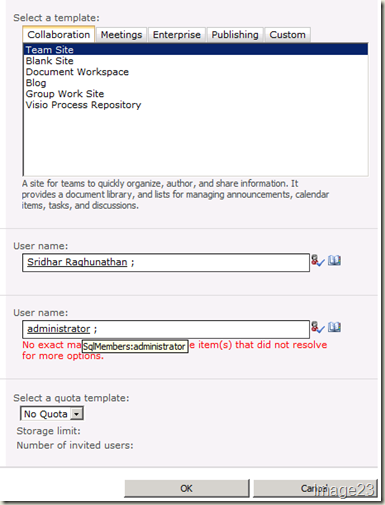
We will now create a site collection on this web application. Go to Central Administration site > Create site collections (under Application Management) > ensure the web application with claims authentication enabled is selected in the web application drop-down. Provide a title and description for the site collection, select a template, specify a normal Windows user as primary site collection administrator and for the secondary site collection administration, specify our administrator user from SqlMembers provider. Note that when we hover over the “administrator” user shown in Image23, we can see that it’s from our membership provider.
Hit Ok to create our site collection. Once our site collection is created, browse to it to see the familiar “Sign In” page allowing us to choose Windows or Forms Authentication.
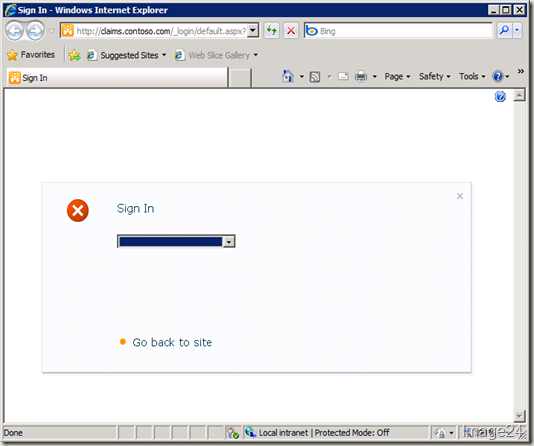
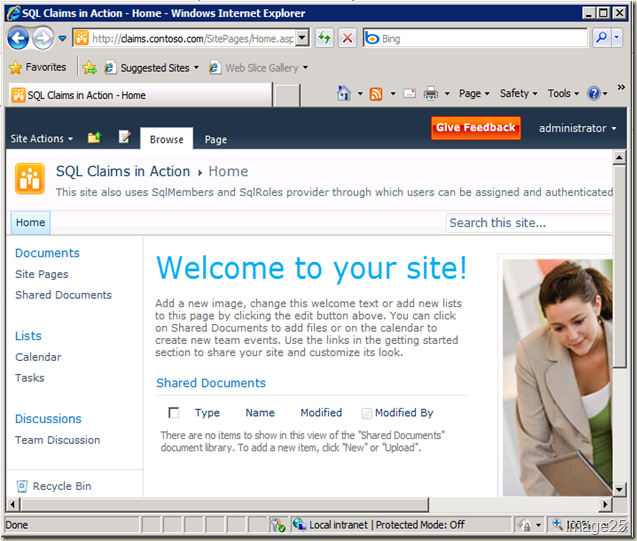
Choose “Forms Authentication” provide the administrator user and its password and login to the site.
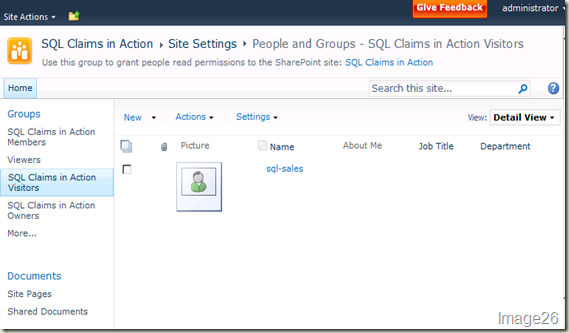
Now, we can add our roles with specific permissions to our site collection. Let’s add our “sql-hr” role to the members group of this site collection and our “sql-sales” role to the visitors group (shown in Image26).
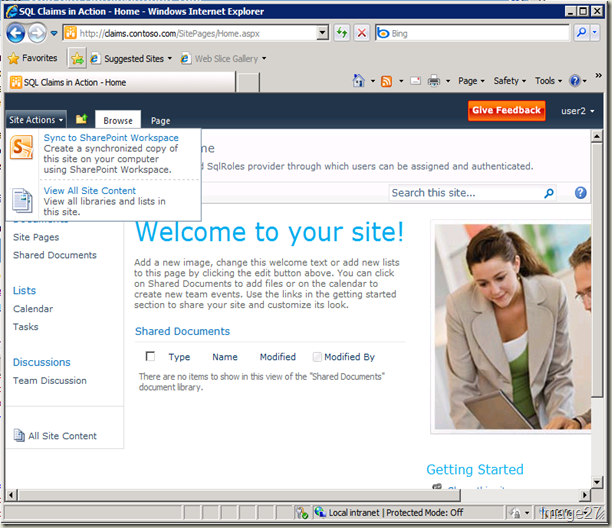
Let’s try browsing to this site using “User2” – recall that this user is added to “sql-sales” group. We should now be able to login to the site using “User2” that will have visitor permissions on our site.
Hope this post gives you an end-to-end scenario on how to configure AspNetSqlMembershipProvider to work with the new claims authentication.
Comments
Anonymous
January 19, 2010
I found it easier to use IIS 7 management console to add the connection string and provider info for each site? IIS Manager >> Site Settings >> Providers >> http://blog.sharepointengine.com/2009/01/iis-70-cannot-get-membership-provider.html May not be the case for you though.Anonymous
January 27, 2010
Great posts Sridhar...waiting for the new arrivals :)Anonymous
February 12, 2010
Excelente Post pero que pasa con "My Profile" NO funciona. Esto parece suceder porque mi aplicacion web esta sobre el puerto xxxx y "My Profile" sobre el 80. Entonces tambien es necesario configurar Claims sobre el puerto 80??Anonymous
June 17, 2010
hi... i successfully setup fba in sharepoint 2010 using claim.. in my web app, i got asp login, change password, and password recovery.... all these control seem not working iin sp2010 using claim based... is there some extra configuration that i must make to ensure this control work properly??? thanks...Anonymous
July 01, 2010
I'm stuck between Images 21 and 22. I cannot get the people picker to validate the users that we added. (Administrator, backupadmin or User1 through User4.) I've triple-checked the Web.Config entries. And I've validated that the users exist in my database table([dbo].[aspnet_Users]). Any suggestions?Anonymous
July 12, 2010
hi how can we create new users manage roles for the above said documents.. we have created a login and manage roles pages.. now that is in under layouts hive14, i can login thru both authentication mode but i am not able to create new pages n all. i think we need to override the web config while while adding users and managing roles.. how can we do that??Anonymous
August 28, 2010
Very comprehensive tutorial on how to set this up. Bravo!Anonymous
September 26, 2010
Iam getting this error please help me out. The server was unable to process the request due to an internal error. For more information about the error, either turn on IncludeExceptionDetailInFaults (either from ServiceBehaviorAttribute or from the <serviceDebug> configuration behavior) on the server in order to send the exception information back to the client, or turn on tracing as per the Microsoft .NET Framework 3.0 SDK documentation and inspect the server trace logs.Anonymous
October 11, 2010
A nice guide for setting FBA in 2010....very well written !Anonymous
October 31, 2010
hi sridhar i tried your steps but ia m not able to view my sqlmebership providr and my usernames in the aspnetdb are not resolved in the peopepicker. can you pls tell why i am not getting those usernames in the poepelpicker ? pls help. i have used membershipseeder tool to enter roles/users .my wesiter admin tool is not working.Anonymous
April 01, 2011
If users are not showing up in people picker, make sure that your web application pool account has access to the sql table containing the users.Anonymous
June 06, 2014
These configuration did not work. People picker did not find FBA Users. Using farm account for all App Pools is a DBOwner to aspnetdb. Also login failed.Anonymous
June 07, 2015
Thanks for sharing. Tested on SharePoint 2013, article still good.