Azure Learning #1 Connectivity errors from External Network to Azure database
This blogs aims at troubleshooting connectivity errors observed when trying to connect via SSMS or other client drivers from your corporate network or public network to azure database. You may find similar blogs however this blogs collates all the information available for such issues. We as engineers often come across scenarios where customer's have tried to troubleshoot a few scenarios and were successful in resolving the errors but there is an ambiguity in understanding the cause. The sole purpose of this article is to provide better understanding co-relating the root cause direct at pre-requites when connecting to Azure database.
Pre-requisites for connecting to Azure databases.
- Dedicated IP address -> By default Azure SQL server is designed to prevent any connections until you specify which IP address has permission to connect. The firewall grants access to databases based on the originating IP address of each computer/resource.
- Outgoing TCP 1433 enabled -> On the computer that hosts your client program, ensure the firewall allows outgoing TCP communication on port 1433.
Possible causes of connection failures to Azure Database.
- IP address blocked by Azure Firewall
- Outbound connections blocked from client machine
- Network reconfiguration on the client side: for example, a new IP address or a proxy server.
- Bad connection string (username and/or password and/or server-name)
- Faulty drivers or providers
Note: Driver is a program installed on a workstation or a server; it allows programs to interact with a Database Management System (DBMS). Such as, JDBC driver provides database connectivity through the standard JDBC application program interface (APIs) available in J2EE.
A data provider is a set of libraries that is used to communicate with data source. Such as, SQL data provider for SQL, Oracle data provider for Oracle, OLE DB data provider for access, excel and MySQL. It serves as a bridge between an application and a data source and is used to retrieve data from a data source and to reconcile changes to that data back to the data source.
Identifying the cause of failure
Outbound traffic not allowed from client to access Azure database
Test 1: ping <servername>.database.windows.net

In the above example server-name australiaeast1-a.control.database.windows.net resolves to IP address [191.238.66.109]. Thus if there is a problem with the ISP or internal network the name will not resolve.
Test 2 : tracert <servername>.database.windows.net
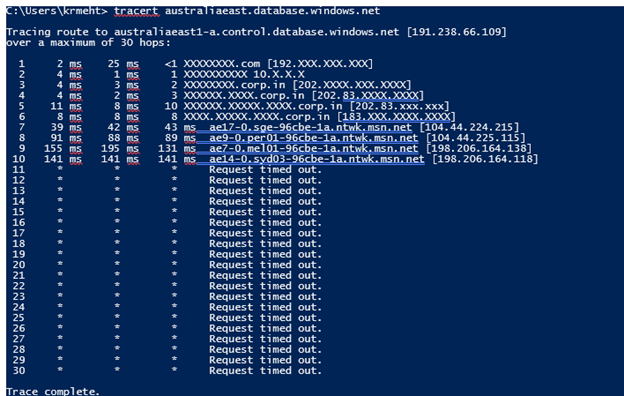
Tracert is used to track the number of hops and IP address at which the packet drop.
In the above example at HOP-7 we get the location ae17-0.sge-96cbe-1a.ntwk.msn.net [104.44.224.215]. The IP address will be within the range of Windows Azure Datacenter IP Ranges list. Location xxxxxx.ntwk.msn.net indicates that the connection was not dropped internally and reached Azure cloud. However should the underlying cause be internal network related your request would not reach the location xxxxx.ntwk.msn.net
Frequent error message due to this cause:
A network-related or instance-specific error occurred while establishing a connection to SQL Server. The server was not found or was not accessible. Verify that the instance name is correct and that SQL Server is configured to allow remote connections. (provider: TCP Provider, error: 0 - Access is denied.) (Microsoft SQL Server, Error: 5)
Outbound TCP traffic blocked on port 1433
Should the above test succeed and you still are not able to connect to the Azure database you need to test the TCP port 1433.
Test 3:Telnet <servername>.database.windows.net 1433
If telnet is not enabled you will get the below error

Enable telnet client from your host machine
- Click Start > Control Panel.
- Click Programs and Features.
- Click Turn Windows features on or off.
- In the Windows Features dialog box, check the Telnet Client check box.
- Click OK. The system installs the appropriate files. This will take a few seconds to a minute.
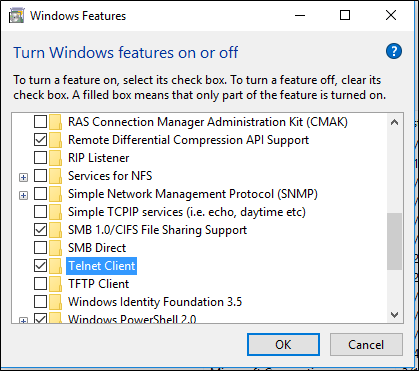
One enabled fire the below command

Should the entry be successful you will get the below message
Connecting To australiaeast.database.windows.net...
Followed by a blank screen

Problem with the provider
Test 4: Test UDL Connection
- Create a file TestConn.udl on your desktop. Once created it shows up in the below icon form.

(Note: Should you not get the above icon change your folder options as follows
Click Start > Control Panel -> File Explorer Options
View Tab -> Uncheck "Hide extensions for know file types" options -> OK)
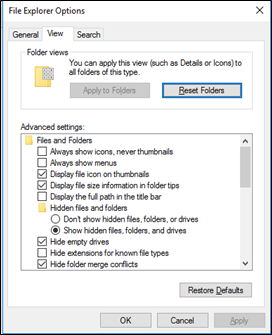
- One the file is created and you double click you will be taken to "Connection" tab.
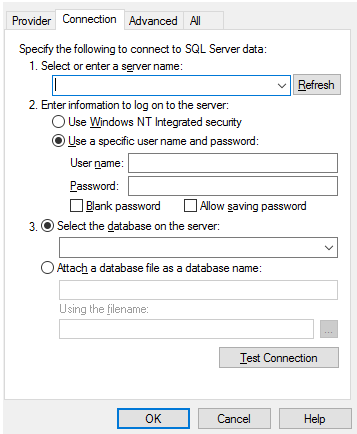
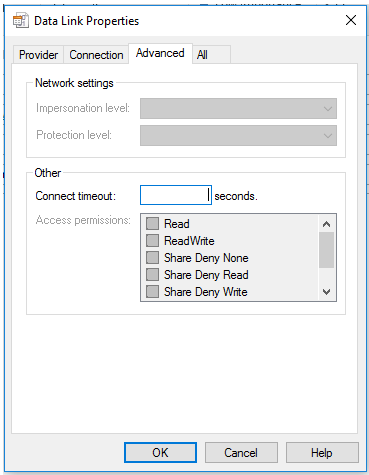
- Ensure the Timeout is 30 seconds under Advanced Tab.
- Test the connection under Connection Tab