More on layout and the LayoutInformation APIs
As I was digging around in an old spec, I came across some very enlightening drawings which I pushed through art review and I will now share with you. Ashish wrote a nice post on the layout and rendering engines which might help you understand what's happening when you put something in a panel. This is particularly useful if you are trying to do a complex layout. Also, as a side note, I really recommend putting background colors on your element or using borders when you are first trying to get something to layout properly. It can really help you figure out what is going on.
As I was going through my list of APIs to document, I stumbled onto the LayoutInformation class. In it are three methods, two of which I found especially interesting (GetLayoutSlot and GetLayoutClip). The other one (GetLayoutExceptionElement) I'm sure would be interesting if you were getting an exception during layout. But happily I have not run across that issue.
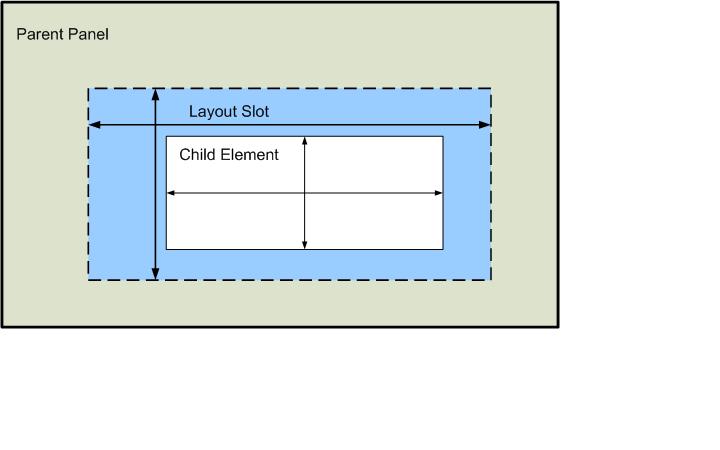
As I discussed in my previous post Creating a Custom Panel, a lot of the layout process is really about positioning the bounding box (or layout slot) that surrounds each element. If you have trouble visualizing this, you are going to love these pictures. GetLayoutSlot returns the rectangle that is your bounding box. The element that is inside the layout slot can be bigger or smaller. If its smaller, then it is positioned inside the layout slot based on it's alignment properties like so:

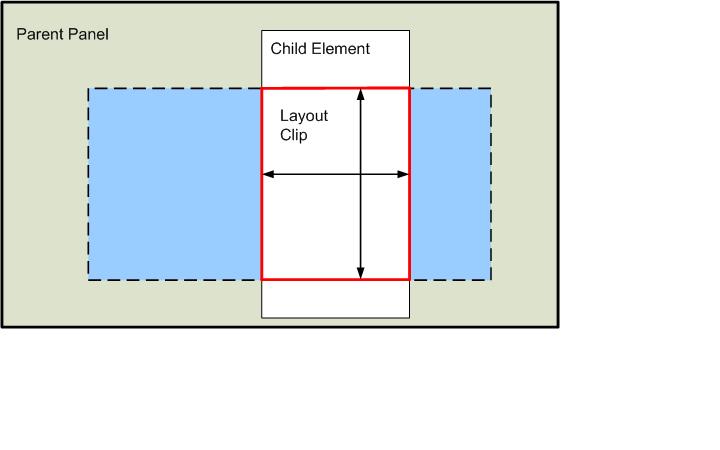
If the element is bigger than its layout slot, then it will be clipped and only the area which is inside of the layout slot will be displayed.

This visible region (outlined in red) is what GetLayoutClip returns to you. The size of the layout slot can change as elements are added or removed from the parent container. Basically every time the layout engine is called, there is a chance for the layout slot to change.
Here's some code that calls GetLayoutSlot and draws the returned rectangle. First the XAML:
<Grid x:Name="LayoutRoot" Background="White">
<Grid.RowDefinitions>
<RowDefinition/>
<RowDefinition/>
</Grid.RowDefinitions>
<StackPanel x:Name="sp1" Grid.Row="0" Background="AliceBlue" Height="100" Width="200"
HorizontalAlignment="Left" VerticalAlignment="Top" >
<Rectangle x:Name="rect1" Fill="Blue" Width="100" Height="50" ></Rectangle>
</StackPanel>
<Button Content="Get Layout Slot" Grid.Row="1" Width="150" Height="50"
Click="Button_Click" HorizontalAlignment="Left"/>
</Grid>
And here's the click event handler:
private void Button_Click(object sender, RoutedEventArgs e)
{
//Get Layout Slot of Rectangle
Rect r1 = LayoutInformation.GetLayoutSlot(rect1);
RectangleGeometry rg1 = new RectangleGeometry();
rg1.Rect = r1;
Path mypath = new Path();
mypath.Data = rg1;
mypath.Stroke = new SolidColorBrush(Colors.Black);
mypath.StrokeThickness = 5;
LayoutRoot.Children.Add(mypath);
//Get Layout Slot of StackPanel
Rect r2 = LayoutInformation.GetLayoutSlot(sp1);
RectangleGeometry rg2 = new RectangleGeometry();
rg2.Rect = r2;
Path spSlotPath = new Path();
spSlotPath.Data = rg2;
spSlotPath.Stroke = new SolidColorBrush(Colors.Red);
spSlotPath.StrokeThickness = 3;
LayoutRoot.Children.Add(spSlotPath);
}
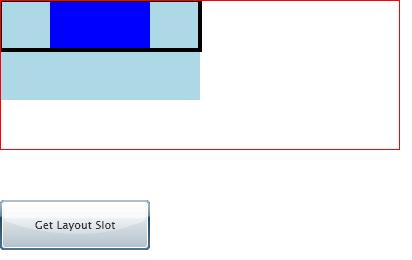
And here's what it looks like after you run it and click the button:

You can see the Rectangle in dark blue and it's layout slot is outlined in black. The StackPanel is in light blue. I highlighted it's layout slot in red so that you could see that even though the StackPanel only requested 200x100 in area, the parent Grid actually gave it a much larger slot.
Margaret
Comments
Anonymous
May 06, 2008
PingBack from http://blogs.msdn.com/silverlight_sdk/archive/2008/05/06/more-on-layout-and-the-layoutinformation-apis.aspxAnonymous
May 08, 2008
As I was digging around in an old spec, I came