InfoPath Forms submission to a SharePoint library – Part 1
Hi, Aravindhan Rajagopal here. I am a developer on the Information Security Tools team.
In this blog, I will explain InfoPath form submission to SharePoint methods and some work-arounds for a specific scenarios explained below. I will begin with a sample InfoPath form creation, web service creation for one of the data submission methods and finally discus how to publish this form (template) to a SharePoint library and get users to submit them.
Recently I worked on a request to automate the customer engagement process in our team. The workflow we had was quite simple. We had a SharePoint team site which would list all the services that our team renders and the customers would have an option to request for either of the services. Our Engagement forms were implemented using InfoPath forms so as to make it editable and deployable with minimal effort. So whenever the customer fills up the engagement request and submits, we planned to have the following done.
- Log the request in the team tracker and assign a unique number to it.
- Send email to PMs in the team about the new request, tracking number and its type (among 3 types).
- Send acknowledgement mail to the customer along with the tracking number.
As you might be aware, there are many ways to submit an InfoPath form:
- SharePoint Library
- Web service
- Web server (HTTP)
- Hosting environment
- Connection from a data connection library
So considering our case, we had the options of email, SharePoint library and web service. We may use either or all of them to match our specified scenario.
Since we had hosted the information on intranet SharePoint sites, we did not want to put custom written code (dlls in public gac) on the SharePoint servers. In other words, we did not want to put custom code in servers when its just going to serve one or few SharePoint sites alone.
So we planned to use the method of web service so that we just need to call the service method on form submission and our automation needs would be taken care off in the web service code.
InfoPath Submit Options:
We used the Email functionality (one of the submit options) to send an email with the InfoPath form as an attachment to an alias in our team. This email functionality is just to ensure that the forms submitted by the customers reaches us even in case of the web service outages in the future. In those situations, we just need to pick up the request forms from the mailbox of our team alias.
Apart from this email submit option (optional & just for backup), we need to set up the form submission to call a web service method. So we need to do set the following in our InfoPath forms.
| Please Note: We are submitting to more than one destinations and hence we use the “Custom action using Rules” option |
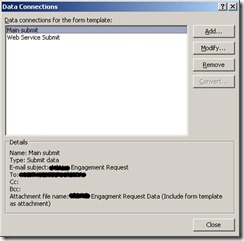
Click on Manage and add the data connections. One for the email submit and one for the web service submit as shown below.
Configure the email submit – data connection
Configure the web service submit – data connection
| Please Note: We would go through the web service creation in a separate section later |
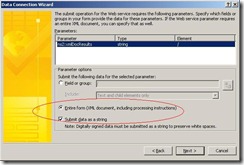
In the case of web service submit, we had set the following in order to obtain the entire content of the InfoPath form as a string. Based on your need, you might even select specific field or group to be sent to the web service as well.
I would continue with the web service creation in my next blog.


