How to create a Dashboard UI add-in
[This post comes to us courtesy of Rui Ling and Yang Cao from Sustained Engineering]
The Windows Server Essentials Dashboard nowadays supports many UI extensions. In Update Rollup 1 for Windows Server 2012 Essentials, Essentials provides an important update for the Hosted Email Add-In Framework, which is used not only for email integration, but also for extending the user management UI in the Dashboard. Value-added solution providers or system integrators can leverage the add-in framework to build Dashboard extensions as part of their total solutions.
By following the steps in this post, you can add a new tab on the Windows Server 2012 Essentials Dashboard. On this tab, you can display information about your own value-add services (such as email, backup, or monitoring). You can also add a new page into the Add a User Wizard so that you can integrate your service configuration with the new user creation flow.
This article is inspired by our partner Cbeyond® (https://cbeyond.com/). From Microsoft PinPoint, you can find other add-ins developed by our partner. It is highly recommended that you take some time to go through Dashboard features or install some add-ins before completing the following steps. You can also review the Hosted Email Add-in Framework as a reference for the UI add-in development.
- Set up the environment: Install Visual Studio on your development system.
- Create add-ins: We will create a sample project first and then introduce how to create the following two types of UI add-ins:
- A new tab on the Dashboard
- A page to add to the wizards of the user management UI on the Dashboard
1.1 Open Visual Studio and create a Class Library project targeting at least .NET Framework 4.0
This article will use the Visual Studio Class Library project as an example to show every part of a UI add-in. Another option is to download the Windows Server 2012 Essentials SDK and create the project against the Essentials template.
Add all the references assemblies you need to the project. Normally for a UI add-in, you need to add the following assemblies:
- AdminCommon
- Microsoft.windowsserversolutions.administration.objectmodel
You can find these assemblies in the install path (%ProgramFiles%\Windows Server\Bin) or GAC from your server running Windows Server 2012 Essentials (or Windows Server 2012 R2 Essentials). You can copy all the binaries you need from the server to your DEV box to compile the project. It is also recommended that you compile the project directly on your server.
Note: Visual Studio will automatically create a Class1.cs in the project. Because we won’t use it for this example, you can remove this class.
2.1 Create a new tab on the Dashboard
Please follow these steps to add a top-level tab to the Dashboard.
2.1.1 Create a user control, MyTabUserControl, and add a label with some text “label in MyTab”
2.1.2 Create the Adorner class MyTabAdorner, and make sure that it inherits from Microsoft.WindowsServerSolution.Administration.ObjectModel.Page
a. In the constructor of this class, you must pass a unique GUID, display name, and description to the base class.
b. You must override the function CreateContent and return your own user control MyTabUserControl.
c. When creating the PageContent, you may create a TaskCollection and implement some global tasks if needed. We will create one task named “MyTask” and will pop up a message box.
d. You can also override other functions to show more information on the tab. For more details, see the SDK doc.
 using Microsoft.WindowsServerSolutions.Administration.ObjectModel;

 namespace SampleClassLibrary.Tab
 {
     public class MyTabAdorner : Page
     {
         public MyTabAdorner()
             : base(new Guid("{B8813153-4DC6-429C-A912-6362E6D9A10F}"),
             "DisplayName for MyTab",
             "Description for MyTab")
         {
         }

         protected override PageContent CreateContent()
         {
             TaskCollection tasks = new TaskCollection();
             tasks.Add(new SyncUiTask("MyTask",
                 new SyncAction(() =>
                 {
                     System.Windows.Forms.MessageBox.Show("Test Task");
                     return null;

                 }), false));

             return PageContent.Create((obj, component) => new MyTabUserControl(), tasks, null);
         }
     }
 }
2.1.3 Create the provider class MyTabProvider, and make sure that it inherits from Microsoft.WindowsServerSolution.Administration.ObjectModel.PageProvider
a. In the constructor of this class, you must pass a unique GUID, display name, and description to the base class.
b. You also need to override the function CreatePages and return your own adorner page MyTabAdorner.
c. You can also override other functions to show more information on the tab. For more details, see the SDK doc.
 using Microsoft.WindowsServerSolutions.Administration.ObjectModel;

 namespace SampleClassLibrary.Tab
 {
     public class MyTabProvider : PageProvider
     {
         public MyTabProvider()
             : base(new Guid("{8A0338F4-C88D-4EF3-8A3E-3BBB0922B575}"),
                    "DisplayName for MyTabProvider",
                    "Description for MyTabProvider")
         {
         }

         protected override object CreatePages()
         {
             return (new object[] { new MyTabAdorner() });
         }
     }
 }
2.1.4 Create an add-in configure file called MyTabConf.addin
a. Set the property “Copy to Output Directory” to “Copy always” because we want to deploy this file to the Windows Server Essentials server.
b. The basedir should be the path where you deploy your add-in assembly to the Essentials server.
c. The type should be the full type string of your provider class and should be case-sensitive.
 <addin name="MyTab Addin" basedir="E:\Sample"
       type="SampleClassLibrary.Tab.MyTabProvider, SampleClassLibrary" />
After completing these steps, your SampleClassLibrary will look like this screenshot.
Now you can build your project and deploy the add-in to the Essentials server (see the deploy section). In this section, we want to add a top-level tab to the Dashboard, so we deploy the add-in file to “ %ProgramFiles%\Windows Server\Bin\Addins\Primary\MyTabConf.addin”.
After launching/restarting your Dashboard, you will see this screenshot.
2.2 Insert a new page to the Dashboard User Management wizards and retrieve data from PropertyBag
2.2.1 Create a user control, MyPageUserControl, and add a button with some text “button in MyPage”
a. Double-click the button in the VS designer; VS will automatically generate the button click handler. Add some code to this handler:
 if (null == FormPropertyBag)
             {
                 MessageBox.Show("You need to set the FormPropertyBag");
             }
             else
             {
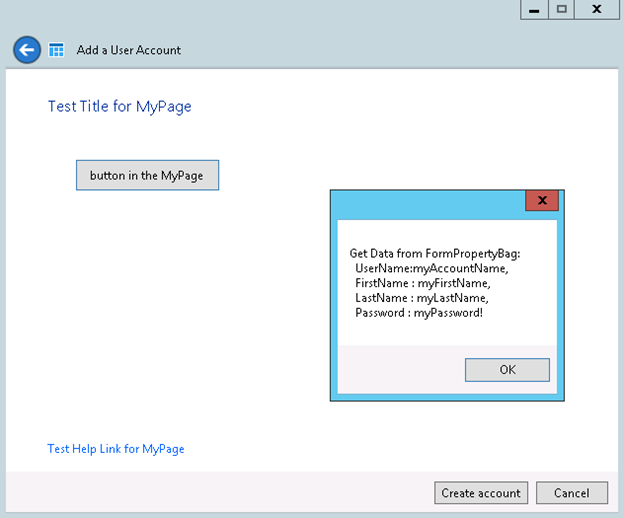
                 MessageBox.Show(string.Format("Get Data from FormPropertyBag:\r\n  UserName : {0},\r\n  FirstName : {1},\r\n  LastName : {2},\r\n  Password : {3}",
                     FormPropertyBag.UserName,
                     FormPropertyBag.FirstName,
                     FormPropertyBag.LastName,
                     FormPropertyBag.Password));
             }
b. Add the namespace
using Microsoft.WindowsServerSolutions.Administration.ObjectModel.Adorners;
and one property to MyPageUserControl.cs:
public FormPropertyBag FormPropertyBag { get; set; }
2.2.2 Create the provider class MyPageContent, and make sure that it inherits from Microsoft.WindowsServerSolution.Administration.ObjectModel.Adorner.AddinPageContent
a. In the constructor of this class, you need to add Microsoft.WindowsServerSolution.Administration.ObjectModel.Adorner.FormPropertyBag as the parameter and pass it to its base class.
b. You need to override the function CreateControl and return your own control MyPageUserControl.
c. You also need to override the event handler PropertyChanged.
d. You can override other functions or events to customize the behavior of this class. For more details, see the SDK doc.
 using Microsoft.WindowsServerSolutions.Administration.ObjectModel.Adorners;

 namespace SampleClassLibrary.Wizard
 {
     public class MyPageContent : AddinPageContent
     {
         public MyPageContent(FormPropertyBag bag)
             : base(bag)
         {
         }

         public override Control CreateControl()
         {
             return new MyPageUserControl() { FormPropertyBag = this.PropertyBag };
         }

         public override event EventHandler PropertyChanged;
     }
 }
2.2.3 Create the Adorner class MyPageAdorner, and make sure that it inherits from Microsoft.WindowsServerSolutions.Administration.ObjectModel.Adorners.FormContentAdorner
a. In the constructor of this class, you need to pass a unique GUID, display name, and description to the base class.
b. You need to override the function CreatePages and return MyPageContent created in the last step.
c. You can also override other functions to show more information on the tab. For more details, see the SDK doc.
 using Microsoft.WindowsServerSolutions.Administration.ObjectModel.Adorners;

 namespace SampleClassLibrary.Wizard
 {
     public class MyPageAdorner : FormContentAdorner
     {
         public MyPageAdorner()
             : base(new Guid("E2B29E47-CD46-4B11-8AB1-B1384E917A0C"),
             "DisplayName for MyPage",
             "Description for MyPage"
             )
         {
         }

         public override ICollection<AddinPageContent> CreatePages(FormPropertyBag propertyBag)
         {
             List<AddinPageContent> list = new List<AddinPageContent>();

             list.Add(new MyPageContent(propertyBag) {
                 Title = "Test Title for MyPage",
                 HelpLink = new Uri("https://www.contoso.com"),
                 HelpLinkText = "Test Help Link for MyPage",
             });

             return list;
         }

         public override ICollection<System.Threading.Tasks.Task> CreatePostExecutionTasks(FormPropertyBag propertyBag)
         {
             List<System.Threading.Tasks.Task> list = new List<System.Threading.Tasks.Task>();

             list.Add(new System.Threading.Tasks.Task(()
                 =>
                 {
                     // do something in the task
                 }
             ));

             return list;
         }

         public override ICollection<System.Threading.Tasks.Task> CreatePreExecutionTasks(FormPropertyBag propertyBag)
         {
             List<System.Threading.Tasks.Task> list = new List<System.Threading.Tasks.Task>();

             list.Add(new System.Threading.Tasks.Task(()
                 =>
                 {
                     // do something in the task
                 }
             ));

             return list;
         }
     }
 }
2.2.4 Create an add-in configure file MyPageConf.addin
a. Set the property “Copy to Output Directory” to “Copy always” because we want to deploy this file to the Windows Server Essentials server.
b. The basedir should be the path where you deploy your add-in assembly to the Essentials server.
c. The type should be the full type string of your provider class and should be case-sensitive.
 <addin name="MyPage Addin" basedir="E:\Sample"
       type="SampleClassLibrary.Wizard.MyPageAdorner, SampleClassLibrary" />
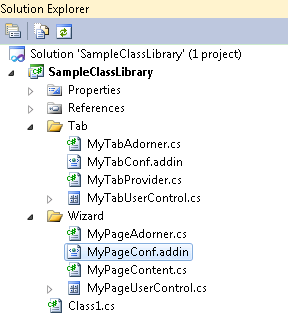
After these four steps, your SampleClassLibrary will look like this screenshot.
Now you can build your project and deploy your add-in to the Essentials server (see the deploy section). In this section, we want to insert the page to the Add-User Wizard, so we deploy the add-in file to “ %ProgramFiles%\Windows Server\Bin\Addins\Users\AddUserWizard\MyPageConf.addin. ”
After launching/restarting your Dashboard, you can run the “add a user” task and go through the wizard flow. On the last configure page, you will see the add-in page.
3.1 Deployment
After building your project in Visual Studio, you will get the binaries and several add-in configure files.
a. Confirm that your target installation includes Update Rollup 1 so that the Hosted Email Add-In Framework is present.
b. Deploy your *.dll to the Essentials server (for example, E:\Sample).
c. Make sure that the path you deploy to the add-in binaries is the same as the basedir in the add-in configure files.
d. Deploy your *.addin to the correct add-in folder.
Reference MSDN article: How to: Install a Top-Level Tab
Reference MSDN article: How to: Install the UI Update
Comments
Anonymous
September 13, 2013
I Don't see a reason for a dashboard UI Add-In creation can you mention some since you have mentioned your inspiration.Anonymous
September 15, 2013
There might be various reasons for creating a Dashboard UI add-in. One common example is for email integration. Today the Dashboard provide built in support for O365 and on-premises Exchange. The support allows you to assign an email account to a domain user and sync the password. What if you're using other email solutions? How can you still manage the mapping of the email account and the user account? Creating a Dashboard UI add-in can achieve that goal.Anonymous
November 22, 2013
I see that you are proposing an actual development structure. I have written a series of article on KPI gathering in order to build your Dashboard. I encourage you to take a look: ludismedia.com/.../kpi-how-to-guide ludismedia.com/.../kpi-how-to-guide-part-2Anonymous
January 01, 2014
Pingback from How to create a service integration add-in for Windows Server Essentials Experience - The Windows Server Essentials and Small Business Server Blog - Site Home - TechNet BlogsAnonymous
January 01, 2014
Pingback from How to create a service integration add-in for Windows Server Essentials Experience - The Windows Server Essentials and Small Business Server Blog - Site Home - TechNet BlogsAnonymous
January 01, 2014
今天的博文来自Windows Server Essentials团队的软件工程师杨晶生和凌睿。 如大家所熟知,微软的云服务,如 Office 365、Windows Azure 备份和DynamicsAnonymous
May 15, 2015
These are the top Microsoft Support solutions for the most common issues experienced when you use WindowsAnonymous
January 07, 2016
http://www.happynewyear2016wishesimagessms.com/hindu-festival-2016/
http://www.happynewyear2016wishesimagessms.com/lohri-pics-lohri-sms-lohri-wallpapers/
http://www.happynewyear2016wishesimagessms.com/happy-lohri-images/
http://www.happynewyear2016wishesimagessms.com/happy-lohri-quotes/
http://www.happynewyear2016wishesimagessms.com/happy-lohri-wishes/
http://www.happynewyear2016wishesimagessms.com/happy-lohri-wallpaper/
http://www.happynewyear2016wishesimagessms.com/lohri-greetings/
http://www.happynewyear2016wishesimagessms.com/lohri-images/
http://www.happynewyear2016wishesimagessms.com/lohri-songs/
http://www.happynewyear2016wishesimagessms.com/lohri-wishes/
http://www.happynewyear2016wishesimagessms.com/lohri-festival/
http://www.happynewyear2016wishesimagessms.com/happy-lohri-bonfire-festival/
http://www.happynewyear2016wishesimagessms.com/lohri-bonfire-festival/
http://www.happynewyear2016wishesimagessms.com/lohri-the-bonfire-festival/
http://www.happynewyear2016wishesimagessms.com/up-helly-aa-event-in-scotland/
http://www.happynewyear2016wishesimagessms.com/dinagyang-festival/
http://www.happynewyear2016wishesimagessms.com/sundance-film-festival-2016/
http://www.happynewyear2016wishesimagessms.com/wwe-in-india-wwe-live-event-in-new-delhi/
http://www.happynewyear2016wishesimagessms.com/lohri-wishes-for-friends-family/
http://www.happynewyear2016wishesimagessms.com/cowboy-poetry/
http://www.happynewyear2016wishesimagessms.com/ati-atihan-festival-full-information/
http://www.happynewyear2016wishesimagessms.com/holy-ship-2016/
http://www.happynewyear2016wishesimagessms.com/things-to-do-in-banff-town-canada/
http://www.happynewyear2016wishesimagessms.com/rainbow-serpent-festival/
http://www.happynewyear2016wishesimagessms.com/sundance-film-festival-winners/
http://www.happynewyear2016wishesimagessms.com/junkanoo-parade/
http://www.happynewyear2016wishesimagessms.com/hogmanay-2016/
http://www.happynewyear2016wishesimagessms.com/ice-sculpture-snow-sculpture-festival/
http://www.happynewyear2016wishesimagessms.com/carnevale-di-venezia/
http://www.happynewyear2016wishesimagessms.com/bpm-festival-what-bpm-festival-is/
http://www.happynewyear2016wishesimagessms.com/thaipusam-thaipusam-is-a-hindu-festival/
http://www.happynewyear2016wishesimagessms.com/holy-ship-unveils-massive-lineups-for-2016-cruises/
http://www.happynewyear2016wishesimagessms.com/quebec-winter-carnival/
http://www.happynewyear2016wishesimagessms.com/jam-cruise/
http://www.happynewyear2016wishesimagessms.com/things-to-do-in-edinburgh/
http://www.happynewyear2016wishesimagessms.com/harbin-ice-festival/
http://www.happynewyear2016wishesimagessms.com/the-sundance-film-festival-a-program-of-the-sundance-institute/Anonymous
January 07, 2016
http://www.republicdayimagesi.com/republic-day-songs/
http://www.republicdayimagesi.com/republic-day-status-republic-day-wallpaper/
http://www.republicdayimagesi.com/republic-day-information-republic-day-photos/
http://www.republicdayimagesi.com/republic-day-pictures-republic-day-pics/
http://www.republicdayimagesi.com/republic-day-messages-republic-day-sms/
http://www.republicdayimagesi.com/republic-day-in-hindi/
http://www.republicdayimagesi.com/essay-on-republic-day/
http://www.republicdayimagesi.com/what-is-republic-day/
http://www.republicdayimagesi.com/republic-day-wishes/
http://www.republicdayimagesi.com/speech-on-republic-day-in-hindi-speech-for-republic-day/
http://www.republicdayimagesi.com/republic-day-speech-in-hindi/
http://www.republicdayimagesi.com/republic-day-image/
http://www.republicdayimagesi.com/india-republic-day/
http://www.republicdayimagesi.com/republic-day-quotes/
http://www.republicdayimagesi.com/images-of-republic-day-pics-of-republic-day/
http://www.republicdayimagesi.com/speech-on-republic-day/
http://www.republicdayimagesi.com/republic-day-2016/
http://www.republicdayimagesi.com/republic-day-india/
http://www.republicdayimagesi.com/republic-day-speech/
http://www.republicdayimagesi.com/republic-day-images/
http://www.republicdayimagesi.com/happy-republic-day/
http://www.republicdayimagesi.com/republic-day/
http://www.republicdayi.com/republic-day-songs/
http://www.republicdayi.com/republic-day-status-republic-day-wallpaper/
http://www.republicdayi.com/republic-day-information-republic-day-photos/
http://www.republicdayi.com/republic-day-pictures-republic-day-pics/
http://www.republicdayi.com/republic-day-messages-republic-day-sms/
http://www.republicdayi.com/speech-on-republic-day-in-hindi-speech-for-republic-day/
http://www.republicdayi.com/republic-day-in-hindi/
http://www.republicdayi.com/essay-on-republic-day/
http://www.republicdayi.com/what-is-republic-day/
http://www.republicdayi.com/republic-day-wishes/
http://www.republicdayi.com/republic-day-speech-in-hindi/
http://www.republicdayi.com/republic-day-image/
http://www.republicdayi.com/india-republic-day/
http://www.republicdayi.com/republic-day-quotes/
http://www.republicdayi.com/images-of-republic-day/
http://www.republicdayi.com/speech-on-republic-day/
http://www.republicdayi.com/republic-day-2016/
http://www.republicdayi.com/republic-day-india/
http://www.republicdayi.com/republic-day-speech/
http://www.republicdayi.com/republic-day-images/
http://www.republicdayi.com/happy-republic-day/
http://www.republicdayi.com/republic-day/Anonymous
January 07, 2016
http://www.happylohrii.com/lohri-pics-lohri-sms-lohri-wallpapers/
http://www.happylohrii.com/happy-lohri-images/
http://www.happylohrii.com/hindu-festival-2016/
http://www.happylohrii.com/happy-lohri-quotes/
http://www.happylohrii.com/happy-lohri-wishes/
http://www.happylohrii.com/happy-lohri-wallpaper/
http://www.happylohrii.com/lohri-greetings/
http://www.happylohrii.com/lohri-images/
http://www.happylohrii.com/lohri-songs/
http://www.happylohrii.com/lohri-wishes/
http://www.happylohrii.com/lohri-festival/
http://www.happylohrii.com/happy-lohri-bonfire-festival/
http://www.happylohrii.com/lohri-bonfire-festival/


