SQL Server 2012 AlwaysOn – Part 6 – Building an AlwaysOn Availability Group
[Edit] You can find the summary of the complete series here.
Version 2.0 Added necessary step to change JDBC connection string
After having the primary and replica instances prepared for AlwaysOn as described in the former part by having copied, restored and synchronized the databases between the replicas and having synchronized the logins as described in part #5, we now can go to the step of finally creating the AlwaysOn Availability Group
Creation of first Availability Group
Let’s assume all the steps described here have been executed successfully. The databases of the different replicas are in sync, the logins and database users also are in sync. At this point in time we can start to create the Availability Group. The login used to create an Availability Group needs to be member of the sysadmin role.
The only other thing you usually need to have now is one or multiple IP Addresses for the Availability Group Listener. The Availability Group Listener is a virtual name which is the umbrella over the AlwaysOn configuration. The SAP system will use that name to connect to the Availability Group containing the SAP database(s). Therefore we need an IP address assigned to the listener for each of the subnets replicas are running in. In case of all replicas running within one subnet only, one also can decide to use DHCP in order to have an IP address dynamically assigned. In our experience most of our customers are using fixed IP addresses to have SAP application instances connect to SQL Server. Therefore using fixed assigned IP addresses would be our recommendation here as well. If the replicas are running in two different subnets, DHCP is not possible and two or multiple fixed IP addresses (one for each subnet) are required. Make sure that you got these IP addresses available before continuing.
First step: Stop the SAP system running on the primary server at the moment. This will stop any new transactions.
Second step: Disable the backup job of Log shipping if you used Log shipping to synchronize and run a last transaction log backup manually.
Third step: Copy the last log backup to the servers the secondary replicas shall run on and restore those against the restored and non-recovered database there. Please be careful and as before with the restore of the full database backup choose ‘Restore with Norecovery’ in the ‘Option’ pane. Otherwise all the efforts to restore your SAP database on one of the designated secondaries was in vain.
Fourth Step: Create the Availability Group
Go the server/replica which should be the primary server, open SSMS and go to the item ‘AlwaysOn High Availability’ in the Object Explorer (might need to expand a bit). Open the New Availability Group Wizard like seen here:
Define the name of the new Availability Group. Having in mind that you eventually want to create more than one SAP system you might want to think about naming conventions to name those. In our case, I used ERP for the SAP ERP system, the function (like production, test,sandbox, etc) and the SID [1] and ended with a name like ERPPRODE64
Next choice to make is to choose the database. As we only look at one dedicated DBMS Server of a SAP ERP system there only is one database to choose from:
Now we need to add the additional replicas and also define the basic relationship in terms of Availability and Failover mode like seen here:
In our scenario of having two of the replicas in the same datacenter and one in the DR site, the configuration would look like this one:
The servers #5 and #6 are in the same datacenter and will be replicated synchronously whereas the server #7 sits in the DR site and is getting synchronized asynchronously. Accordingly we also have the Failover Modes set with Automatic Failover between #5 and #6 and manual failover to #7.
Let us check the other taps and eventually correct them for a simple Availability Group. Hence we now check the tap of endpoints. Endpoints are the connection endpoints which are dedicated for the data replication between the different replicas. The wizard will pre-populate the entries and will pre-populate the 5022 port for the communication. Hence you would need to have this port opened on each of the servers running a replica and eventually some other routers, etc along the way. If you want to use another port, you can change that. But be aware, these ports need to be open for communication. See this screen shot:
In our case we leave it with the default ports. The endpoints (if not existing already from database mirroring) will be created as action derived out of the wizard entries.
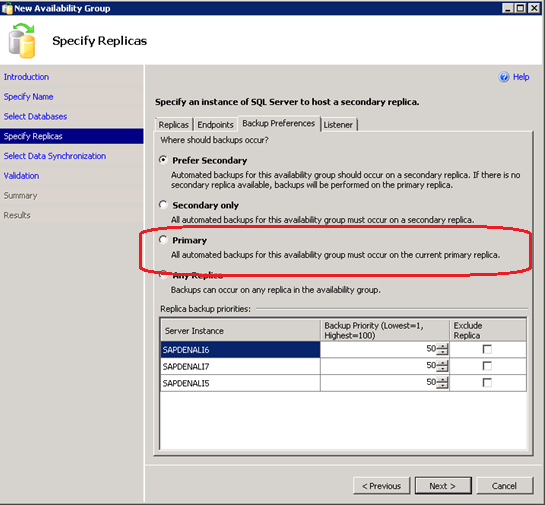
Next to check is the backup preference. We want to keep it simple and simply want to do the backups on the primary. The default setting we are going to change does not affect the ability to perform manual backups from secondaries at all. We will write a whole article about backup from secondaries where we explain the background of this setting. Let’s change the default from ‘Prefer Secondary’ (still marked below) to ‘Primary’ (red circled) in the screen shown below:
Next step is to create the Listener. As with the Availability Group we do want to follow a naming convention. Therefore we took the AG name and just added ’vn’ to it. You can take whatever name you want. However, I would take a different name than the name of the AG. I also would recommend using the same naming convention all the time for the different objects. So that it is clear, when looking at a name, on whether is an AG or a Listener name. As you see below, we chose Static IP addresses and also needed to cover two different subnets
Please excuse wiping out the real IP addresses in this screen shots. Also define port 1433 (default port for SQL Server) as port. If you choose to use a different port, you would need to add that port number into the connection string used by SAP application to connect to SQL Server. This would be done with the parameter dbs/mss/server in the default or instance profiles as well as <SID>/DBHOST in the transport profile. The format is dbs/mss/server = host:xxxx where xxxx is a port number
The next screen asks for the way how we want to perform the data synchronization or whether we want to perform it at all. Since we did the data synchronization already, we are going to choose ‘Join Only’
With that we go to the next screen which checks some preconditions. In our case a lot of the items do not require any checks since we only want to create and join the AG, but don't need to perform the data synchronization.
The last screen before the activity is executed is a summary screen which looks like this:
We are ready to go now and press Finish. The progress is documented like this:
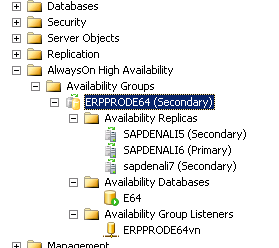
As these steps finish, we can close the wizard and check-out our first Availability Group. The picture in Object Explorer looks like:
You see the listener as well as the Availability Group in place. You also see that the AG has one database which is E64. We also look at three replicas of which #6 is currently primary. The other two replicas act as secondaries.
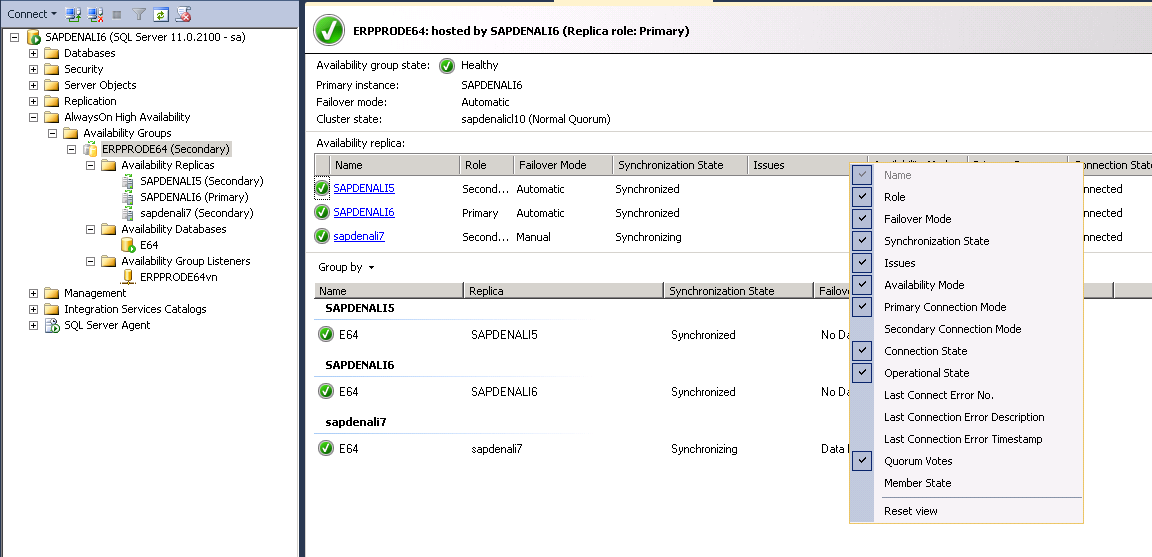
Expanding the databases in Object Explorer, we will see that the databases participating are marked either as synchronized (in case of the replicas being in a ‘synchronous’ failover mode or ‘synchronizing’ in case of an asynchronous failover mode or synchronization still taking place. Another check can be done over the AlwaysOn dashboard (mark your Availability Group, press right mouse key and choose ‘Show Dashboard’) which gives you a good overview like this:
The columns displayed in the upper half can be defined by right clicking on the grey header bar with the column names to select new columns or delete displayed columns like shown here:
Fifth Step: After all these steps, it is time to change the SAP profiles.
As such the first one is the default.pfl to change. The entry for dbs/mss/server needs to be changed to our listener name.
IMPORTANT: Additionally we need to add a connection string parameter to dbs/mss/server which is necessary for mutli-subnet deployments. However that connection string parameter also results in some advantages with single subnet configurations. Therefore we should set it as default for AlwaysOn configurations. The connection string parameter is MultiSubnetFailover=yes
Hence our dbs/mss/server default/instance profile parameter would look like:
dbs/mss/server= ERPPRODE64vn; MultiSubnetFailover=yes
Next entry to change is in the TP_DOMAIN_<SID>.PFL the entry of <SID>/DBHOST. Also needs to point to the Listener name plus the multi-subnet connection string parameter (just like dbs/mss/server).
We also need to change the environment settings of <sid>adm. This environment set is read from SAPService<SID> when starting up the SAP instance services. Correct, the user context of SAPService<SID> is reading the environment of <sid>adm. So the environment setting of <sid>adm would look like:
The environment as read is also saved in the registry of <sid>adm under the key
HKEY_LOCAL_MACHINE\SOFTWARE\SAP\E65\Environment
You'll find a parameter MSSQL_SERVER which needs to be changed to the Listener Name plus multi-subnet connection string parameter.
This registry parameter is saved the moment when the SAP instance is started.
In all the profiles change SAPDBHOST to the listener name WITHOUT the multi-subnet parameter (Just the Listener Name is sufficient - MultiSubnetFailover parameter will lead to error messages in SAP Netweaver).
NOTE: More details about the reason to use the MultiSubnetFailover connection string parameter will be explained in the next part of the Blog series. However please use ‘yes’ as the parameter value, despite all kinds of documentation stating the value should be ‘True’. SQL Server 2012 ADO.NET interfaces do accept the values true/yes and false/no. However SNAC only accepts ‘yes’ and ‘no’.
For SAP Java Instances, an additional step is necessary. When installing a Java instance, an entry with the URL of the JDBC connection string is created in the Secure Store. This URL tells the JDBC driver against which SQL Server instance to connect. Since the Java instance got installed against one of the nodes before AlwaysOn was configured, the original entry points to one of the SQL Server on one of the AlwaysOn nodes and not to AlwaysOn Listener. The following steps need to be performed to adapt the JDBC connection string to the AlwaysOn Listener:
- Open the Secure Store. The file to start the Configuration Tool to manage the Secure Store is called configtool.bat and can be found in this directory ...\usr\sap\<SID>\j2ee\configtool.
- After the start you might need to look under the Tab Connection Pool to find the entry that looks similar to this one:
jdbc:sqlserver://<dbserver name>:1433;databasename=<SID>
- In order to make AlwaysOn work, the first step is to exchange the <dbserver_name> with the <AlwaysOn Listener name>. We also recommend to add the option MultiSubnetFailover=true into the connection string. So the JDBC connection string/URL would look like:
jdbc:sqlserver://<AlwaysOn Listener name>:1433;databasename=<SID>; MultiSubnetFailover=true
Be aware that if you changed the default port of 1433 when creating the AlwaysOn Listener you would need to change the port in this string as well.
Sixth step: Restart the services of all the SAP instances to get the changes in the default.pfl valid for the SAP services. Now start the SAP system.
Series of last checks before going productive
First check: On the SAP side, we want to check in the developer traces of one of the workprocesses of each instance whether the listener name was picked up as the name to connect to the database.
We should find a section looking similar with this one (details might vary a bit from Basis release to Basis release):
C Thank You for using the SLODBC-interface
C Using dynamic link library 'C:\usr\sap\E64\SYS\exe\uc\NTAMD64\dbmssslib.dll'
C dbmssslib.dll patch info
C SAP patchlevel 0
C SAP patchno 111
C Last MSSQL DBSL patchlevel 0
C Last MSSQL DBSL patchno 110
C Last MSSQL DBSL patchcomment Workprocess exit in DSQL/ADBC (1641238)
C ODBC Driver chosen: SQL Server Native Client 11.0 native
C Network connection used from sapdlblog1 to ERPPRODE64vn using tcp:ERPPRODE64vn
C Network connection used from sapdlblog1 to ERPPRODE64vn using tcp:ERPPRODE64vn
C Driver: sqlncli11.dll Driver release: 11.00.2100
C GetDbRelease: 11.00.2100.60
C GetDbRelease: Got DB release numbers (11,0,2100,58)
B Connection 0 opened (DBSL handle 0)
First thing we want to check is whether the correct version of the SQL Server native Access Client got used. We expect version 11.0 of it to connect against SQL Server 2012 (see first red line)
Second we want to check is that we used the correct name to connect. We expect the listener name (in our case ERPRPRODE64vn). As you see this is correct. Two connections per SAP process are getting opened. Both entries refer to that name.
Third thing we want to check is whether the exact release of SQL Server and SQL Server Native access Client are the same. In our case, we are fine.
Second Check: On SQL Server side, we go to the primary and issue this query in SSMS
select sc.session_id, sc.local_net_address, se.host_name, se.program_name from sys.dm_exec_connections sc, sys.dm_exec_sessions se
where sc.session_id >49 and sc.session_id=se.session_id and se.program_name like 'R3%' order by session_id asc
In the second column (local_net_address) we expect to find one of the IP addresses which is assigned to the listener. Or to be more precise, we expect to see the IP address which is assigned to the subnet in which the current primary runs.
Third check: A last check in case you did upgrade from earlier versions of SQL Server. You want to check whether the compatibility level of all the databases is on the correct compatibility level. We want to have all the databases on the compatibility level of SQL Server 2012 including the system databases. Using in-place upgrade to SQL Server 2012 doesn't do this. There issue this query on all the instances running replicas of the AG:
select name, compatibility_level from sys.databases
If not all databases are showing up with a level of ‘110’, please go to the properties of those databases and set them to the compatibility level of SQL Server 2012.
Now we finally can take the SAP system in operation again.
Fourth Check
Failover to each of the replicas and check the login/user mapping between logins in master and users in the SAP database.
Use SSMS to manually failover from the primary to the secondary replicas and execute the following query in the SAP database:
select sp.name as 'Login Name', sp.principal_id as 'Server Principal ID', sp.type_desc as 'Login Type', dp.name as 'Database User', dp.principal_id as 'Database Principal ID', dp. type_desc as 'Database Role', s.name as 'Schema Name'
from sys.server_principals sp, sys.database_principals dp, sys.schemas s
where dp.sid=sp.sid and dp.principal_id = s.principal_id
and sp.name = '<sid>'
On each of the replicas, the result should look like here:
Login Name |
Server Principal ID |
Login Type |
Database User |
Database Principal ID |
Database Role |
Schema Name |
e64 |
290 |
SQL_LOGIN |
e64 |
5 |
SQL_USER |
e64 |
NOTE: You might realize that the ‘Server principal ID’ value can be different on each of the replicas. This is fine and will not create any problems since the link is the value in column ‘sid’ on both sides. If there is no result set returning, then the SAP system will not be able to work after a failover took place. As a result of the login/user mapping being wrong, messages like these can be seen in the SAP developer traces:
[Microsoft][SQL Server Native Client 11.0][SQL Server]Setuser failed because of one of the following reasons: the database principal 'e64' does not exist, its corresponding server principal does not have server access, this type of database principal cannot be impersonated, or you do not have permission.
Before you can move into production this mismatch needs to be fixed on all the replicas.
Enough words spent in this article. In the next blog we will look at what runs behind the scenes in our Availability Group we formed.
[1] Names of servers, users, SAP systems used are not reflecting real systems available in Microsoft, but just represent temporary systems created for the creation of this series of blogs
Comments
Anonymous
February 21, 2014
Hi, how do we restrict the access to the availability group Listener. once the listener configured its public IP right? how do i restrict the access to that Listener such a way that only few machines from internet can connect to it.. (using certificate?)Anonymous
March 28, 2016
The comment has been removedAnonymous
December 16, 2016
Per SAP note 1082356, "Using the ODBC based DBSL for Microsoft SQL Server":In kernel/DBSL release 7.10, 7.20 and later, the dbmssslib.dll contains only the ODBC DBSL. . . . The DBSL will always try to use the latest version of the SNAC ODBC driver (SQLNCLI*.DLL) which is installed on the system. This means that the worker process log messages you indicate above, e.g.:C ODBC Driver chosen: SQL Server Native Client 11.0 nativeWill actually say:C ODBC Driver chosen: ODBC Driver 11 for SQL Server nativeDo we know if SAP's DBSL automatically sets the MultiSubnetFailover connection property?Anonymous
December 20, 2016
Per SAP note 2020535 - Profile parameter conn_opts:A new profile parameter named dbs/mss/conn_opts has been implemented in the DBSL interface. Set this parameter to the connection option to be added. Example: dbs/mss/conn_opts = MultiSubnetFailover=yesThe parameter should also be set in the environment for standalone tools: MSSQL_CONNOPTS=MultiSubnetFailover=yes


