Tips and Tricks: Contour your work
A typical work week is rarely typical. Yet, you can plan for this with a Project 2007 feature called “work contours.” If you discover that there is a consistent work pattern in your organization where people are assigned to work more hours at the beginning of a task than at the end, you can have Project account for this using assignment contours. Or, perhaps a task requires more work in the middle of it than at the beginning to account for ramp-up time.
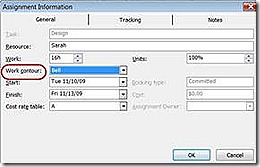
No problem. After assigning a person to a task, switch to the Task Usage view from the Tools menu. The tricky part is double-clicking the person’s name assigned to a task and not the task itself. This brings up the Assignment Information dialog box (which is what you want since you’ll be adjusting an assignment and not the task itself).
In the Work Contour list, select the type of work assignment pattern that makes sense for the work that will be performed on the task. Now, in the list of patterns, you may not know the difference between a “Turtle” and “Bell” contour, so it’s best just to apply different contours and see how the hours automatically “shape” themselves in the timesheet portion of the Task Usage view. The view should now look like this:
In the image above, two different contours are used: a “Bell” contour and a “Front-loaded” contour, as you can tell by the icon on the left.
On the right side of the view, Tom has his work hours shaped, or “contoured,” to reflect a front-loaded work pattern.
Comments
Anonymous
March 24, 2011
thanks,but above content helps to know what work contour is for, nothing else thier to get the exact idea for what diffrt types given in its drop down..and hw it is diffrnt from each other..for the MSP user(beginer).Anonymous
July 24, 2011
thank you. would like to know how to edit a contour to make it more suitable for typical type of workAnonymous
July 24, 2011
If you want to edit the contours, she the timesheet (right) side of the Usage view. If you need more effort applied up front, for example, edit the hours. In the example above, if you think you need 10 hours of work on the first day, enter "10", and then decrease the hours toward the end of the task duration.

