A brief description of the steps which occurs in a simple SCCM OSD task sequence
Hello People,
In continuation to my last blog PXE Deep Dive, I am writing this one next in the series
Before the Task Sequence begins, there are series of steps which occur:
Once the PC boots into WinPE from Boot Media or PXE , the machine connects to the Management point to download the policies.
Point of failures at this stage are:-
- MP communication
- NIC and storage drivers
To verify if the drivers are correct or not, enable Command line support in the boot image.
Once winPE initializes, open Command prompt by pressing F8, type ipconfig.
If you see an IP address assigned to the machine, it can be concluded that PC has the correct NIC drivers.
Next type DISKPART in command prompt hit enter
Type List Disk
If you see the HDD listed there, your storage drivers are OK.
To verify MP communication, go through SMSTS log which is located at X:\windows\Temp\SMSTSLOG
In ConfigMgr 2012, you can directly open the log in WINPE as CMTRACE is included in WINPE and. Depending on the architecture of the boot image it is located under
X:\SMS\BIN\I386\cmtrace.exe or X:\SMS\BIN\x64\cmtrace.exe
Once we verify the above are working OK, assuming there are only optional deployments , we should be prompted with the list of task sequences available for that machine.
If the machine has a required task sequences deployment, it will start the task sequences execution.
The first thing the PC will do is to check the task sequences dependencies. i.e. it will verify the distribution point location for all the packages referenced in the task sequence.
Once it gets at least one Distribution point location for all the packages, then only it initiates the Task Sequence execution.
The first thing it does is, it creates a list of steps which it will perform in the entire execution
It does so by parsing the TS as shown in the screenshot
The above screenshot shows extract of the steps which the TSmanager will execute. Please notice that this is a truncated log and you may not see your log exactly the same way as you see here.
This log tracks the initial policy download and MP communication. Please note that the log is truncated and only shows the points of interest
Contd..
Following are the bare minimum steps which you would generally see the Task sequence to deploy an OS :-
Restart in WINPE
This step is required so that that actual WIM file can be laid down on to the hard drive. This step is only needed when the Task Sequence starts in the full OS and its purpose is to lay down WinPE on the hard drive so it can reboot into WinPE from the hard drive. WinPE is a mini OS for purposes of deploying Windows
Logs will always be under X:\Widows\Temp\SMSTSLog. They should ALWAYS be obtained from this location
This step does not run when booted from PXE or boot media due to a condition that is placed on it. The condition evaluates the variable SMSTSinWinPE to determine if it is FALSE. If in WinPE, SMSTSinWinPE will evaluate to TRUE. If not in WinPE, SMSTSinWinPE will evaluate to FALSE. Booting from PXE or boot media boots directly in to WinPE so SMSTSinWinPE will evaluate to TRUE, causing the step to be skipped.
Next is:-
Format and Partition Disk
In this step the HDD is formatted so that OS can be laid down.
The associated executable with this step is OSDDiskPart.exe
Below is the truncated log for Format and partition log.
This log is truncated and you may not see as is.
The disk is formatted per the settings configured at this step.
In this step, notice that by default from Win7 onwards OS’s it actually creates two partitions one which is 350MB in size and other which utilizes 100% of the remaining Hard drive. (You can always customize this as per your preference.)
The “System Reserved” partition is created so that it can contain the boot files on a separate partition than the Windows partition. This allows additional features such as Bitlocker, WinRE, and recovery tools to be used. Also, the above only applies to BIOS PCs. It does not apply to UEFI PCs which use a completely different partitioning scheme.
The command that runs in this step is:-
Set command line: "X:\windows\system32\diskpart.exe" /s "X:\windows\TEMP\DiskPartScript.txt
The text file is immediately deleted after the completion of this step.
Apply Operating System Image
Then drive is wiped excluding C:\_SMSTaskSequence, c:\SMSTSClientCache and %OSDStateStorePath%. Boot files are then copied to root of drive and BCD is written. It then finally saves the initial windows configuration to C:\windows\panther\unattend\unaddend.xml. The component which does all these is ApplyOperatingSystem.
Once the Disk is formatted, the next step is the Apply Operating System task. In this step, the wim file is copied to C:\_SMSTaskSequence\Packages if the download settings for package is "download and run".
The image is applied to the hard drive which basically copies all of the contents in the WIM file to the hard drive.
The image is applied by using wingapi.dll
Boot files are copied and the BCD is created on the boot partition and not necessarily the Windows partition. This goes back to the System Reserved partition which I clarified on in the Format and Partition Disk step. The System Reserved partition is the boot partition and this is where boot files are copied to and the BCD created.
It then finally saves the initial windows configuration to %Windir%\panther\unattend\unaddend.xml
The associatedexecutable with this step is ApplyOperatingSystem.exe
Below is another truncated log while OS is getting applied :-
Points of interest are highlighted
Cont.…
Cont…
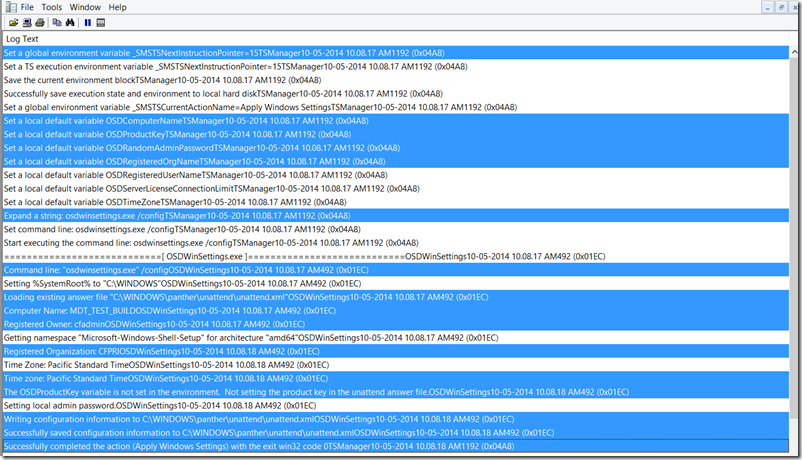
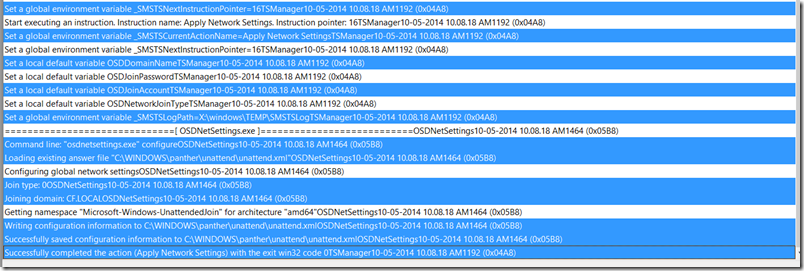
Apply Windows Settings/ Apply Network Settings :
In both these steps, the OS/network specific settings are added to the existing %windir%\panther\unattend.xml file.
The associatedexecutables with these steps are OSDWinSettings.exe and OSDNetSettings.exe
In these two steps the settings are not actually applied to Windows but only added to the unattend.xml file. The settings are not actually applied until the Windows Setup runs during the Setup Windows and ConfigMgr task.
Apply Network settings:-
Apply Device Drivers:
In this step, the search is done on entire Drivers catalogue and a list of drivers is prepared which will be installed once the Full OS boots.
The associatedexecutable with this step is OSDDriverClient.exe.
In the above case, the PC was a virtual machine hence no drivers were installed.
Setup Windows And Configmgr:
The Client installation files are copied to C:\_SMSTaskSequence\Packages.The boot manager is updated to boot into the Windows OS installed at the Apply Operating System task and the machine is rebooted to full blown OS and windows setup is run. In this phase windows and network settings, are actually executed using the unattend.xml file which was created earlier.
Before booting out of WinPE and into the full OS, this task creates a SetupComplete.cmd file in the Windows installation under Windows\Setup\Scripts. In this file it adds the following line
%windir%\system32\osdsetuphook.exe /execute
SetupComplete.cmd is a Windows Setup file that gets executed once Windows Setup completes. In this way, the Task Sequence continues once Windows Setup is complete.
Once the task sequence continues, the ConfigMgr client install is completed, if there are additional steps, the task sequence will execute them. e.g. install application, apply software updates.
SMSTS log at this stage moves to C:\_smsTaskSequence. And after the client gets installed , it moves to C:\windows\ccm\logs
If everything goes as expected, the C:\_smstaskSequence folder is deleted and You will have the Operating system ready to use.
Comments
- Anonymous
January 01, 2003
thanks - Anonymous
January 01, 2003
Very good Article posted, everything explained in easy way to understand - Anonymous
May 12, 2014
Very well explained, Thanks Pawan :) - Anonymous
May 12, 2014
Good one Pawan. Waiting for lot more....! - Anonymous
May 12, 2014
good one Pawan :) - Anonymous
May 13, 2014
Pingback from Blog Post: A brief description of the steps which occurs in a simple OSD task sequence | Isupon - Anonymous
May 13, 2014
Thanks - Anonymous
May 31, 2014
Good one Pawan bhai..Thank you! - Anonymous
August 25, 2014
Appreciate your effort to prepare this. Thanks and Keep doing the good work! - Anonymous
August 25, 2014
WOW. Pawan, you rock. It wasn't until I read this blog that I realized that you were the author. You have been a huge help to me in my plight to use the OSD feature. I will watch for more writings from you. Thanks again.
Jonas - Anonymous
February 06, 2016
Nice blog.


