Outlining in OneNote
One of the greatest things about OneNote is its outlining capabilities. It's perhaps the most underrated feature as well as the one we most often take for granted. People often use outlining without even knowing they're using it.
What is outlining you ask? Well, Webster defines it as "a condensed treatment of a particular subject <an outline of world history> " or "a summary of a written work: synopsis: a preliminary account of a project. "
In OneNote each note you take is an element of an outline. It might be a paragraph of text, or just a single list item. Each outline appears in a container, surrounded by a thin line and a grab-handle along the top edge.
To resize the outline just click the resize handle  of the top border and begin dragging. Or you can click anywhere along the right border of the outline.
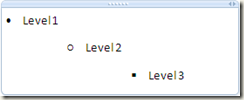
If you're making a list of items you plan to take with you on an upcoming camping trip. You might begin with something looking like this:
| You can also hide levels of your outlines like this. Just double-click the grab-box to hide all element levels beneath the current one. Double-click the grab-box again to show the levels. |  |
Each outline element has a small grab box on its outside edge. It's appearance conveys different meanings. For example, it might look like this,  which means you can grab it and drag it around to rearrange the order or level, or even drag it outside of the outline. It only appears when you mouse over the element. Or it might look like this,
  which means it's currently a selected element. It might also look like this,
  which means it's in a collapsed state.
You can also drag-to-select, similar to selection in other Windows applications.
You can also right-click the grab box of a given element and choose Select All at Same Level. This will select all children at the given level.
Each outline is self-contained. This means that all formatting changes are contained only within itself. For example, you might decide to change the text style to a different font. Then when you click elsewhere on OneNote's page surface to begin a new outline, the font you selected previously won't be in effect.
This also holds true for bullets and numbering styles.
You can do this by right-clicking on the outline's grab-handle. Then you can select Order from the menu and choose Bring to Front, Send to Back, Bring Foreword or Send Backward.
Tips:
- You can set the alignment of an element by pressing <Ctrl + E> for Center, <Ctrl + R> for Right and <Ctrl + L> or for Left.
- To discontinue showing the outline containers on the page, click Tools -> Options -> Display -> remove the checkmark from Show note containers on pages.
- To automatically begin a bulleted list type an asterisk, * , followed by a space or a tab.
- You can also type any number, followed by one of these character: " ) ", " > ", " - " (dash) or " . " (period) and a space or tab.
- Or you also can type any letter, followed by a character to begin a list.
- To begin your list with roman numerals, type "i" or "I" followed by the character you wish to follow.
- When you press <Enter>, OneNote automatically continues the bulleted or numbered list
- To discontinue the list on the next element, press <Shift + Enter>.
- If you wish to disable auto bullets & numbering permanently, click Tools -> Options -> Editing and remove the checkmark from Apply numbering/bullets to lists automatically.
- Press <Tab> to decrease the list level.
- Press <Shift + Tab> to increase the list level.
- To quickly switch from a bulleted list to a numbered list, press <Ctrl + / >.
- Or press <Ctrl + . (period)> to switch from a bulleted to a numbered list.
- These shortcut keys can also be used to turn bullets and numbering on or off.
- Double-click the element's grab box to collapse it.
- Double-click again to expand it.
- You can change the style of your bullets & numbering.
|
 |
|
 |
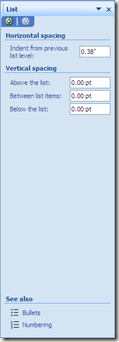
- You can customize your bullet/numbering properties by clicking on the More menu item beneath either of the above menus. Or you can double-click on the bullet/number.
- This one's been changed to .5".
Comments
Anonymous
June 10, 2008
PingBack from http://www.tips.luiscorreia.com/outlining-in-onenote/Anonymous
June 16, 2008
Great post - I definitely picked up a few tips here! It's not exclusive just to working in Outlines, but my most-used keyboard shortcuts have to be CTRL+SHIFT+UP and CTRL+SHIFT+DOWN for re-ordering list items (and thanks for using the same shortcuts Word has been using since the dawn of time). It works really nicely with collapsed outline levels.Anonymous
July 20, 2011
If I expand all levels in an outline, then move to another section, then move back again, the levels that are showing have changed. This is a real pain when trying to print out Notebook sections. Any idea how to stop it?Anonymous
September 19, 2011
how do you open up a task pane for adjusting the horizontal spacing in a list?Anonymous
October 12, 2011
The comment has been removedAnonymous
December 07, 2012
THANK YOU! this just made my exam outline a million times easier to fix!Anonymous
August 18, 2013
I'm still frustrated by not being able to change the INTERIOR color of OneNote windows (and many other programs). I'm not referring to the window border, nor the section color or the page color. I am talking about the area at the top around the toolbar, which always remains pale blue. Considering that this is a large part of the window and is still the primary overall color effect a user gets from the page, will there ever be an option to change this?Anonymous
May 04, 2014
I have been using OneNote 2007 every minute of every day since, well, 2007. I had no idea that I could collapse and expand my lists outline-style. THIS IS GOING TO CHANGE MY LIFE !!!!!!!!


