Configuring Azure Service Bus endpoint and CRM Plugin Steps
Wow its been a while since I posted here; As most of you have seen, the Dynamics CRM world as been quite busy ( 3 Releases of CRM, Mobile apps, USD Added to the product, New Tools and such ) been a busy year or so. So folks, I apologize for being absent from the Blogging world.
To business,
Just the other day, I was doing some ad hoc testing on the new Plugin Registration Tool’s Service Buss endpoint configuration system and realized that the instructions in the CRM documentation and the tasks I needed to do were really confusing. Confusing to the point where I ended up going over to the API/SDK PM and asking how to get this to work.. Now that’s not a good situation to be in.
After some discussion and going back and forth over the SDK Doc’s we came to the conclusion that really what was wrong was that terms CRM uses and Azure UX have changed over time between CRM and Azure. Also, Azure is innovating their portal / management tools so quickly that its hard for our doc’s to stay 100% current.
So here, I will walk though setting up a service bus endpoint that CRM can talk to. Start to finish. ( This is as of Sept 2014 ![]() )
)
Configuring Service Bus endpoint to work with a CRM Plugin Step.
First you need to create your service bus endpoint to work with.
Here is where I went wrong the first time. The Natural instinct here is to go to the Azure Management Portal and create your service bus endpoint there, then try to configured ACS. This will result in a service bus endpoint that you cannot easily integrate to CRM. So.. RESIST the urge, leave the management portal out of it for now..
The proper way to do it is actually described in one of our walkthrough in the SDK, here. The confusing part about this walkthrough is that it is actually about configuration of the full Azure ACS Service to work with CRM vs. just setting up the a Service Bus Plugin endpoint. So you only need part of it..
You will need to have the Azure PowerShell module, if you don’t have it installed, this part will not work. if you need to install it, here is a link to walk you though that process : How to install and configure Azure PowerShell.
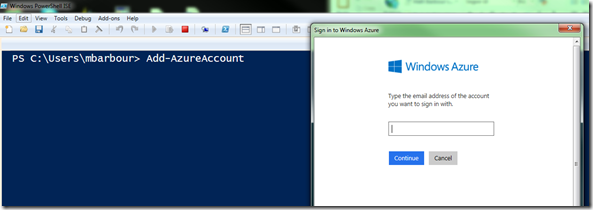
Open up Windows PowerShell ISE ( or powershell of you like )
Next type the command : Add-AzureAccount
This will pop a window that will walk you though Logging into your Azure Account.
*Important: If you have more the one Azure subscription, Make sure your on the right subscription for the next part, else your Service bus Endpoint may not get created where you expected it too.
Next, Use the following command to create the Azure Service Bus:
New-AzureSBNamespace <YourNSName> –Location <Azure Region to live in>
YourNSName is the name of your service bus endpoint, in my case its CrmExampleSb
For Location, Location can be any of the Azure Supported Regions, at the time of this post that list looked like:
Central US, East US, East US 2, North Central US, South Central US, West US, North Europe, West Europe, East Asia, Southeast Asia, Brazil South, Japan East, and Japan West.
In my case, I used “West US”
This results in some information about your service bus, including the keys you will need in later steps.
So this action creates the Service Bus endpoint, and the ACS service that you need integrate with CRM, all in one command.
Don’t close this window as you will need this information in a few min.
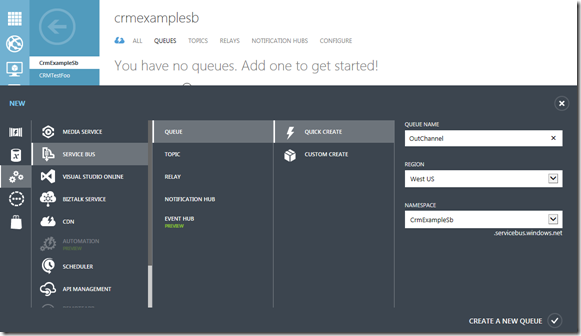
Now, We need to open up the Azure Management console as there is not a way currently via cmdlets to Create the queue
Navigate to the service bus area and you should see your newly created service bus namespace:
Step into your new Namespace here and goto queues:
Click the create a new queue button and ( in this case ) use the Quick Create:
In this case, I called my queue “OutChannel”
Ok, So now we are all set on the service bus side… now we just need to create our Plugin Step Registration to talk to it.
Creating an Azure Service Endpoint in the Plugin Registration tool
Start up the Plugin Registration tool, You can find that tool in the tools directory of the CRM SDK.
Using the Plugin Registration Tool, Login to the CRM Deployment you want to set up the step in.
In my case, I am going to use CRM Online as that has all the CRM service side bits of the Azure interface preconfigured and ready to go.
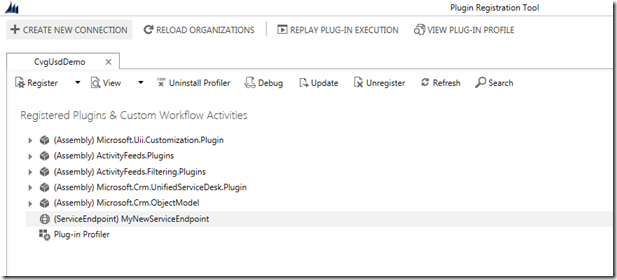
Here I have started the Plugin Registration Tool and connected it to an organization called CvgUsdDemo
Now I want to click the dropdown button called “register” and then choose “Register new Service Endpoint”
That opens up my step registration form.
Here is where we use the information we created via Powershell and the Azure Management portal
Name is my name for the service endpoint for CRM. This is what CRM will describe it as.
Solution Namespace is the Service bus endpoint name. so in my examples here, that would be CrmExampleSb
Path is the queue we created in the Management Portal, so in my example here, that’s outchannel
Contract is a bit tricky. Depending one the type of item you put in the Service Bus your options here change.. in my case, I created a queue, which allows me to use either PresistentQueue or Queue for this field. If I try to do something else, I will get an error.
Claim is really short hand for: add the user context info or not to the message on the service bus.
Now, I click Save and Configure ACS,
The Plugin Registration Tool does most of the heavy lifting here for configuring security and such. however it does need a few things from you to do it.
This step requires information from 2 places,
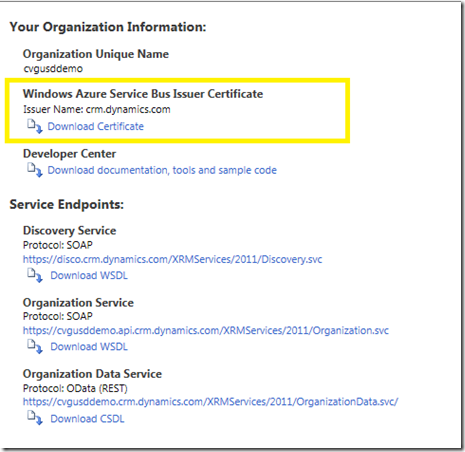
First you will need to go to your CRM developer settings are to get the Certificate for CRM and the Issuer Name for the Certificate. For CRM Online, this is all preconfigured for you when your CRM online instance is created, for CRM on premise, you will need to set this up in your deployment before you can do this next step.
In the Plugin Registration Tool, we provide a link right on the Configure ACS page for you to get to this info in CRM
so in my case, This info looks like this:
The two things I need here are the Issuer Name, and the certificate.
- Take note of the Issuer Name
- Download the certificate to your workstation.
Second you will need the management key for the service bus, the PowerShell command to create the service bus reported that key.
Back in the PowerShell output (from creating the service bus) that’s called the “defaultkey”
so populated, my form looks like this:
Next, you push the configure ACS button.
You will get a warning here,
Click Yes and wait…
when complete.. you will see a report indicating that it worked or didn’t work.. in this case, working looks like this:
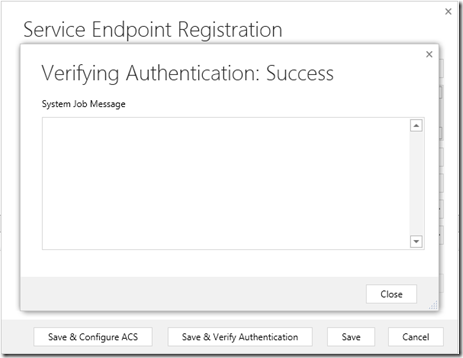
The final step, is to close this window and then click the Save and Verify Authentication button on the Service Endpoint Registration page.
it should take a moment to complete.. and when complete you should be presented with a screen like this:
If you got here, you are good to go.
Click Close, then save the Service Endpoint Registration.
Your new endpoint now shows in the “Registered Plugins and Custom Workflow Activities” list.
Creating an Step Registration for the new Service Endpoint in the Plugin Registration tool
Now you just need to wire the events you want to listen too the service endpoint.
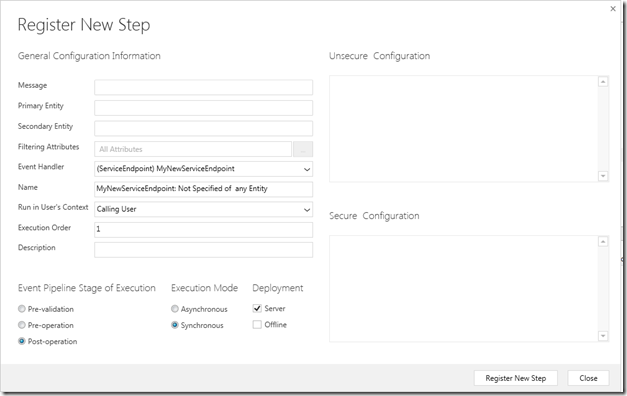
Right Click on the Service Endpoint and choose “Register New Step”
That then opens this UX:
As you can see the event handler is already set to the service endpoint, now all we need to do is configure the Message we care about and the entity to act on… so in my case, Create of Account and post messages Async:
Then click “register new step” and volia ..
Any new Accounts will also get sent to the Azure Service bus queue we configured for that end point.
Comments
Anonymous
October 03, 2014
Glad to see you back after more than a year Matt...That's a nice and pretty clear article as always... It would be great, if you can blog some thing on USD tooo... Thank you SrikanthAnonymous
October 14, 2014
Thanks a lot for this post. It allowed to get thing set up quickly. Unfortunately I found that setting the service endpoint contract to 'PersistentQueue' does not work. With this settings no messages were actually posted to the queue. The log of the corresponding system job in CRM hints that this is a compatibility issue with the default settings for queues. Setting the contract to 'Queue' instead solves the problem. Thanks, MichaelAnonymous
March 04, 2015
What if the CRM Online certificate is changed? do we have to run through the process again? is there any way to handle this kind of certificate updates?Anonymous
June 09, 2015
Nice Blog. I was doing service endpoint configuration first time and this helps me like anything.Anonymous
June 09, 2015
Michael The issue is likely that Partitioned Queue is set as default when you create a Persistent queue. You need to create the queue manually, and look at the advance settings, and uncheck the Partitioned switch. Bharat You need to rerun the authentication process with the new Cert.
