Getting started with Lab Management (Part 3)
Configuring the “system under test” in VS
The system under test for the purpose of this walkthrough is a simple calculator web service with its unit tests.
Start by creating a new team project in VS. Connect to the TFS server and create a team project (Labwalkthru). The solution is attached to the blog post.
Calculator app:
1: using System.Web.Services;
2:
3: [WebService(Namespace = "https://tempuri.org/")]
4: [WebServiceBinding(ConformsTo = WsiProfiles.BasicProfile1_1)]
5: public class CalculatorService : System.Web.Services.WebService
6: {
7: public CalculatorService()
8: {
9: }
10:
11: [WebMethod]
12: public long Add(long lNum1, long lNum2)
13: {
14: return lNum1 + lNum2;
15: }
16:
17: [WebMethod]
18: public long Subtract(long lNum1, long lNum2)
19: {
20: return lNum1 - lNum2;
21: }
22:
23: [WebMethod]
24: public long Multiply(long lNum1, long lNum2)
25: {
26: return lNum1 * lNum2;
27: }
28:
29: [WebMethod]
30: public long Divide(long lNum1, long lNum2)
31: {
32: return lNum1 / lNum2;
33: }
34: }
Test code:
1: using Microsoft.VisualStudio.TestTools.UnitTesting;
2: using Microsoft.VisualStudio.TestTools.UnitTesting.Web;
3:
4: namespace CalcTest
5: {
6: /// <summary>
7: ///This is a test class for CalculatorServiceTest and is intended
8: ///to contain all CalculatorServiceTest Unit Tests
9: ///</summary>
10: [TestClass()]
11: public class CalculatorServiceTest
12: {
13: private TestContext testContextInstance;
14:
15: /// <summary>
16: ///Gets or sets the test context which provides
17: ///information about and functionality for the current test run.
18: ///</summary>
19: public TestContext TestContext
20: {
21: get
22: {
23: return testContextInstance;
24: }
25: set
26: {
27: testContextInstance = value;
28: }
29: }
30:
31: /// <summary>
32: ///A test for Add
33: ///</summary>
34: [TestMethod()]
35: [HostType("ASP.NET")]
36: [UrlToTest("https://localhost/Calc")]
37: public void AddTest()
38: {
39: CalculatorService_Accessor target = new CalculatorService_Accessor();
40: long lNum1 = 1;
41: long lNum2 = 1;
42: long expected = 2;
43: long actual;
44: actual = target.Add(lNum1, lNum2);
45: Assert.AreEqual(expected, actual);
46: }
47:
48: /// <summary>
49: ///A test for Subtract
50: ///</summary>
51: [TestMethod()]
52: [HostType("ASP.NET")]
53: [UrlToTest("https://localhost/Calc/Default.aspx")]
54: public void SubtractTest()
55: {
56: CalculatorService_Accessor target = new CalculatorService_Accessor();
57: long lNum1 = 5;
58: long lNum2 = 2;
59: long expected = 3;
60: long actual;
61: actual = target.Subtract(lNum1, lNum2);
62: Assert.AreEqual(expected, actual);
63: }
64:
65: /// <summary>
66: ///A test for Multiply
67: ///</summary>
68: [TestMethod()]
69: [HostType("ASP.NET")]
70: [UrlToTest("https://localhost/Calc/Default.aspx")]
71: public void MultiplyTest()
72: {
73: CalculatorService_Accessor target = new CalculatorService_Accessor();
74: long lNum1 = 2;
75: long lNum2 = 5;
76: long expected = 10;
77: long actual;
78: actual = target.Multiply(lNum1, lNum2);
79: Assert.AreEqual(expected, actual);
80: }
81:
82: /// <summary>
83: ///A test for Divide
84: ///</summary>
85: [TestMethod()]
86: [HostType("ASP.NET")]
87: [UrlToTest("https://localhost/Calc/Default.aspx")]
88: public void DivideTest()
89: {
90: CalculatorService_Accessor target = new CalculatorService_Accessor();
91: long lNum1 = 10;
92: long lNum2 = 2;
93: long expected = 5;
94: long actual;
95: actual = target.Divide(lNum1, lNum2);
96: Assert.AreEqual(expected, actual);
97: }
98: }
99: }
100:
When extracting the solution from the zip file, you can extract the attached zip file and from an elevated command prompt
|
Add the solution to the Labwalkthru project in source control and build it. For running these tests in a remote lab environment, these tests to be part of the TCM in TFS. Import the test cases to TCM by using the tcm command.
C:\calc\calctest\bin\Debug> tcm testcase /import /collection:https://varadab2tfs:8080/tfs/DefaultCollection /teamproject:Labwalkthru /storage:CalcTest.dll Modification Title -------------- ----------------------------------------------------------- Added AddTest Added SubtractTest Added MultiplyTest Added DivideTest Summary -------------- Added 4 Updated 0 Removed 0 Total 4 |
Create the rest of the Test assets:
We should provide the BVT experience a test suite to run, so launch the “Microsoft Test and Lab Manager” and connect to the project.
Create a test plan by clicking on Add
Let us call it “BVT tests” and select the “Select plan”
In the tests add the tests that we just imported
Create a Lab Environment for running the tests:
In MTLM, move from test center to Lab center.
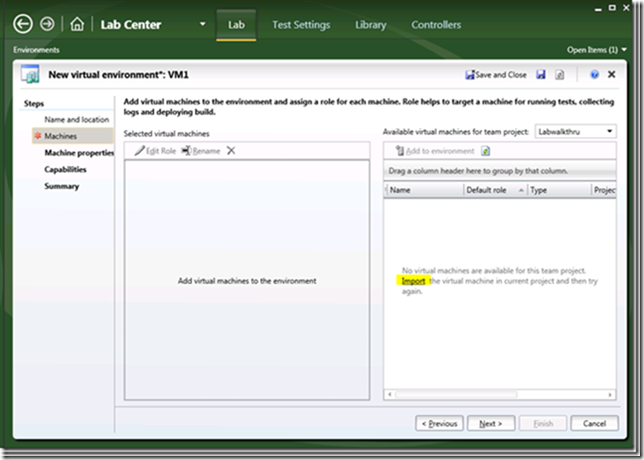
Create a new virtual environment
and in the machine tab, select import
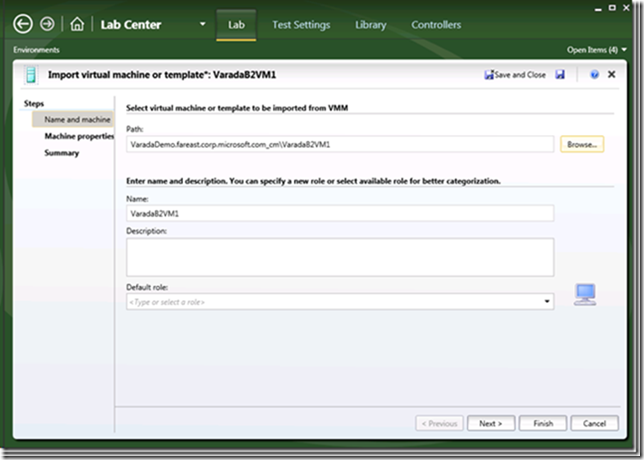
and import the prepared VM stored earlier
Finish the import and click Add to Environment, edit the role to be Web Server
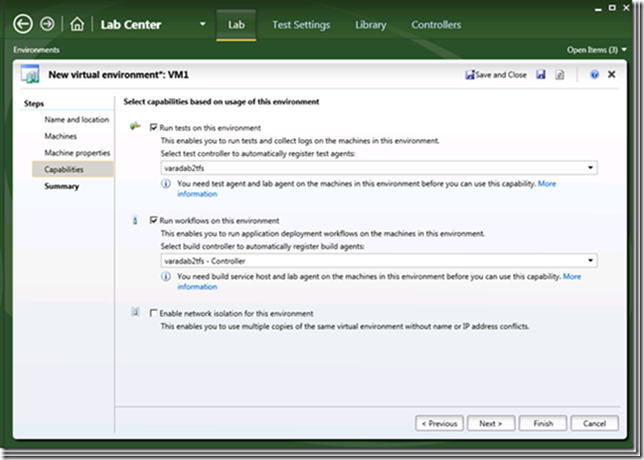
Add “Run test” and “Run workflow” capabilities
and click the “Finish” button. This will create a test environment which can be used as part of the “build / deploy & test workflow”. At this point, lab will deploy the store environment in the library share to a hostgroup. This will take a bit of time to complete.
After the environment is up and running, you should see that the workflow capability and test capability are all ready in the environment.
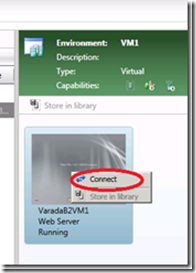
In our case, on the environment, we are running web tests as NetworkService (the test agent is configured by default to run as networkservice). To run tests in ASP.NET, the user has to be administrator on the machine. So connect to the lab machine,
logon to the VM and add Networkservice as member of the administrators group and then reboot the machine.
|
Reboot the machine to allow for this to take effect.
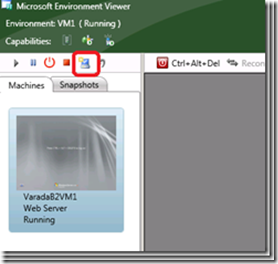
When the tests run, you would want to restore the environment to a clean snapshot. Take the snapshot, by clicking on the “Take Snapshot” icon.
Let us call the Snapshot, “CleanCP”
Create test settings for the automated run:
Create a new test setting and set the test run to automated.
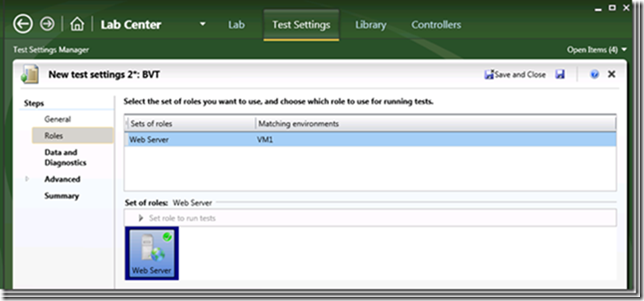
In the Roles tab, select the web server role (VM1) to be the role where tests are run. This is needed in case where your environment has multiple roles, you can pick the right role where the tests get run.
And finish.
In the next blog post, we will connect all the dots to execute the test runs as part of the development workflow.
Comments
Anonymous
November 23, 2009
The comment has been removedAnonymous
November 23, 2009
Alex - Do you have the default test case work item type defined on your TFS server? If not, can you just import the default test case work item type and try connecting?Anonymous
November 23, 2009
There are a few steps that you need to follow to get a 2008 team project converted to support the test management features in Dev 10 http://blogs.msdn.com/allclark/archive/2009/10/13/enabling-new-application-lifecycle-management-features-for-visual-studio-2010-beta-2-in-upgraded-team-projects.aspxAnonymous
November 30, 2009
The comment has been removedAnonymous
November 30, 2009
Never Mind, I got it, somehow I skipped right over the part about importing the categories. Thanks Again,


