Note
Access to this page requires authorization. You can try signing in or changing directories.
Access to this page requires authorization. You can try changing directories.
I’ve been working on a SharePoint 2007 project recently where part of a workflow involved generating a large number of Infopath forms in a SharePoint Infopath form library. Now one way (and arguably the more popular way) would have been to create an empty form based on the library’s template, save it somewhere and use it as reference to generate the form at runtime, perhaps using an XmlDocument object. Another way, which I hit upon while doing this would be to just package the form as part of the assembly (as an embedded resource) and load it up into an XmlDocument at runtime. This would save us the effort of writing loads of tedious XmlDocument related code. We could then use Xpath expressions to work our way through the document populating the relevant nodes. While both of these methods work, they’re too prone to failure.
That’s when I thought of another idea. An Infopath form is basically an XML file with a bunch of extra processing instructions on top. For example, here’s a super simple Infopath form I put together for this post:
The form gathers a bit of data about a user. In fact, it isn’t actually as simple as it looks. The Hobbies section at the bottom is a repeating section that can contain any number of values. Repeating sections (as well as optional sections) are of course quite common in real life Infopath forms so its a good idea to see how our approach works with a form that has one. Here’s what the form’s XML looks like with some dummy data:
    1: <?xml version="1.0" encoding="UTF-8"?>
    2: <?mso-infoPathSolution solutionVersion="1.0.0.4" productVersion="12.0.0" PIVersion="1.0.0.0" href="https://mosstest/TestFormLibrary/Forms/template.xsn" name="urn:schemas-microsoft-com:office:infopath:TestFormLibrary:-myXSD-2010-04-26T19-55-45" ?>
    3: <?mso-application progid="InfoPath.Document" versionProgid="InfoPath.Document.2"?>
    4: <my:myFields xmlns:xsi="https://www.w3.org/2001/XMLSchema-instance" xmlns:my="https://schemas.microsoft.com/office/infopath/2003/myXSD/2010-04-26T19:55:45" xmlns:xd="https://schemas.microsoft.com/office/infopath/2003" xml:lang="en-us">
    5:   <my:Username>username</my:Username>
    6:   <my:Password>secret</my:Password>
    7:   <my:ConfirmPassword>secret</my:ConfirmPassword>
    8:   <my:EmailAddress>email@address.com</my:EmailAddress>
    9:   <my:Hobbies>
   10:     <my:Hobby>
   11:       <my:Description>Hobby1</my:Description>
   12:     </my:Hobby>
   13:     <my:Hobby>
   14:       <my:Description>Hobby2</my:Description>
   15:     </my:Hobby>
   16:   </my:Hobbies>
   17: </my:myFields>
Notice the two <?mso… XML processing instructions on top? These are what differentiate this form from any odd XML document. That and the namespace definition for the “my” namespace prefix. An interesting thing about the my prefix is the date/time stamp at the end of it. I have had situations where this mismatched in the generated form (because I created the classes from a template different from the one I deployed) and it has been a source of huge headaches. You’ve been warned! Also pay close attention to the value of the href attribute on the <?mso-infoPathSolution> processing instruction. This is the location of the Infopath form’s template as deployed on the SharePoint server. You will probably want to plug this in at runtime depending upon what your site address and form library names are.
There are other namespace prefixes as well, such as xsi and xd that you will need to think about. Finally, there’s the xml:lang attribute that identifies the language for the form. The Infopath designer might add more prefixes if it uses them within the schema so it’s a good idea to have a copy of an empty form handy just to see what you’re generating.
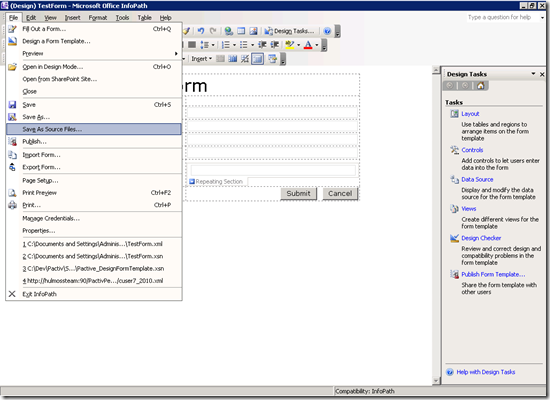
Right, now that we know what we’re generating, lets get cracking on the problem. The first step is to get a handle on the Infopath form’s schema. The quickest way to do this is to open up the form template in Design mode and select the File –> Save As Source Files option. Here’s what it looks like:
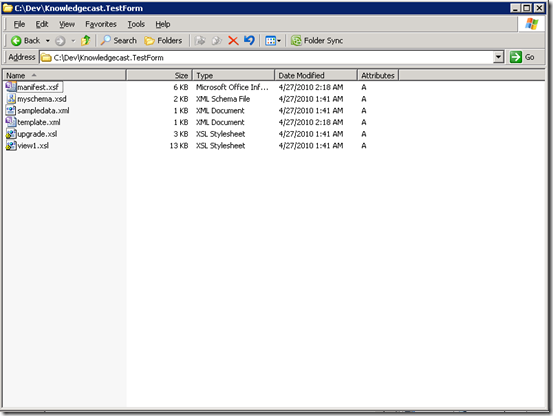
Choose a folder where you want to save the source files. Be sure to use the same form that you published to the form library. Also be aware that if you are signing the form (perhaps you have some code in your form that you need to run) Infopath will warn you that saving as source files will remove the signature. This is fine because we won’t have to sign the generated forms. You should get a folder full of files like this:
The one we’re interested in here is myschema.xsd. This file defines the schema for the Infopath form that we just saw. Next step is to bring up the Visual Studio Command Prompt. Now we’ll use the xsd.exe utility to generate class files for the XML schema definition in myschema.xsd. Change into the directory where myschema.xsd is and use the following command:
xsd.exe /c /l:cs /n:Knowledgecast.TestForm myschema.xsd
The first argument (/c) asks xsd.exe to generate classes and the second one (/l:cs) specifies the language to use. In our case, this is C#. We use the /n argument to specify the namespace under which the classes must be generated. Go ahead and change this to an appropriate value for your solution. Finally, we specify the name of the schema for which classes need to be generated (myschema.xsd). The xsd.exe utility has other arguments that you might find useful depending upon your situation. You can explore the other arguments by using the /? argument. The command execution usually results in a single file (called myschema.cs in our case) containing all the class files necessary to generate an instance of the schema. The class names map to the XML element names so in our case the top-level class would be called myFields.
For the final step, lets build a little console application around our generated classes and actually generate a form. The first thing to do would be to bring in myschema.cs and make it part of the project. Once that is done, writing the code to generate the form is easy. Here’s what the main method of the console application looks like:
    1: static void Main(string[] args)
    2:         {
    3:             myFields form = new myFields
    4:             {
    5:                 Username = "user1",
    6:                 Password = "supersecret",
    7:                 ConfirmPassword = "supersecret",
    8:                 EmailAddress = "dummyaddress@dummysite.com",
    9:                 Hobbies = new Hobby[]
   10:                 {
   11:                     new Hobby
   12:                     {
   13:                         Description = "This is hobby 1"
   14:                     },
   15:                     new Hobby
   16:                     {
   17:                         Description = "This is hobby 2"
   18:                     }
   19:                 }
   20:             };
   21:
   22:             using (var xmlWriter = new XmlTextWriter(@"C:\Dev\Knowledgecast.TestForm\GenerateTestForm\TestForm.xml", Encoding.UTF8))
   23:             {
   24:                 var serializer = new XmlSerializer(form.GetType());
   25:                 var ns = new XmlSerializerNamespaces();
   26:                 ns.Add("xsi", "https://www.w3.org/2001/XMLSchema-instance");
   27:                 ns.Add("my", "https://schemas.microsoft.com/office/infopath/2003/myXSD/2010-04-26T19:55:45");
   28:                 ns.Add("xd", "https://schemas.microsoft.com/office/infopath/2003");
   29:
   30:                 var templatePath = "https://mosstest/TestFormLibrary";
   31:                 xmlWriter.WriteProcessingInstruction("mso-infoPathSolution", "solutionVersion=\"1.0.0.4\" productVersion=\"12.0.0\" PIVersion=\"1.0.0.0\" href=\"https://hulmossteam:90/TestFormLibrary/Forms/template.xsn\" name=\"urn:schemas-microsoft-com:office:infopath:TestFormLibrary:-myXSD-2010-04-26T19-55-45\"");
   32:                 xmlWriter.WriteProcessingInstruction("mso-application", "progid=\"InfoPath.Document\" versionProgid=\"InfoPath.Document.2\"");
   33:
   34:                 serializer.Serialize(xmlWriter, form, ns);
   35:             }
   36:         }
We simply fill out the myFields class with some dummy data and a couple of hobbies. We use an XmlTextWriter because it lets us add the extra processing instructions we need and conveniently lets us put all the XML in a file. Note that your definition for the my namespace and template path will probably end up looking different from mine.
Run the program and and upload the file that was generated to the form library. To test whether the form came out right, open it up by clicking on it in the form library. Here’s what mine looks like:
Voila! We’ve just generated an Infopath form using a strongly typed class. One of the things I plan to do on our project is to make the source files part of the project and turn the call to xsd.exe into a pre-build event. That way, any time someone updates the form template all they have to do is update the source files and rebuild. It would be interesting to see how this would work on the build server. But that is a challenge for another day :)


