Bootcamp For Using Azure Connect With Virtual Machines
I had a few Partners I was working with tell me that they were having some problems figuring out how to get Azure Connect working. Specifically, they wanted to connect a physical or VM on-premise to a VM in Azure and allow them to communicate by IPV6 or hostname. Now, turns out this isn’t all that complicated but the documentation that exists assumes you know your way around Visual Studio and how that interfaces with Azure. For those of us that don’t know VS and don’t have a lot of experience with Azure…but just want to get this working…this is for you. :)
NOTE: Now, this blog post isn’t the place to go deep into all the various connectivity options available in Azure, but essentially you have some hardcore VPN type capabilities so that you can get broader access – similar to how you would setup a remote office for example. Azure Connect is a client based mechanism which allows you to create groups of computers – either physical or VM…and on-premise and in Azure that can ‘talk’ to each other via IP and hostname. Before you get too much further, Azure Connect is 100% IPV6. So, make sure that you have that running and enabled at least on the endpoints that you are going to be working with otherwise none of this will work properly.
This Video, in about 3 minutes, will help you better understand the Azure VPN/Connectivity Options
Easy VPN – Using Azure Connect to Create a Secure Network Connection between two on-premise machines
If you read some of the instructions, it seems to be pretty straightforward. THIS is probably the best documentation on how to do this that I’ve seen thus far – except it assumes that you know how to finesse a Visual Studio Azure Cloud Project, which many folks trying to do this task – hard core infrastructure folks – don’t have much or any experience with.
So, without re-doing then entire TechNet article I just referred you to – I’ll fill in a few of the blanks as I’ll admit, I’m not a Visual Studio guy either…so I just had to bang my head against it a little and eventually figured out the one check-box I needed to uncheck to make everything work perfectly.
GETTING STARTED:
First thing – you obviously need access to an Azure subscription and you have to enable the VM Preview. I walk through that as well as how to interface Azure VM’s with System Center App Controller in THIS post. At the time I published this, the most current System Center release is the SP1 Beta. You have a few options – you can setup the 90 day free trial OR if you have a MSDN subscription you get access to Azure, which is what I’m using.
Most of where you are setting this up is in the old-school Azure Management Console (not the new preview console) and in Visual Studio. I used Visual Studio 2012 and the downloaded the Azure SDK. The Azure SDK’s can be found here.
If you’re not sure how to get back to the old-school GUI you simply click on the green “PREVIEW” button in the new console and it will give you the option to go back:
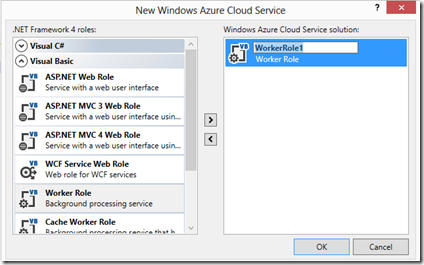
I have a MSDN subscription, so I used the “Ultimate” SKU but you can use less than that. The SDK installation is pretty straightforward and probably the biggest obstacle I faced was figuring out how to get started with an Azure Cloud Service Project from the “New Project” wizard. The GUI defaults to .NET Framework 4.5…and no Azure stuff shows up in there. You have to pull that drop down at the top and select .NET Framework 4…Ah, now you see it!
From there, I choose the Visual Basic (I tried it with C#, works as well) Worker Role. Notice that if you want to rename the worker role (and you probably do) to something more identifiable then you have to click the pencil icon in this GUI to make that change:
Now, once your in the project there’s only a few things that you have to do before publishing it.
First, Import your Azure Subscription into VS. The process is pretty self-explanatory – just go into your Azure Management Console (the old school one) and copy/paste your subscription ID into VS.
Once you do this – VS will enumerate the VM’s that you have created in Azure. I’ve underlined a few key areas that you have to pay attention to here. First of all highlight your VM in the server explorer and then in the Solution Explorer double click or right click for properties on the WorkerRole that you created for this project. It will bring up what you see in the middle here.
UNCHECK THE DIAGNOSTICS. You don’t need it to create this service and you’ll get warnings/errors when the project builds/publishes.
The other thing that you’ll have to do in here is in the properties of the WorkerRole (middle of the screen) you need to click down to the Virtual Network settings. From here, you need to get the activation token from your Azure Management Console.
Here’s where you get the activation token that you’ll paste into that field. When you click the icon, it will give you the code to paste.
If you did that last part right, when you click back to the “Settings” tab in the WorkerRole, you should now see your Token:
Now you can publish your service to Azure. Just go to the BUILD menu and choose PUBLISH for your Azure Project – it will start the process and you’ll eventually see it in Azure.
OK, NOW WHAT?
Go back and follow the directions in the TechNet Guide I referenced as far as how to setup the local endpoints, etc… It’s spot on there. But basically, in the Azure Management Console –> Virtual Network you’ll see the “Install Local Endpoint” icon. You will want to install this on both the on-premise physical or virtual machine as well as the Azure VM.
Once you do, you’ll see them populate in the GUI:
The next step, and this is also well documented in the TechNet article is to create the Group so that everything can communicate with each other.
You click on the “Create Group” icon in the screen above to do this. From here you add the endpoints that Azure sees – in my case ‘labmgmt.virt.lab’ is my domain joined machine running on-premise and knlazurevm is, well, the Azure VM. You’ll want to check the box to allow connections between endpoints in the group and then of course you add in your Azure roles that you created in Visual Studio and published to Azure.
What will happen at this point is that you should see your Azure connect tray icons lighten up. If you’re impatient like I am, you can right-click on the icon and choose the ‘refresh policy’ and it should come to life.
Now, you should be able to ping FROM on-premise TO Azure using the Role Instance ID’s.
You’ll get an IPV6 reply:
Now FROM the Azure VM TO the on-premise physical/VM you should be able to ping by hostname or FQDN:
FROM the on-premise physical/VM TO the Azure VM you can ping by name as well:
Now you could create, for example, a SharePoint instance in Azure and connect that using the FQDN of the SQL Server that will backend that running on-premise.
CONNECTING AZURE VM’S TO ACTIVE DIRECTORY ON-PREMISE:
Now, if you want to make it real fun – connect your Azure VM’s to your on-premise AD. To do this, you’ll need to install that local endpoint from the Azure Management GUI to one of your domain controllers. Now, you’ll see it show up in the endpoints screen we talked about above. You now need to go in and EDIT your endpoint group and then add in your domain controller so that it can talk to everyone as well.
In the Azure VM, you’ll need to make one change to the IPV6 DNS so that it can see your on-premise DC.
In the Azure VM – do a ping to the FQDN of your DC. Copy that IPV6 address and in the network properties of your NIC change the default IPV6 DNS server to the one that matches your on-premise DC.
Now, you’ll be able to add your Azure VM’s to your on-premise Active Directory!
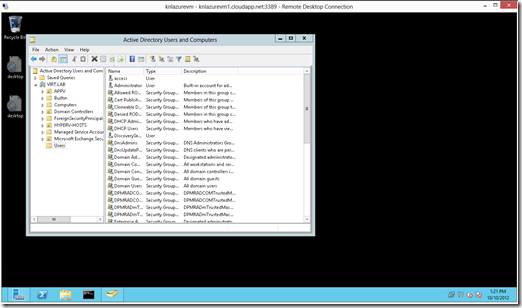
Here’s a fun screenshot – my Azure VM that’s domain joined, logged in as a domain administrator and using some AD tools:
Something else that’s kinda fun is the ability to now (with on-premise computers that have Azure Connect installed and are added to the same group) use on-premise Server Manager to connect and manipulate VM’s in Azure. In my case, I setup a new group called “AZURE SERVERS” and was able to add the ‘knlazurevm’ by hostname. Now I can manage my Server 2012 instances in the ‘cloud’ the same way I do my on-premise. Nice!
Good stuff!
Have fun and enjoy!


