Failed Request Tracing - IIS
The introduction of IIS 7.0 in Windows Server 2008 included enhanced logging tools available as part of the web server role. Failed Request Tracing is one of these features introduced in IIS 7 and is still available in IIS 8.5 included as part of Windows Server 2012R2.
Failed Request Tracing captures trace events for a request when it fails, in a lot more detail than the IIS logs. We have the option to specify which failed requests should be captured, based on a specific error code or the time it takes to load an application. This feature can also be used on valid requests, not just failed requests. When a web server role is installed the default modules selected does not provide the functionality for Failed Request Tracing. The Tracing module, found under the Health and Diagnostics section of the role service, must be selected for installation. As a result of this many customers are not aware of this feature even though it has been available as part of the web server role in excess of 7+ years.
How to install Failed Request Tracing (FRT)
In order for FRT to be enabled specific modules, also known as role services, needs to be selected for installation as part of the web server role. In both Windows Server 2008R2 and Windows Server 2012R2 this module is Tracing, which can be found underneath the Health and Diagnostics section.
Image 1: Screenshot of the Add Role Services Wizard in Windows Server 2012R2
Image 2: Screenshot of the Add Role Services Wizard in Windows Server 2008R2
How to enable Failed Request Tracing (FRT)
Once the tracing module has been installed the link to enable FRT can be found in the IIS manager actions pane as illustrated below.

Image 3: Screenshot highlighting the location of FRT within the IIS Manager
Selecting the FRT link, as highlighted in image 3, will display the below dialog box to enable the feature. Tick the check box to enable FRT and specify the directory where FRT logs should be stored. It is recommended that logs are stored on a different partition to the system drive. There is also an option to specify the maximum number of trace files in the settings dialog box.
Image 4: Screenshot of the FRT settings dialog box
Please note that enabling FRT will affect the request processing speed of IIS. The feature will self tune itself should there be too many requests in a short period of time and there is no need to worry about the possible implications to the web server.
How to configure Failed Request Tracing (FRT)
In the connections pane, select Failed Request Tracing Rules. Ensure that a site or application is selected from the connections pane first prior to configuring the feature.
Image 5: Screenshot of the FRT rules feature
Click Add in the Actions Pane and the below dialog box will appear where a specific rule to capture a failed request can be set up. Select what should be traced, there are four options as shown in image 6.
Image 6: Screenshot of the FRT rules configuration dialog box
Next we need to define the trace conditions, there specify what should be traced, a specific error code(s), time taken or an event such as Error or Information. It is also possible to specify a range of status codes rather than just one.
Image 7: Screenshot of the FRT rules configuration dialog box
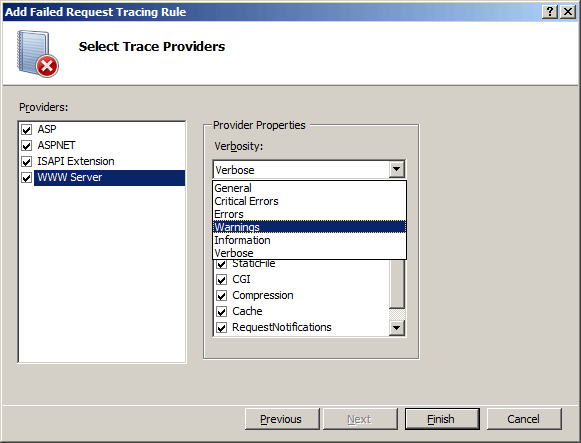
The final step is to select the trace providers and the level of verbosity. Once all the providers have been selected, click finish. The FRT rule will now be visible on the IIS Manager.
Image 8: Screenshot of the FRT rules configuration dialog box
Each time when there is an occurrence of a failed request as per our rules, the traces will be captured and stored in the location specified in image 4. Click on the freb.xsl, as shown in image 9, to view the traces in a formatted web page through Internet Explorer.
Image 9: Screenshot of the FRT log
Image 10: Screenshot of the FRT in Internet Explorer
FRT can also be configured through the <traceFailedRequests> element located in the ApplicationHost.config configuration file.
Disclaimer
The sample scripts are not supported under any Microsoft standard support program or service. The sample scripts are provided AS IS without warranty of any kind. Microsoft further disclaims all implied warranties including, without limitation, any implied warranties of merchantability or of fitness for a particular purpose. The entire risk arising out of the use or performance of the sample scripts and documentation remains with you. In no event shall Microsoft, its authors, or anyone else involved in the creation, production, or delivery of the scripts be liable for any damages whatsoever (including, without limitation, damages for loss of business profits, business interruption, loss of business information, or other pecuniary loss) arising out of the use of or inability to use the sample scripts or documentation, even if Microsoft has been advised of the possibility of such damages.


