Azure Web App Client Certificate Authentication with ASP.NET Core
This post will walk through securing an ASP.NET Core application deployed to an Azure Web App that is secured using client certificates.
The code is available for download at ClientCertDemo.
Background
Many customers have implemented client certificates for older web applications and are looking at Azure Web Apps to move their code. A common question is how to leverage client certificates in Azure Web Apps. This demo shows one possible solution to validating the certificate.
The client application will add the client certificate to the HTTP request. We will update the Azure Web App to enable client certificates, and the client certificate will be available using the X-ARR-ClientCert HTTP header. We can then parse this as an X509Certificate2 class to read the properties of the certificate and perform validation. Note that Azure Web Apps do not perform any validation on the certificate, this is up to the application to implement. That’s what this post shows.
The source code for the web application is available at https://github.com/kaevans/ClientCertDemo.
Create the Certificates
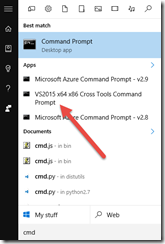
There’s nothing special about the certificate used in this demo, we’ll use self-signed certificates. In fact, I am going to reuse the self-signed certificate that I used for creating a point-to-site VPN connection. I am using makecert.exe, which is easy to find if you have Visual Studio 2015 installed… just load the “VS2015 x64 x86 Cross Tools Command Prompt”.
First, generate the root cert.
Generate a Root Certificate
- makecert -sky exchange -r -n "CN=NetworkingDemoRootCert2" -pe -a sha1 -len 2048 -ss My "NetworkingDemoRootCert2.cer"
Next, generate a client certificate that references the root certificate.
Generate Client Certificate
- makecert.exe -n "CN=NetworkingDemoClientCert2" -pe -sky exchange -m 96 -ss My -in "NetworkingDemoRootCert2" -is my -a sha1
Now open certmgr.msc to verify the certificates are there.
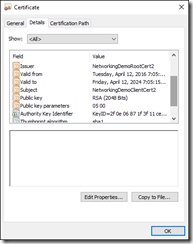
Double-click on the client cert that you just created and see its properties, we’ll need these properties in a moment.
Now that we have the certs, create the project.
Create the Web Application
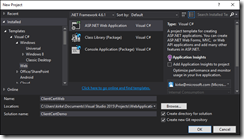
Create a new ASP.NET Web Application.
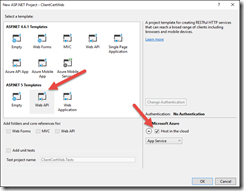
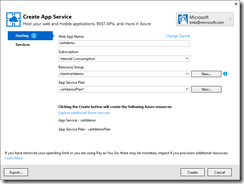
Use the ASP.NET 5 Web API template, and choose host in Azure Web App.
You are prompted to create the Azure Web App.
Enable Configuration
Update the dependencies in the project.json file to include Microsoft.Extensions.OptionModel.
Update appsettings.json with the values from your certificate, taking care to remove spaces from the values (I lost a bit of time troubleshooting that one!)
appsettings.json
- {
- "Logging":
- {
- "IncludeScopes": false,
- "LogLevel":
- {
- "Default": "Debug",
- "System": "Debug",
- "Microsoft": "Debug"
- }
- },
- "CertificateValidation":
- {
- "Subject": "CN=NetworkingDemoClientCert2a",
- "IssuerCN": "CN=NetworkingDemoRootCert2",
- "Thumbprint": "E8434AB532846AD2BDF20863A8789AF23E20ECBA"
- }
- }
Add a class to hold the configuration values.
CertificateValidationConfig
- namespace ClientCertWeb
- {
- public class CertificateValidationConfig
- {
- public string Subject { get; set; }
- public string IssuerCN { get; set; }
- public string Thumbprint { get; set; }
- }
- }
Now update the ConfigureServices method in Startup.cs to use services.AddOptions and register your custom class with the dependency injection system.
ConfigureServices
- public void ConfigureServices(IServiceCollection services)
- {
- services.AddOptions();
- services.Configure<CertificateValidationConfig>(Configuration.GetSection("CertificateValidation"));
- // Add framework services.
- services.AddMvc();
- }
Add Some Middleware
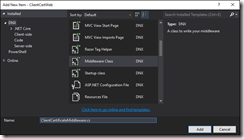
Add a middleware class.
The middleware class will request the configuration class via the Options model, and will also request logging via dependency injection via its constructor. We add an overload to the extensions class to add the options model in the constructor. When the HTTP request is received, the Invoke method is run for every request, and the configuration and logging types are passed to our middleware. The Invoke method will validate the certificate that is passed. The validation code is borrowed from the article How To Configure TLS Mutual Authentication for Web App with a few slight modifications to enable using the configuration system and adding logging.
ClientCertMiddleware
- using Microsoft.AspNet.Builder;
- using Microsoft.AspNet.Http;
- using Microsoft.Extensions.Logging;
- using Microsoft.Extensions.OptionsModel;
- using System;
- using System.Security.Cryptography.X509Certificates;
- using System.Threading.Tasks;
- namespace ClientCertWeb
- {
- // You may need to install the Microsoft.AspNet.Http.Abstractions package into your project
- public class ClientCertificateMiddleware
- {
- private readonly RequestDelegate _next;
- private readonly CertificateValidationConfig _config;
- private readonly ILogger _logger;
- public ClientCertificateMiddleware(RequestDelegate next, ILoggerFactory loggerFactory, IOptions<CertificateValidationConfig> options)
- {
- _next = next;
- _config = options.Value;
- _logger = loggerFactory.CreateLogger<ClientCertificateMiddleware>();
- }
- public async Task Invoke(HttpContext context)
- {
- //Validate the cert here
- bool isValidCert = false;
- X509Certificate2 certificate = null;
- string certHeader = context.Request.Headers["X-ARR-ClientCert"];
- if (!String.IsNullOrEmpty(certHeader))
- {
- try
- {
- byte[] clientCertBytes = Convert.FromBase64String(certHeader);
- certificate = new X509Certificate2(clientCertBytes);
- isValidCert = IsValidClientCertificate(certificate);
- if (isValidCert)
- {
- //Invoke the next middleware in the pipeline
- await _next.Invoke(context);
- }
- else
- {
- //Stop the pipeline here.
- _logger.LogError("Certificate is not valid");
- context.Response.StatusCode = 403;
- }
- }
- catch (Exception ex)
- {
- //What to do with exceptions in middleware?
- _logger.LogError(ex.Message, ex);
- await context.Response.WriteAsync(ex.Message);
- context.Response.StatusCode = 403;
- }
- }
- else
- {
- _logger.LogError("X-ARR-ClientCert header is missing");
- context.Response.StatusCode = 403;
- }
- }
- private bool IsValidClientCertificate(X509Certificate2 certificate)
- {
- // In this example we will only accept the certificate as a valid certificate if all the conditions below are met:
- // 1. The certificate is not expired and is active for the current time on server.
- // 2. The subject name of the certificate has the common name nildevecc
- // 3. The issuer name of the certificate has the common name nildevecc and organization name Microsoft Corp
- // 4. The thumbprint of the certificate is 30757A2E831977D8BD9C8496E4C99AB26CB9622B
- //
- // This example does NOT test that this certificate is chained to a Trusted Root Authority (or revoked) on the server
- // and it allows for self signed certificates
- //
- if (null == certificate) return false;
- // 1. Check time validity of certificate
- if (DateTime.Compare(DateTime.Now, certificate.NotBefore) < 0 || DateTime.Compare(DateTime.Now, certificate.NotAfter) > 0) return false;
- // 2. Check subject name of certificate
- bool foundSubject = false;
- string[] certSubjectData = certificate.Subject.Split(new char[] { ',' }, StringSplitOptions.RemoveEmptyEntries);
- foreach (string s in certSubjectData)
- {
- if (String.Compare(s.Trim(), _config.Subject) == 0)
- {
- foundSubject = true;
- break;
- }
- }
- if (!foundSubject) return false;
- // 3. Check issuer name of certificate
- bool foundIssuerCN = false;
- string[] certIssuerData = certificate.Issuer.Split(new char[] { ',' }, StringSplitOptions.RemoveEmptyEntries);
- foreach (string s in certIssuerData)
- {
- if (String.Compare(s.Trim(), _config.IssuerCN) == 0)
- {
- foundIssuerCN = true;
- break;
- }
- }
- if (!foundIssuerCN) return false;
- // 4. Check thumprint of certificate
- if (String.Compare(certificate.Thumbprint.Trim().ToUpper(), _config.Thumbprint) != 0) return false;
- // If you also want to test if the certificate chains to a Trusted Root Authority you can uncomment the code below
- //
- //X509Chain certChain = new X509Chain();
- //certChain.Build(certificate);
- //bool isValidCertChain = true;
- //foreach (X509ChainElement chElement in certChain.ChainElements)
- //{
- // if (!chElement.Certificate.Verify())
- // {
- // isValidCertChain = false;
- // break;
- // }
- //}
- //if (!isValidCertChain) return false;
- return true;
- }
- }
- // Extension method used to add the middleware to the HTTP request pipeline.
- public static class ClientCertMiddlewareExtensions
- {
- public static IApplicationBuilder UseClientCertMiddleware(this IApplicationBuilder builder)
- {
- return builder.UseMiddleware<ClientCertificateMiddleware>();
- }
- public static IApplicationBuilder UseClientCertMiddleware(this IApplicationBuilder builder, IOptions<CertificateValidationConfig> options)
- {
- return builder.UseMiddleware<ClientCertificateMiddleware>(options);
- }
- }
- }
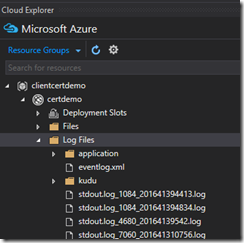
To enable logging when deployed to Azure, modify the web.config file and change the stdoutLogEnabled value to true.
When deployed to Azure, this will write the log files so that you can troubleshoot when things aren’t working.
Finally, we need to register our middleware in the Configure method in Startup.cs.
Configure
- public void Configure(IApplicationBuilder app, IHostingEnvironment env, ILoggerFactory loggerFactory)
- {
- loggerFactory.AddConsole(Configuration.GetSection("Logging"));
- loggerFactory.AddDebug();
- app.UseIISPlatformHandler();
- app.UseStaticFiles();
- app.UseClientCertMiddleware();
- app.UseMvc();
- }
That’s it! We have now created the middleware needed to validate the certificate.
Update the Azure Web App
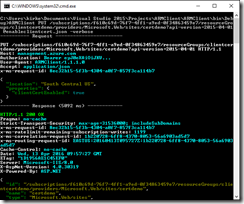
The Azure Web App needs to be updated in order to allow client certificates. There are instructions at How To Configure TLS Mutual Authentication for Web App that show how to use ARMClient to update the web app. Note that you could do this at deployment time if you were deploying using an ARM Template with web deploy.
The PUT request that you need looks like:
ARMClient PUT
- ARMClient PUT subscriptions/{Subscription Id}/resourcegroups/{Resource Group Name}/providers/Microsoft.Web/sites/{Website Name}?api-version=2015-04-01 @enableclientcert.json -verbose
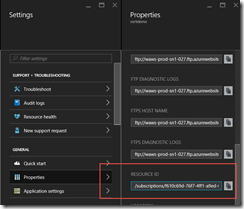
The ARMClient tool requires your subscription ID, resource group name, and web app name. An easy way to get this information is to go to the Azure portal and go to your web app’s properties, looking at the resource ID.
Create a local file, enableclientcert.json and use your web app’s location in the file.
enableclientcert.json
- { "location": "South Central US",
- "properties": {
- "clientCertEnabled": true } }
Run ARMClient.exe with the PUT URL and the output will look similar to the following.
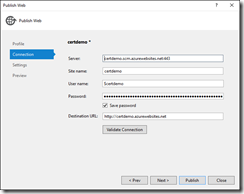
Publish the Web Application
Right-click the project and choose Publish to publish the web application to Azure.
When the publish is complete, you’ll get an error page in the browser with a 403 error.
I opened an incognito window in Chrome and changed to the HTTPS URL for my Web API controller. I am prompted for a client certificate.
I provide it and now I can access the values.
Create a Client Application
For an extra bonus, I created a client application to test things out. It uses the HttpClient API to make a request to Azure. Make sure that you are using the SSL URL, else the certificate will not be sent.
Client
- using System;
- using System.Collections.Generic;
- using System.Linq;
- using System.Net.Http;
- using System.Net.Http.Headers;
- using System.Net.Security;
- using System.Security.Cryptography.X509Certificates;
- using System.Text;
- using System.Threading.Tasks;
- namespace client
- {
- class Program
- {
- static void Main(string[] args)
- {
- var p = new Program();
- p.RunAsync().Wait();
- }
- private async Task RunAsync()
- {
- var handler = new WebRequestHandler();
- handler.ClientCertificateOptions = ClientCertificateOption.Manual;
- var cert = GetClientCert();
- handler.ClientCertificates.Add(cert);
- handler.ServerCertificateValidationCallback = delegate (object sender, X509Certificate certificate, X509Chain chain, SslPolicyErrors error)
- {
- //Ignore errors
- return true;
- };
- handler.UseProxy = false;
- using (var client = new HttpClient(handler))
- {
- client.BaseAddress = new Uri("https://certdemo.azurewebsites.net/");
- //client.BaseAddress = new Uri("https://localhost:44315/");
- client.DefaultRequestHeaders.Accept.Clear();
- client.DefaultRequestHeaders.Accept.Add(new MediaTypeWithQualityHeaderValue("application/json"));
- var response = await client.GetAsync("api/values");
- if (response.IsSuccessStatusCode)
- {
- var str = await response.Content.ReadAsStringAsync();
- Console.WriteLine(str);
- }
- else
- {
- Console.WriteLine("FAIL:" + response.StatusCode);
- }
- }
- }
- private static X509Certificate GetClientCert()
- {
- X509Store store = null;
- try
- {
- store = new X509Store(StoreName.My, StoreLocation.CurrentUser);
- store.Open(OpenFlags.OpenExistingOnly | OpenFlags.ReadOnly);
- var certs = store.Certificates.Find(X509FindType.FindBySubjectName, "NetworkingDemoClientCert2", true);
- if (certs.Count == 1)
- {
- var cert = certs[0];
- return cert;
- }
- }
- finally
- {
- if (store != null)
- store.Close();
- }
- return null;
- }
- }
- }
Just like in the web page, the client works, too. The source code for the web application is available at https://github.com/kaevans/ClientCertDemo.
For More Information
How To Configure TLS Mutual Authentication for Web App
https://github.com/kaevans/ClientCertDemo
Comments
- Anonymous
May 26, 2016
Hi Kurt,It would be awesome if you could expand on the client app, showing how to publish that app and upload it's certificate to Azure Web Apps. Thanks!
