Implement Kerberos Authentication for Exchange 2010 CAS Servers and MAPI clients and Confirm it’s Working
The process of implementing Kerberos authentication on the CAS servers involves creating a service account and registering the service principal name (SPN). This must be done on each CAS server in both the Egan and San Mateo Datacenters.
The steps to deploy the ASA credential are as follows:
- Create a computer account to be used as the ASA credential.
- Deploy the ASA credential to the CAS members (using the RollAlternateserviceAccountPassword.ps1 script)
- Confirm the setting on each CAS server
- Convert the Offline Address Book (OAB) virtual directory to an application using the CovertOABVdir.ps1 script
- Assign the SPNs to the ASA credential computer account.
- Confirming Kerberos at the client
To configure Kerberos ASA:
- Create a computer object service account. (All computer accounts must end with the "$" character but do not add "$" to the computer account name, it will be added automatically and will be shown in the SAMAccountName in LDP. ) The password is not important; it will be reset by the script. A Machine (computer) account is preferred. Only one service account is required for multiple Active Directory sites. NOTE: The CAS array members in multiple sites will use this same service account but different SPNs.
EXAMPLE
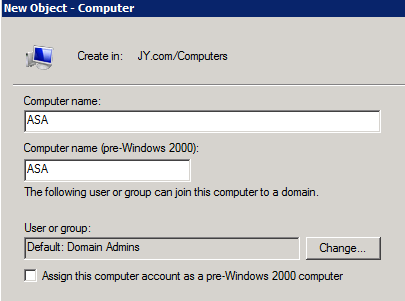
In my lab I'm using ADUC to create the ASA account:
Proceeded by filling in the details, no need for pre-windows 2000 assignment:
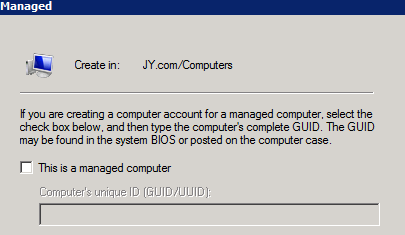
And no need for ticking "This is a managed computer"
- Deploy the ASA credential to the CAS members (using the RollAlternateserviceAccountPassword.ps1 script)
Execute the following from the Exchange 2010 Management Shell:
- To target only members of a specific CAS array:
.\RollAlternateserviceAccountPassword.ps1 -ToArrayMembers <CASArrayName>
-GenerateNewPasswordFor <Domain\Account$ >
- Select Yes at the prompt to change password
If this syntax is used then the command must be run twice, once for each datacenter.
- To target all Exchange 2010 CAS servers in the forest:
.\RollAlternateserviceAccountPassword.ps1 -ToEntireForest
-GenerateNewPasswordFor <Domain\Account$ >
- Select Yes at the prompt to change password
- To target a newly installed CAS server:
.\RollAlternateServiceAccountPassword.ps1 -CopyFrom <ExistingServerName>
-ToSpecificServers <NewServerName> -Verbose
EXAMPLE
In my lab have multi-role servers running MB, HT and CAS which means I'm running the cluster service which mean I can't add NLB to the CAS servers which means I can't create a CAS array. But the above commands will apply to most environments and the example below is for adding the ASA credential to my individual CAS servers:
Prior to setting the ASA the above command you can run the following command showing the ASA is not set:
Get-ClientAccessServer -Identity e2010 -IncludeAlternateServiceAccountCredentialStatus | fl AlternateServiceAccountConfiguration
My CAS server name is E2010
Now I'm running the following script pointing to my 1st CAS server:
.\RollAlternateserviceAccountPassword.ps1 -ToSpecificServers e2010 -GenerateNewPasswordFor "jy.com\ASA$" -Verbose
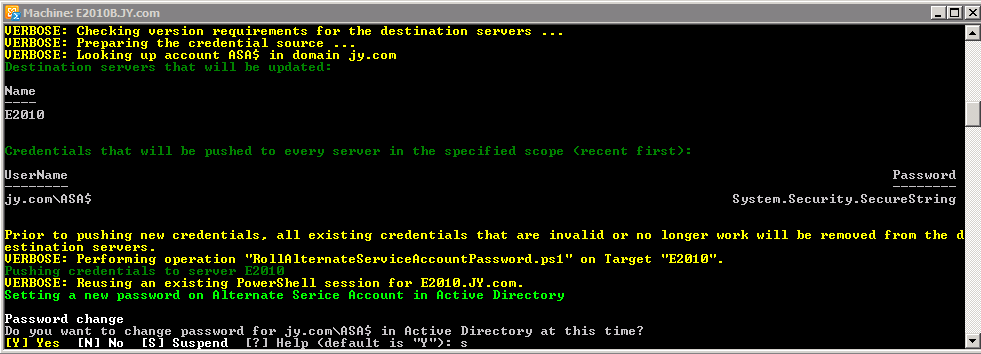
Which produces this output:
And the rest of script output asking for the Password change:
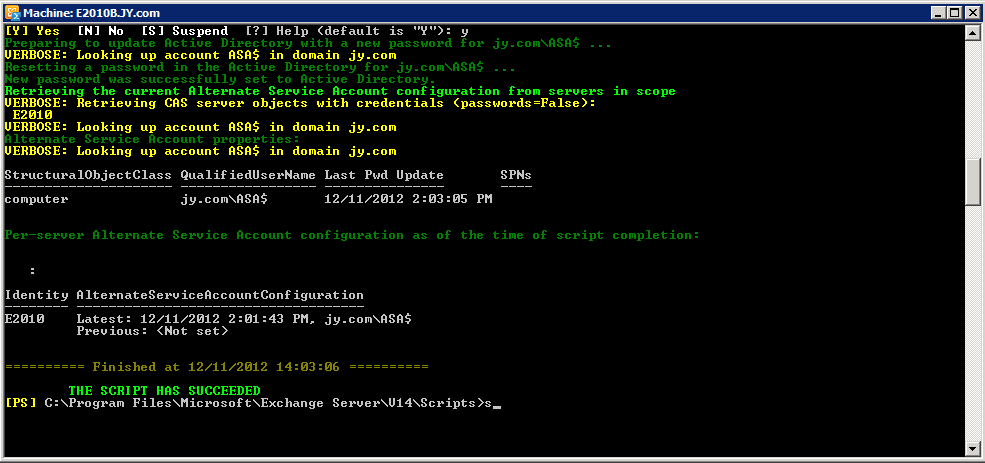
Once you select Y you'll see the script complete:
Next I'll run the following command to add the ASA credential to another CAS server, e2010B. You would do this to newly deployed CAS servers:
.\RollAlternateServiceAccountPassword.ps1 -CopyFrom e2010 -ToSpecificServers e2010B –Verbose
- Confirm the setting on each CAS server by running the following:
Get-ClientAccessServer -Identity <CASServerName>
-IncludeAlternateServiceAccountCredentialStatus | fl AlternateServiceAccountConfiguration
EXAMPLE
Now that I've deployed the ASA credential I'll run the above command confirming the ASA credential has been deployed to my CAS servers, looking at just the e2010 CAS server:
- Convert the OAB virtual directory
This script will convert the OAB virtual directory to an IIS web application as well as create the new application pool, MSExchangeOabAppPool. Converting the OAB virtual directory is necessary to support different authentication methods like Kerberos and Certificate authentication and must be done before you configure Kerberos Client Authentication. The name of the script is ConvertOABVdir.ps1. The script is located in the Scripts subdirectory of the Exchange install path.
.\ConvertOABVdir.ps1
EXAMPLE
This is easy and will complete quickly:
Done! Above is the result you're looking for.
- Register the SPNs for this account
This is done only once using the SETSPN.EXE utility. Depending on how Active Directory permissions are implemented, the operation may require Domain Administrator rights. The step should only be completed after all previous steps have completed successfully.
NOTE: RollAlternateserviceAccountPassword.ps1 -This step must be performed immediately with production servers that are added in the future. Failure to do so will result in poor client performance if a new server is added to the CAS array and the steps above are not followed. Microsoft recommends that you schedule this password change via a schedule task.
EXAMPLES
- Use the created service account in Active Directory from step 1 above: JY\ASA
- Register the SPN's on this account
- setspn -F -S exchangeMDB/webmail.jy.com JY\ASA
- setspn -F -S exchangeRFR/webmail.jy.com JY\ASA
- setspn -F -S exchangeAB/webmail.jy.com JY\ASA
- setspn -F -S HTTP/webmail.jy.com JY\ASA
- setspn -F -S exchangeMDB/webmail JY\ASA
- setspn -F -S exchangeRFR/webmail JY\ASA
- setspn -F -S exchangeAB/webmail JY\ASA
- setspn -F -S HTTP/webmail JY\ASA
- The following steps have to be executed on each CAS server ?$cred = get-credential "JY\ASA"
- Set-clientaccessserver -Identity CASserver -AlternateServiceAccountCredential $cred
- iisreset
- restart-service MSexchangeAB
- restart-service MSexchangeRPC
- To verify the setting, execute the following on each CAS server:
- Get-ClientAccessServer -Identity CASserver -IncludeAlternateServiceAccountCredentialStatus |fl AlternateServiceAccountConfiguration
Once you've registered your SPN for your environment you can view the registration via the following command, here's I'm using my ASA account in my jy.com domain:
Setspn –L jy.com\ASA
- Confirming Kerberos at the client
Note; you'll need to run an IISReset, and restart the Exchange Address Book Service and the Exchange RPC Client Access Service on each CAS server after all the above steps are completed
EXAMPLE 1
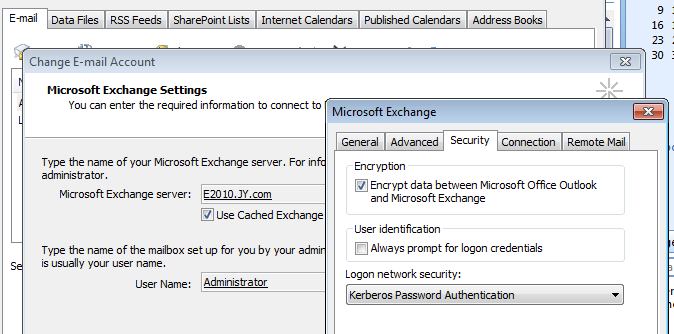
Configure your Outlook profile to use Kerberos authentication via the Account settings of the profile via Change E-mail Account | More settings | Security and Restart Outlook if running :
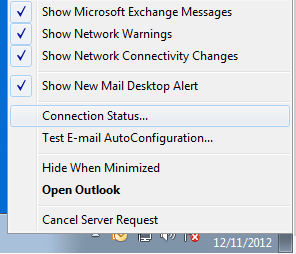
Check the connection status by right-clicking the systray Outlook icon and selecting connection status:
If your connection is TCP/IP you're successfully using Kerberos for MAPI connected clients, if HTTPS than you are not:
EXAMPLE 2
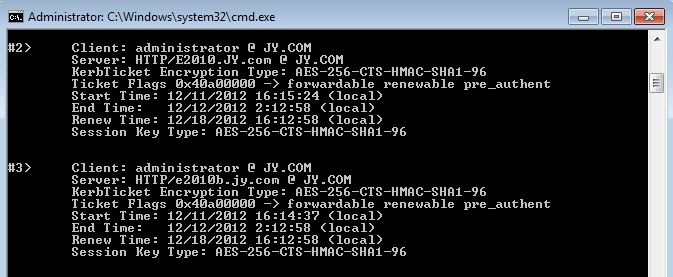
You can also run klist from a command prompt to see the Kerberos tickets for Outlook access:
EXAMPLE 3
Another method to ensure Kerberos is being accepted by the CAS servers using logs from OAB:
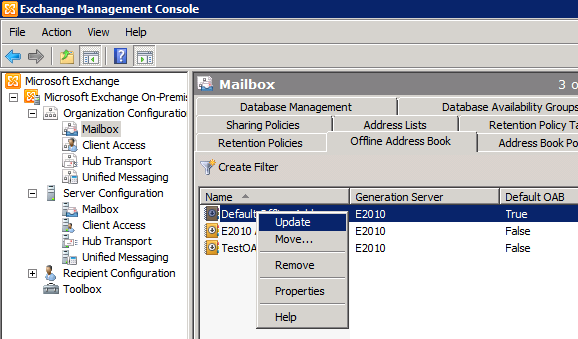
- Update your OAB from EMC:
- Followed by looking at the logs in their default location:
C:\Program Files\Microsoft\Exchange server\v14\Logging\AddressBook Service
- Confirm the AddressBook_... is reflecting the time of your update and open it. Once you scroll to the end you should see something like this, notice the 'Kerberos' at the end of last line:
2013-02-11T21:09:20.994Z,6,0,/o=JY/ou=Exchange Administrative Group (FYDIBOHF23SPDLT)/cn=Recipients/cn=Administrator,,192.168.0.13,e2010,ncacn_ip_tcp,GetFQDNFromLegacyDN,,7,,,Kerberos,
EXAMPLE 4
Capture a netmon trace and look to see if the Kerberos Token is seen:
- Periodically Changing the Password for the ASA Credential Account
It's recommended to periodically change the password for the ASA credential account. To do so you would need to create a scheduled task that runs the RollAlternateServiceAccountPassword.ps1 script. From: https://technet.microsoft.com/en-us/library/ff808311.aspx
If the script runs as a scheduled task, its results are logged to the Exchange server Logging folder in a subfolder called RollAlternateServiceAccountPassword.
You can use the log to confirm that the task has been running successfully.
- References
The following references were used in the creation of this document:
- Using Kerberos with a Client Access Server Array or a Load-Balancing Solution
- Enabling Kerberos Authentication for MAPI Clients Connecting to Exchange 2010 SP1
- Recommendation: Enabling Kerberos Authentication for MAPI Clients
- Using the RollAlternateserviceAccountPassword.ps1 Script in the Shell
Hope this helps!
Comments
Anonymous
January 01, 2003
Really thorough. This is just what I was looking for.Anonymous
September 18, 2013
This was just what I was looking for. Thanks for the helpful information.

