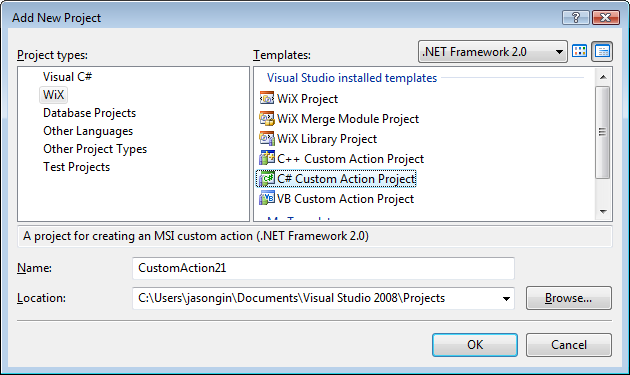
Custom action project templates
New in this week's WiX build 3.0.4123 are Visual Studio 2005 & 2008 templates for C++, C#, and VB custom action projects:

The C++ project sets you up with the WiX unmanaged CA utility library (wcautil), while the C# and VB projects use the DTF library for managed-code MSI custom actions. I assume you're here because you want to read more about the latter.
When DTF first released with WiX last week, it included some sparse documentation about how to create a post-build step to package up your managed CA assembly in a form callable by MSI. I apologize to anyone who jumped on it right away and had trouble hooking things up (which was only made more difficult by a missing binary that had to be built from source). I should have had these templates ready then.
When you create a C# custom action project from the new template, the project has the necessary post-build step hooked up already. For the curious, those build rules are in %ProgramFiles%\MSBuild\Microsoft\WiX\v3.0\wix.ca.targets. Building the custom action project will produce an additional DLL in the target directory with the name $(TargetName).CA.dll. That is the DLL to be streamed into your MSI Binary table. Since that DLL exports ordinary entrypoints callable directly by the MSI engine, you can use it with any MSI authoring tool as if it was an unmanaged CA DLL.
The custom action build process will automatically package up any non-GAC'd assemblies that your CA depends on. (Make sure the Copy Local property is set to 'true' on the reference node if you want it included.) Those dependencies will include at a minimum the Microsoft.Deployment.WindowsInstaller.dll assembly from DTF. Additionally, any items in the project with a Build Action of 'Content' will be included in the CA package. CustomAction.config is the sole Content file in the template; your CA may require additional resources or data files at runtime.
In Votive, a convenient way to consume the custom action DLL in your setup is via a project reference:
- Create a solution with a WiX MSI or WiX Library project and a C# or VB custom action project.
- Add a reference from the WiX project to the custom action project.
- Author the custom action in your setup with WiX code similar to the fragment below. Note you may need to change some attributes in the XML, depending on your CA and how it executes.
<Fragment>
<Binary Id="MyCustomAction.dll"
SourceFile="$(var.CAProjectName.TargetDir)$(var.CAProjectName.TargetName).CA.dll" />
<CustomAction Id="MyCustomAction" BinaryKey="MyCustomAction.dll"
DllEntry="CAMethodName" Execute="immediate" />
</Fragment>
I hope this helps interested developers get started with managed custom actions. Future posts here will hopefully get into some actual coding.
Comments
Anonymous
June 07, 2010
Thank you! Exactly the info I was looking for!Anonymous
September 30, 2010
Is this add-in going to be included in VS 2010 at some point? Thanks, JonAnonymous
September 30, 2010
@JonM These project templates along with the Votive extension for Visual Studio 2010 are part of the WiX 3.5 package. I don't know what the plans are for future versions of Visual Studio.Anonymous
October 08, 2010
The comment has been removedAnonymous
October 12, 2010
The comment has been removedAnonymous
October 12, 2010
The answer is yes I was missing something stupid... My Custom Action DLL was compiled using .Net Framework 4.0 and the 4.0 Framework hasn't been installed on the test machine yet, because that's part of what this Custom action is going to do... I updated the DLL to Compile against the 2.0 Framework and everything appears to be working correctly now.Anonymous
September 30, 2011
Thanks a lot for this clear explanation, you saved me so much time !Anonymous
January 31, 2012
Great post!! Thanks for your effort.