Configuration Manager: Cache Management
Greetings all! Heath here, reporting in after a lengthy vacation and the holidays. I hope everyone has been doing well over the past month or two, and hope 2014 is off to a great start for you.
This post is all about something we use everyday, but probably don’t spend too much time managing or monitoring in our enterprise: the Configuration Manager Client Cache! This is an all up post, meaning I’ve got example code to make changes, and then we follow-up with inventory and reports to validate the settings in our environment.
First, an intro to the Configuration Manager client cache. It’s used for a large number of Configuration Manager operations – by default, whenever a client needs to grab content for an action (think Application Management and Software Updates), the client will download to a temporary location. This “download and execute” behavior is what gives us the ability to use BITS to move content to a client, allows us to be clear of network requirements while running setup.exe, and allows clients to re-execute an application with out re-downloading any content.
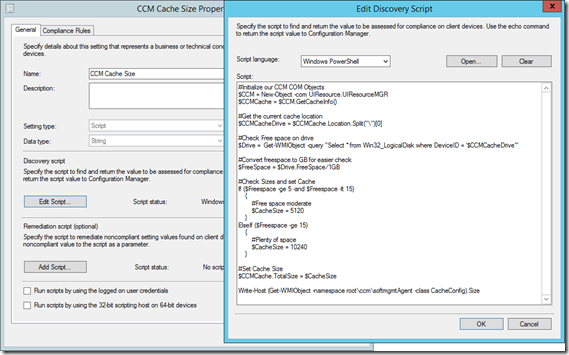
Let's get started in the lab. We'll start with our script below – in this case, we’re going to use the Configuration Manager COM object to interact with the Configuration Manager client. I encourage everyone to poke around with this – much of the client automation work you’ll see in the SDK is geared around COM, so this is a great skill to add to your scripting repertoire if you are a Configuration Manager admin!
 #Initialize our CCM COM Objects
 $CCM = New-Object -com UIResource.UIResourceMGR

 #USe GetCacheInfo method to return Cache properties
 $CCMCache = $CCM.GetCacheInfo()

 #Get the current cache location
 $CCMCacheDrive = $CCMCache.Location.Split("\")[0]

 #Check Free space on drive
 $Drive = Get-WMIObject -query "Select * from Win32_LogicalDisk where DeviceID = '$CCMCacheDrive'"

 #Convert freespace to GB for easier check
 $FreeSpace = $Drive.FreeSpace/1GB

 #Check Sizes and set Cache
 If ($Freespace -ge 5 -and $Freespace -lt 15)
 {
 #Free space moderate
 $CacheSize = 5120
 }
 If ($Freespace -ge 15)
 {
 #Plenty of space
 $CacheSize = 10240
 }

 #Set Cache Size
 $CCMCache.TotalSize = $CacheSize

 Write-Host (Get-WMIObject -namespace root\ccm\softmgmtAgent -class CacheConfig).Size
Here you’ll see a couple of things take place:
- Initialize the ConfigMgr UI COM Object
- Get the drive holding the current cache
- Check the free space (notice, we tell it to divide by 1GB)
- We determine the size of the cache and then set the new cache size
- Finally, we check that the setting took by checking the cache size via the CacheConfig class in the CCM\SoftMgmtAgent namespace - more on this below.
Cool! We’ve got a PowerShell script that will change the Configuration Manager client cache size without restarting the Configuration Manager client. Where would this be useful? We could send this out via package and program to set it once, maybe even with a recurring schedule. I’m a huge fan of Compliance Settings within Configuration Manager, and this sounds like a perfect use case for Configuration Manager Compliance Settings!
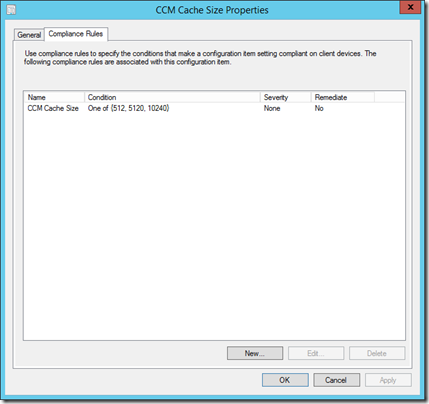
Here, we’ll wrap this up in a Compliance Setting Configuration Item. This Configuration Item will use a script to detect and set the state, then we’ll check the outcome of the script as our measure of compliance:
Great, now we’ve got a CI that will enforce client cache configurations, and since it’s a CI, we can set an easy recurrence pattern and get basic information back out of the script.
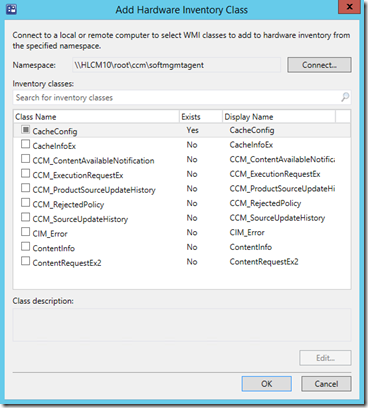
Now that we’re able to manage the cache on the client, we’ll probably want to be able to report on this configuration, so we’ll need to do a bit of work to make this happen. We’ll be using Hardware Inventory to pull back the Configuration Manager Cache Configuration – in this case, we’ll need to use the nifty new MOF-free editor in System Center 2012 Configuration Manager to go grab the class we’re after.
Lets start by connecting to the appropriate namespace on a client – we’ll have to run the console as Admin (Right click, “Run As Administrator”). We’ll navigate to root\ccm\SoftMgmtAgent namespace, then select the CacheConfig class:
While we’re modifying hardware inventory, a great attribute to add to an existing class is “Free Space” in the Logical Disk class. This will be used later for the reports below.
Cool, now that we have hardware inventory reporting back, we should be able to build a few reports that reference the V_GS_CacheConfig. I won’t go into too many details, as the reports are available below, but we’ll make use of our newly created inventory class to report on the current state of the client cache enterprise wide.
If we click through each of the cache sizes, we can dig into a detailed view for each client in that state. This could easily be adapted to a “I need to deploy a 10GB package – which clients can handle it?” type of report!
All of the sample files are available here, via TechNet. I debated splitting this into two posts, but I wanted to make sure the entire solution is available for folks, and the nice thing is you can choose to use all of the components (Script, reports, inventory changes) or the individual pieces (report/inventory info OR cache script). Maybe you’ll use this as a starting point for your project, maybe you’ve had issues with a standardized client cache in the past – either way, let me know how you use this or any questions or comments below!
Comments
Anonymous
January 07, 2014
Great post. Very easy to follow. Thanks!Anonymous
December 23, 2014
This is a great guide and a very clever way of adjusting your client cache dynamically. The only critique I can offer is that in order to get the CI to run, a custom client setting is needed on the device to allow unsigned scripts to run on the system. By default, the client setting is set to only allow signed scripts and this hindered the baseline's ability to adjust the client size via PowerShell. Below is a link to a very helpful article that explains how to create the custom device setting. www.petervanderwoude.nl/.../deployment-of-configuration-baseline-failed-with-error-script-is-not-signed-in-configmgr-2012Anonymous
March 08, 2015
Hi Heath Thanks for this excellent post - However, the reports do not work as they are. Can you give us some tips on how to modify them for our environments? Thanks.Anonymous
April 03, 2015
Great write up, I'm not familiar at all with COM object and it seemed a rather difficult task without this guide. I wrote it into an advanced function if anyone is interested, I also deployed this as an application not a baseline and below is my detection method as well. Function: github.com/.../Set-CCMCacheSize.ps1 Detection Method: #Initialize our CCM COM Objects $CCM = New-Object -com UIResource.UIResourceMGR #USe GetCacheInfo method to return Cache properties $CCMCache = $CCM.GetCacheInfo() if ($CCMCache.TotalSize -ge '10240') { Write-Host '10GB cache' }Anonymous
August 10, 2016
Is there a way to accomplish this via a vbscript. We had an sccm guy who was looking at doing something similar to this with powershell. The problem he ran into was that he was going to have the run the powershell unrestricted which is not allowed hereAnonymous
August 10, 2016
And I think the reason he was looking to have it run unrestricted is because the script wasn't signed and we don't allow unsigned powershell scripts and that was why he was looking at running it unrestricted.Anonymous
August 10, 2016
One other question on this subject as I was thinking on it. Even if it was a vbscript wouldn't that also require a digital signature.Anonymous
August 10, 2016
Talked with one our Microsoft guys here and he stated that the require digital signature policy only applies to powershell not vb.


![clip_image002[5] clip_image002[5]](https://msdntnarchive.z22.web.core.windows.net/media/MSDNBlogsFS/prod.evol.blogs.msdn.com/CommunityServer.Blogs.Components.WeblogFiles/00/00/01/60/37/metablogapi/1682.clip_image0025_thumb_2361BF1D.jpg)