Camera construction in ParallaxUi
One of the more subtle aspects of the otherwise pretty straightforward ParallaxUi is the "registration" between the 2D and the 3D. This comes into play when you just move ever so slightly off-angle, and the view goes from the 2D view of the UI to a 3D view of a Viewport3D with pretty much a head on view. It's critical that this transition be seamless, otherwise the illusion is completely broken.
But how do we get that seamless transition? The key is in setting up the 3D camera correctly. This post will talk about how, given a field-of-view, we can set up the camera to have the identical view on a 3D model that we'd have on the 2D object that it replaces. A subsequent post will talk about how we'll choose what field-of-view to use.
A WPF PerspectiveCamera has four primary components of interest:
- Position - A Point3D representing the camera's location in space.
- LookDirection - a Vector3D representing the direction the camera points.
- UpDirection - which way is up?
- Field of View -- in degrees, how much does the camera see?
Here, we'll have set up our overall 3D scene to act as if the 2D element it's registered with has it's size as elt.RenderSize, and has its corner at the origin (0,0). We also set things up so the camera points in the negative-z direction, and has positive-y as its up direction. This means that the camera needs to be centered, in x/y at (elementWidth / 2, elementHeight / 2) so it is right in the middle of the element.
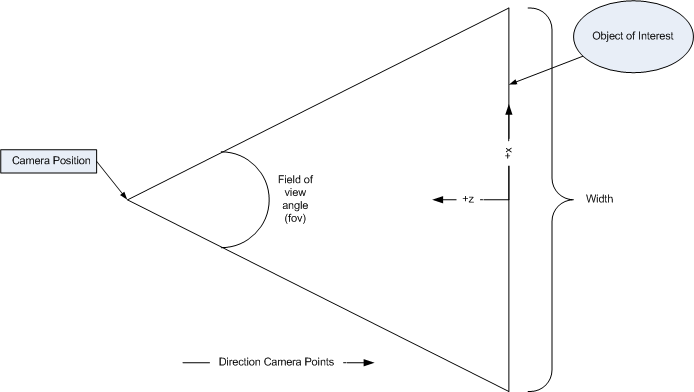
Then the big question is -- how far along the z-axis does the camera need to be. Here, we need to use a little high school trigonometry. Consider the following diagram, where the camera is centered on the element of interest in x and y. In the below diagram, we're above looking down the y axis.

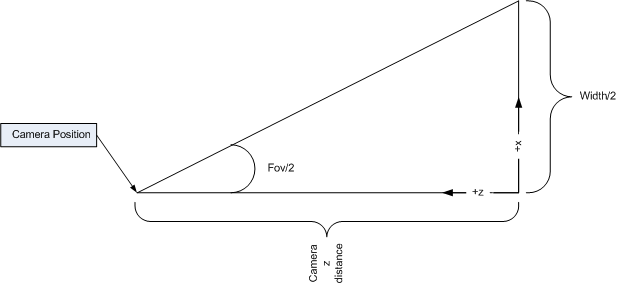
We need to figure out how far along z the camera needs to be. So cut the triangle in half and wind up with this:

What this shows us is that tan(fov/2) = (width/2) / z. Solving for z... z = (width/2) / tan(fov/2).
Putting it together results in this helper function used in the code.
/// <summary>
/// Create a camera that looks down -Z, with up as Y, and positioned right halfway in X and Y on the element,
/// and back along Z the right distance based on the field-of-view is the same projected size as the 2D content
/// that it's looking at.
/// </summary>
private Camera CreateCamera(UIElement elt, double fieldOfView)
{
Size size = elt.RenderSize;
double fovInRadians = fieldOfView * (Math.PI / 180);
double zValue = (size.Width / 2) / Math.Tan(fovInRadians / 2);
Point3D cameraPosition = new Point3D(size.Width / 2, size.Height / 2, zValue);
Vector3D negativeZAxis = new Vector3D(0, 0, -1);
Vector3D positiveYAxis = new Vector3D(0, 1, 0);
return new PerspectiveCamera(cameraPosition,
cameraDirection,
upVector,
fieldOfView);
}
Comments
Anonymous
April 03, 2007
PingBack from http://dressupgameblogs.info/camera-construction-in-parallaxui/Anonymous
April 04, 2007
WPF Architect Greg Schecter has written a few really cool 3D transitions for 2D elements. We've gottenAnonymous
April 11, 2007
Já pensou em animar objetos 2D? Quem saber fazer uma entrada animada, com caixas de texto se movendo,Anonymous
April 15, 2007
In my last post , I said that "one of the more subtle aspects of the otherwise pretty straightforwardAnonymous
October 25, 2007
When incorporating 3D support into WPF, we strived for integration with the rest of the system, and sufficientAnonymous
October 25, 2007
When incorporating 3D support into WPF, we strived for integration with the rest of the system, and sufficientAnonymous
November 27, 2007
My previous two posts ( here and here ) discuss usage of the Planerator control.  There are someAnonymous
November 27, 2007
My previous two posts ( here and here ) discuss usage of the Planerator control.&#xA0; There are