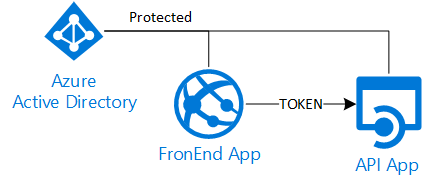
Access an Azure AD secured Api with Asp.Net Core 2.0
tl;dr
- Register a new Web App in AAD for the Api
- Register a new Web App in AAD for the FronEnd
- Add the permissions to access the Api app
- Configure the Web apps code with the authentication details as usual (ClientID, Client Secret, Audience Uri..etc..).
- In Azure portal edit the FrontEnd manifest enabling the implicit flow:
"oauth2AllowImplicitFlow": true - To obtain an access token, in the FrontEnd app code, configure the OpenIdConnection options:
- set the response type to "token id_token"
- specify the Api Application ID
- enable the saving of the tokens in the HttpContext
"Hello World!"
In my previous post I talked about a delegation scenario with AzureAD and a classic Asp.Net web project. In this post I would like to explain a simpler solution: an Asp.Net Core 2.0 FrontEnd that needs to access a backend Api, both secured with the same AzureAD directory.
Even if the theory and the protocols behind are always the same (OAuth2/OpenIdConnect) in Asp.Net Core 2.0 the default behavior is different, so we need to take and code different steps.
These are the major differences:
- On client side we need to use MSAL and not ADAL to obtain a token
- On server side we need to configure the middleware to support AzureAd
- The implicit flow is used (opposed to the "authorization code flow")
In order to protect with AAD an Asp.Net Core 2.0 project we need to add the OpenIdConnect support and configure it properly. This is not a trivial task, but fortunately, we can grab the needed code from the standard Asp.Net Core 2.0 template. If we create a new web project and select the "work or school account" authentication option we will have all the needed classes in the files AzureAdAuthenticationBuilderExtensions and AzureAdOptions. With these files enabling the authentication is straight forward, as we just need to configure the AzureAd parameters in the appsettings.json and the client secret using the "manage user secrets" option.
By default the authentication library uses the "implicit flow", that means the client (browser) will get the required tokens directly from the authentication server. So differently from the "authorization code flow" (used with ADAL in Asp.Net) the server side receives the tokens from the caller and there is no "authorization code" that need to be redeemed. In other words this means the server side has no way to exchange the user credentials for an access token for the Api layer.
Again by default the authentication library tells the client to ask only for the identity token (id_token) and not for any access token, so to obtain an access token for the Api layer we need to explicitly enable it:
 //enable the access token request
options.ResponseType = "token id_token";

//the target resource ID (access token for?)
options.Resource = "XXXXXX-YYYYYY-ZZZZZ-WWWWW";

//save tokens in the request context
options.SaveTokens = true;

//these lines must be added in the Configure method of the ConfigureAzureOptions class.
It is important to note that kind of response type for the implicit flow is not enabled by default for AzureAd, so we need to edit the manifest via the Azure portal and enable it (for the FrontEnd application):
"oauth2AllowImplicitFlow": true
The library saves the tokens sent by the client in the HttpContext, so it is really easy retrieve them:
 string accessToken = await HttpContext.GetTokenAsync("access_token");
string idToken = await HttpContext.GetTokenAsync("id_token");
Remember that the id_token represents the user for the current resource and cannot be used to access other resources. Vice versa the access_token is meant only for the target resource specified in request the options, so we need to use the latter to call the Api layer:
 //example of Autorest client, created with --add-credentials
string accessToken = await HttpContext.GetTokenAsync("access_token");
var credentials = new TokenCredentials(accessToken);
IMyApiLayer apiClient = new MyApiLayer(credentials);
apiClient.BaseUri = new Uri("https://localhost:57736");
var obj = apiClient.MyMethod();
You can find a sample demo code here
Comments
- Anonymous
December 27, 2017
Thank you. This is the only code that worked for me - Anonymous
January 30, 2018
Very interesting, thank you. Although I thought the "Read Directory Data" permission for the Windows Azure Active Directory app needed to be granted for the users to log in... Looks like I don't understand what that permission is for...
