Getting Started with WCF WebHttp Services in .NET 4
This is part one of a twelve part series that introduces the features of WCF WebHttp Services in .NET 4. In this post we will cover:
- Downloading and using the new online project templates for WCF WebHttp Services
- Learning the basics of a WCF WebHttp Service: [WebGet] and UriTemplates
- Creating a simple web service that honors HTTP GET requests to developer-defined URIs
The TeamTask Web Service
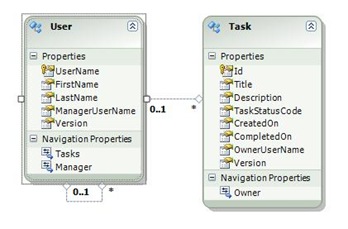
Over the course of this blog post series, we will be building a web service called TeamTask that utilizes all of the new features available in WCF WebHttp Services. The TeamTask service allows a team to track tasks that are assigned to members of the team. It is a relatively simple service that introduces the concept of a user and the concept of a task. A user has a name, a manager, and a list of assigned tasks. A task has an id, a title, a status (in progress, blocked, completed, etc.), relevant dates and an owner.
For our TeamTask service, we will be using an ADO.NET Entity Data Model(EDM) to model these concepts of a user and a task. Here is a graphical view of the data model for the TeamTask service:
Downloading the TeamTask Code
At the end of this blog post, you’ll find a link that will allow you to download the code for the current TeamTask Service as a compressed file. After extracting, you’ll find that it contains “Before” and “After” versions of the TeamTask solution. If you would like to follow along with the steps outlined in this post, download the code and open the "Before" solution in Visual Studio 2010. If you aren’t sure about a step, refer to the “After” version of the TeamTask solution.
Note: If you try running the sample code and see a Visual Studio Project Sample Loading Error that begins with “Assembly could not be loaded and will be ignored…”, see here for troubleshooting.
Getting Visual Studio 2010
To follow along with this blog post series, you will need to have Microsoft Visual Studio 2010 and the full .NET 4 Framework installed on your machine. (The client profile of the .NET 4 Framework is not sufficient.) At the time of this posting, the Microsoft Visual Studio 2010 Ultimate Beta 2 is available for free download and there are numerous resources available regarding how to download and install, including this Channel 9 video.
Step 1: Downloading the New Online Project Templates
You won’t find any project templates for WCF WebHttp Services out-of-the-box with Visual Studio 2010. However, using a new feature in Visual Studio 2010 called the Extension Manager, locating and downloading our new online templates is quick and easy.
In Visual Studio 2010, open the Extension Manager from the main menu bar using “Tools”—>”Extension Manager”.
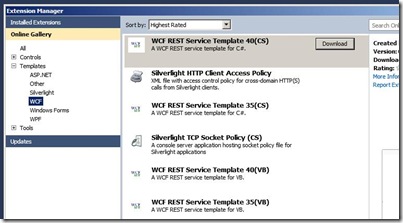
On the left-hand side of the Extension Manager, select the “Online Gallery” and then select “Templates”—>”WCF” from the tree-view control that appears. This will list the relevant templates that are available online. At the time of this writing, the following templates were available:
Click on the “Download” button for the WCF REST Service Template 40(CS) and follow the prompts. Of course, if you are more comfortable with Visual Basic than C#, there is also a VB template. (Although this blog post series will be entirely in C#.) Note: There are also templates for .NET 3.5, but using these templates will preclude the use of the new .NET 4 features that are the focus of this blog post series.
Step 2: Creating the TeamTask.Service Project
With the online template installed, you can now easily create a new WCF WebHttp Service.
If you haven't already done so, download and open the “Before” solution of the code attached to this blog post. You’ll find that the solution doesn’t have a project but includes a number of loose files within two solution folders: Database and Model. We’ll move these into our new project after we create it.
In the “Solution Explorer” window (Ctrl + W, S), right click on the TeamTask solution and select “Add”—>”New Project”. This will open the “New Project” dialog window.
On the left-hand side of the “New Project” dialog window select “Installed Templates” and then select “Visual C#”—>”Web” from the tree-view control. Choose the “WCF REST Service Application” project template. Note: If you do not see the installed “WCF REST Service Application” project template, you might need to enable the loading of per-user extensions. There will be a link below the template selection area if this is the case. Follow this link to enable the loading of per-user extensions. You may need to restart Visual Studio.
For the project name enter “TeamTask.Service” and then click “Ok”. This will create the TeamTask.Service project in the solution.
Step 3: Exploring the Online Template Project
Before we start implementing our service, we should briefly look at the items that were created in the TeamTask.Service project with the online template. If you’re unsure about the code in these files, don’t worry. We’ll explain the reason behind every custom attribute and configuration setting over the course of building the TeamTask service.
Service1.cs: This code file provides an empty implementation of a WCF WebHttp Service class. The Service1 class includes web operations, which are methods decorated with [WebGet] and [WebInvoke] attributes to indicate the HTTP method and URIs that map to the method.
SampleItem.cs: This code file provides a default data type that is used by the Service1 class. The SampleItem class is deserialized/serialized as the body of request/response HTTP messages.
Web.config: This is a standard .NET configuration file created for web projects, although this one doesn’t have a lot of markup. One of the new features in WCF WebHttp Services is the simplified configuration.
Global.asax: This is an ASP.NET application file that can be used in WCF WebHttp Services for registering simple ASP.NET Routes for your service(s). Routing is a useful way of composing smaller, more manageable WCF WebHttp Services into a larger web application. We’ll look at routes in more detail in part six of this blog series.
Helpful Tip: If you’ve used WCF 3.5 or the WCF REST Starter Kit to build non-SOAP HTTP services in the past, you may recall that hosting in IIS required a .svc file. You may also notice that the online template for WCF WebHttp Services in .NET 4 doesn’t generate a .svc file. This is because ASP.NET routing can now be used instead of .svc files when hosting in IIS. Routes are generally preferable because they give you more control over your URIs. |
Step 4: Adding the Database and Entity Framework Items
The loose files within the “Before” solution attached to this blog post were created to save you the effort of having to create them yourself. None of these items are essential to a WCF WebHttp Service so we didn’t want to cover their creation in depth, but we’ll be using them for our TeamTask web service. Within the “Database” solution folder is an in-project database that has already been created for the TeamTask service. Within the “Model” solution folder is an ADO.NET Entity Data Model (EDM) (TeamTask.edmx) and related classes.
If you are unfamiliar with the ADO.NET Entity Framework, it provides object/relational mapping to easily move data between a database and in-memory CLR instances. The types that the ADO.NET Entity Framework populate with data from the backing data store are referred to as entity types. For the TeamTask service, we have the Task and User entity types in the “Model” solution folder.
Actually the Task and User types are POCO entity types. POCO entities types are a new feature in the ADO.NET Entity Framework for .NET 4. With POCO entity types, a developer has complete control over the type definition and the attributes that are applied to the type and its members. Later, we’ll see that this is important because it allows us to control the content of our HTTP responses. You can see here for details about POCO entity types and how they can be created, but all you need to understand is that the POCO entity types “work” because they have properties with the same names as those used in the EDM (TeamTask.edmx).
The “Model” solution folder also contains a hand-coded TeamTaskObjectContext class (TeamTaskObjectContext.cs) that derives from the ObjectContext base class in the Entity Framework. The TeamTaskObjectContext is the primary means by which we’ll interact with the database as it exposes collections of the User and Task POCO entity types.
In the “Solution Explorer” window (Ctrl + W, S), right click on the TeamTask.Service project and select “Add”—>”New Folder”. Name the new folder “Model”.
Copy all of the files from the “Model” solution folder into the “Model” folder of the TeamTask.Service.
Copy the TeamTask.mdf and TeamTask_log.ldf files from the “Database” solution folder into the “App_Data” folder of the TeamTask.Service.
In order for the TeamTask code to get task and user data from the database, we need to add a database connection string to the Web.config file of the TeamTask.Service project. Open the App.Config file in the “Database” solution folder and copy the full <connectionStrings> element into the <configuration> element of the Web.config. Note: Only SQL Express supports the "User Instance = true" setting in the connection string. If you are not using SQL Express you will need to remove this setting from the connection string.
We no longer need the loose files, so right click on the “Solution Items” folder in the “Solution Explorer” window and select “Remove” from the context menu.
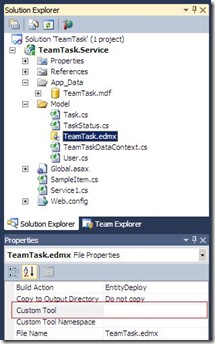
Because we want to use our POCO entity types, we need to disable the default entity generation that the ADO.NET Entity Framework provides. In the “Solution Explorer” window (Ctrl + W, S), right click on the TeamTask.edmx file and select “Properties” from the context menu. In the “Properties” window, you’ll find that the “Custom Tool” entry has a value of “EntityModelCodeGenerator”. Clear this value and leave it blank as shown below. This will disable the default entity generation.
Step 5: Setting the Base Address of our Service
When creating a new web project in Visual Studio the project will be configured by default to use a randomly assigned port with the development server. To reduce confusion and allow you to copy and paste URIs from these blog posts without editing the port, we’ll configure the debug development server to use a specific port.
We’ll also configure the virtual path for the TeamTask service and set the route path for our service to an empty string. The route path is part of the new routes feature introduced with WCF WebHttp Services in .NET 4. We’ll discuss routes in more detail in part six of this blog post series. For now, the important thing to understand is that the base address of the TeamTask service is constructed from the host name and port, the virtual path and the route path (which will effectively be nothing as an empty string).
In the “Solution Explorer” window, right click on the TeamTask.Service project and select “Properties” from the context menu.
In the TeamTask.Service properties editor, select the “Web” tab.
Under the “Servers” section, click on the “Specific Port” radio button and enter “8080” as the port number. Also set the virtual path to “/TeamTask”.
Open the Global.asax file in the code editor.
In the RegisterRoutes() method, replace the route path “Service1” with an empty string like so:
RouteTable.Routes.Add(new ServiceRoute("", new WebServiceHostFactory(),
typeof(Service1)));Now when we run the TeamTask service from within Visual Studio, all of the service operations will be exposed at URIs relative to the base address:
Step 6: Getting a List of Tasks from the TeamTaskService
We’re now ready to create the TeamTaskService. We’ll implement a simple service operation that returns all of the tasks from the database.
Rename the Service1.cs file to “TeamTaskService.cs” by right-clicking on it in the “Solution Explorer” window and selecting “Rename” from the context menu. A dialog box should appear asking if you want to rename all references in the project to the code element “Service1”. Select “Yes”.
Open the newly renamed TeamTaskService.cs file in the code editor.
Since we only want a single service operation for now, delete all of the operations in the TeamTaskService class except for the GetCollection() operation, which you should rename to GetTasks().
Change the UriTemplate value on the GetTasks() operation from an empty string to “Tasks”. This specifies that an HTTP GET request with a URI of “https://localhost:8080/TeamTask/Tasks” will be handled by the GetTasks() operation. This is a simple UriTemplate that specifies just a single URI, but as we’ll see later, UriTemplates can be much more expressive and can represent entire sets of URIs.
Change the return type of the GetTasks() operation to List<Task>. In order to do this, you’ll need to add “using TeamTask.Model;” to the code file.
Implement the GetTasks() operation such that it uses the TeamTaskObjectContext to get all of the tasks from the database. The TeamTaskObjectContext is the ADO.NET ObjectContext that we hand-coded to work with our POCO entity types. It allows us to query the database for the tasks using LINQ:
[WebGet(UriTemplate = "Tasks")]
public List<Task> GetTasks()
{
using (TeamTaskObjectContext objectContext =
new TeamTaskObjectContext())
{
return objectContext.Tasks.OrderBy(task => task.Id).ToList();
}
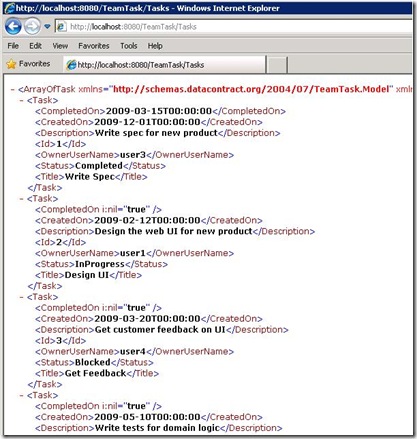
}Start without debugging (Ctrl+F5) and use the browser of your choice to navigate to https://localhost:8080/TeamTask/Tasks. In Internet Explorer, the list of tasks will be displayed as shown below:
Helpful Tip: If you’ve used WCF 3.5 or the WCF REST Starter Kit to build non-SOAP HTTP services in the past, you may recall that operations required both a [WebGet] or [WebInvoke] attribute and an [OperationContract] attribute. You may also notice that we are not using [OperationContract] attributes on the GetTasks() operation. This is because in WCF WebHttp Service for .NET 4, the [OperationContract] attribute is now optional. |
Step 7: Getting a User and His or Her Tasks
Now that we have an operation for retrieving a list of tasks from our TeamTask service, let’s create a second operation for retrieving users. With this new operation we’ll use a UriTemplate that contains a variable so that individual users can be retrieved by supplying a username in the URI.
Open the TeamTaskService.cs file in the code editor if it isn’t already open.
Add a public method called GetUser() that takes a username parameter of type string and returns a User type like so:
public User GetUser(string userName)
To make the GetUser() method an explicit service operation, add a [WebGet] attribute with a UriTemplate value of “Users/{userName}” like so:
[WebGet(UriTemplate = "Users/{userName}")]
public User GetUser(string userName)Notice that the UriTemplate has the name “userName” surrounded by curly braces. These curly braces indicate that “userName” is a variable and not a literal like the “Users” portion of the UriTemplate. The presence of this “userName” variable means that this UriTemplate specifies a set of URIs instead of just a single URI. In this case, the UriTemplate specifies URIs that have a path of “Users/” followed by one additional path segment. For example, URIs (relative to the service base address) such as “Users/annc” or “Users/maryt” would match this UriTemplate, but URIs such as “Users/”, “Tasks/annc”, or “Users/maryt/reports” would not.
Also notice that the GetUser() method has a parameter with the name “userName”. It is not a coincidence that the UriTemplate variable and the method parameter share the same name. By using the same name, the WCF WebHttp Services infrastructure knows to map the UriTemplate variable value from the URI of the request to the method parameter when the operation is invoked. For example, if the request URI were “Users/annc”, the GetUser() method would be invoked with the value of “annc”.
Implement the GetUser() operation using the TeamTaskObjectContext, similar to what was done for the GetTasks() operation:
using (TeamTaskObjectContext objectContext =
new TeamTaskObjectContext())
{
// The 'Include' method is an ADO.NET Entity Framework feature that
// allows us to load the user and his/her tasks in a single query!
var user = objectContext.Users.Include("Tasks")
.FirstOrDefault(u => u.UserName == userName);
return user;
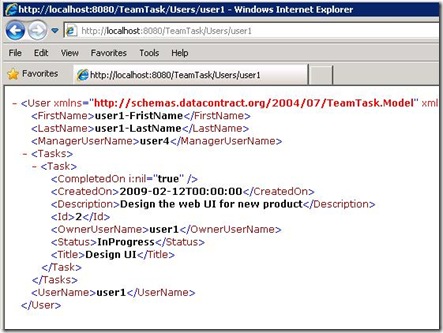
}Start without debugging and navigate to https://localhost:8080/TeamTask/Users/user1. In Internet Explorer, the list of tasks will be displayed as shown below:
Helpful Tip: For more details about how UriTemplates work, see here. |
Step 8: Filtering the List of Tasks with Query String Parameters
With a limited number of tasks in the database, having the TeamTask service return every task with each request isn’t a problem. But of course, for a real world web service with lots of tasks this would be impractical. We need a way to filter the list of tasks on the server, and we can do this by adding query string parameters to the UriTemplate on the GetTasks() operation.
We’ll add “skip” and “top” query string parameters to provide a paging mechanism; given an ordered list of tasks, the “skip” parameter will indicate not to return the first N tasks in the list and the “top” parameter will indicate the maximum number of tasks to return.
We’ll also add an “owner” query string parameter via which a username can be supplied. When the “owner” is specified, only tasks for the given user will be included in the list of tasks returned.
Open the TeamTaskService.cs file in the code editor if it isn’t already open.
The UriTemplate value for the GetTasks() operation is already “Tasks”. Add the query string parameters “skip”, “top” and “owner” along with UriTemplate variables. Also add parameters to the method with names that match the UriTemplate variables like so:
[WebGet(UriTemplate = "Tasks?skip={skip}&top={top}&owner={userName}")]
public List<Task> GetTasks(int skip, int top, string userName)Notice that the skip and top method parameters are of type int and not simply strings. With query string variables, the WCF WebHttp Services infrastructure can provide conversion from the string value to other common types.
Query string parameters are not required, so it is possible that our GetTasks() operation will handle request URIs that don’t include “skip”, “top” or “owner” query string values. Add some code to make sure we use reasonable “skip” and “top” values like so:
// Set reasonable defaults for the query string parameters
skip = (skip >= 0) ? skip : 0;
top = (top > 0) ? top : 25;Note: If a query string value isn’t present in the request URI, the method parameter will be the default value of its given type.
We also need to check for a null userName value, but this can be done while building the query, because we only want to include a LINQ Where clause if there is a userName value:
// Include the where clause only if a userName was provided
IQueryable<Task> taskQuery = (string.IsNullOrWhiteSpace(userName)) ?
objectContext.Tasks.AsQueryable<Task>() :
objectContext.Tasks.Where(task => task.OwnerUserName == userName);Lastly, add the LINQ Skip and Take clauses to the query so that the final implementation of the GetTasks() operation looks like:
[WebGet(UriTemplate = "Tasks?skip={skip}&top={top}&owner={userName}")]
public List<Task> GetTasks(int skip, int top, string userName)
{
// Set reasonable defaults for the query string parameters
skip = (skip >= 0) ? skip : 0;
top = (top > 0) ? top : 25;using (TeamTaskObjectContext objectContext =
new TeamTaskObjectContext())
{
// Include the where clause only if a userName was provided
var taskQuery = (string.IsNullOrWhiteSpace(userName)) ?
objectContext.Tasks :
objectContext.Tasks.Where(
task => task.OwnerUserName == userName);return taskQuery.OrderBy(task => task.Id)
.Skip(skip).Take(top).ToList();
}
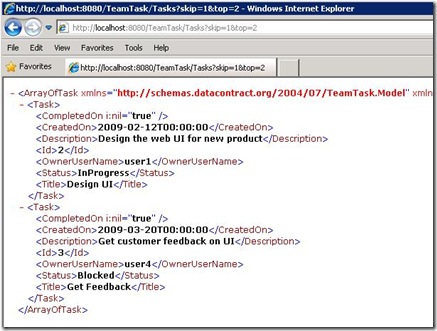
}Start without debugging and navigate to: https://localhost:8080/TeamTask/Tasks?skip=1&top=2. The list of tasks will be filtered to only include tasks 2 & 3 as shown below:
Notice that the “owner” query string parameter wasn’t provided, so the tasks were not filtered by userName.
Next Steps: Clients and the Automatic Help Page in WCF WebHttp Services
We’ve got our TeamTask service up and running, and we can use the browser to retrieve tasks and users. But web services are all about programmatic access, so in the part two of this blog post series we’ll create a client to consume our TeamTask service. We’ll also look at the automatic help page feature in WCF WebHttp Services that makes it easier to build such clients.
Randall Tombaugh
Developer, WCF WebHttp Services
Comments
Anonymous
February 21, 2010
Hi Guys, could you plese provid the link for wc rest service template RC. Thanks DamirAnonymous
February 22, 2010
@damir, Yes... with the move to RC, the WCF REST templates no longer seem to be available on the Visual Studio Gallery (which the Visual Studio extension manager uses). We're working to get them back up as soon as possible. Thanks, ~RandallAnonymous
March 25, 2010
Code shown here in post is giving error on my machine.... [WebGet(UriTemplate = "Tasks?skip={skip}&top={top}&owner={userName}")] when I request this uri, it gives the error "A potentially dangerous Request.Path value was detected from the client (&). ". I am using Windows 7 ultimate 64 bit (IIS 7). Any solution or suggetion to solve the issue?Anonymous
March 25, 2010
Oh.... it's done.... I was missing the querystring seprator '?' in the url.
