You, the System Center and the IaaS
In a previous post, we talked about how you can move a VM from your Hyper-V Server to Windows Azure using the IaaS service. In this article, we'll see how System Center allows to automate and delegate this rather painfull operation.
Before we start, you need the following in you environment :
- A Windows Azure subscription (available for free during 30 days here : https://www.windowsazure.com/en-us/pricing/free-trial/)
- An implementation of System Center Virtual Machine Manager (VMM) and System Center App Controller that you can freely download here : https://technet.microsoft.com/en-us/evalcenter/hh505660.aspx
- At least one physical machine running Hyper-V. You can download the free operating system, Hyper-V Server 2012, here : https://www.microsoft.com/en-us/server-cloud/hyper-v-server/default.aspx
These are the steps that we will follow to achieve the same result than in our previous post:
- Prepare the environment
- Store the VM in the library
- Deploy the Virtual Machine in Azure using the IaaS
While you read this, keep in mind that those steps can be delegated to someone that has the appropriate permissions but do not need to have a full access to either environment. That person also does not need to have a password to access Azure, App Controller is checking the user's authorizations before allowing it to perform any action on the subscription.
1- Prepare the environment
App controller needs to be configured to talk to SCVMM, for that you have to create a Connection. Follow the steps bellow and enter the required information for the connection to VMM.
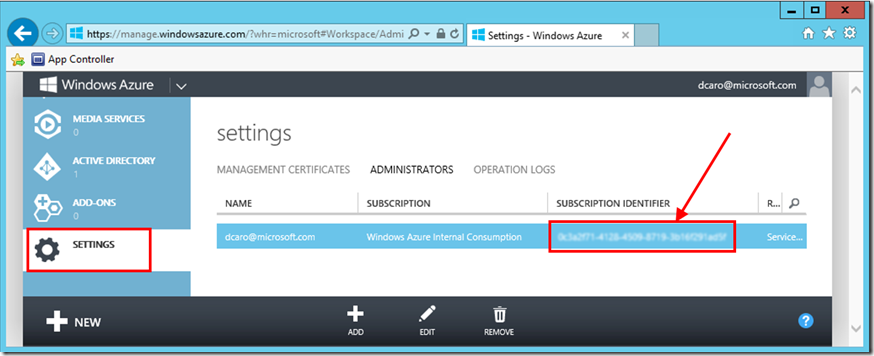
You also need to connect App Controller to Windows Azure:
- Get the subscription ID in the Azure Management interface here:
- Have the Management certificate for this Azure subscription available (or create a new one. An easy way to do it from the server withour Visual Studio : https://www.davidaiken.com/2009/12/21/how-to-create-a-x509-certificate-for-the-windows-azure-management-api/ )
Now, we can fill the wizard used to create the subscription :
In App Controller, you should now see your two environments with view similar to the following one.
We have now configured App Controller.
2- Store the VM in the library
In the cloud jargon, the Library is what becomes your the reference in terms of virtual machine templates and other components that we may use when we deploy a VM (application, database schema etc …).
To start, we have our Virtual Machine (DemoVM) deployed on a priate cloud in our environement as you can see bellow :
In order to be able to "move" that VM to Windows Azure, first we must store the VM to the Library (click on the button "store").
You can verify that the process has completed correctly, the state near the VM is "Stored".
Under App Controller, go to the library. Expand you Azure subscription and if you haven't already done so do the following :
- Create a Storage Account
- Create a Container (you need to select the folder representing your strorage account)
Now also expand the directory "StoredVms" (this is the default directory where the VMs are stored with Virtual Machine Manager 2012. A directory with the name of the VM appear. Under this directory, you have all the elements necessary to re-start the VM in the private cloud.
Select the VHD in the right pane of App Controller and select "Copy" and click "Paste" in the appropriate Azure container where you want to put your vhd.
Now we are simply creating a VM in Azure using this disk.
3- Deploy the Virtual Machine in Azure using the IaaS
Select the VHD file that has just been uploaded in Azure and click "Deploy". This will automatically populate part of the deployment wizard. fill the missing information and you are good to deploy.
Once the deployment has completed, we have a running VM in Windows Azure as you can see bellow.
That's it !
Enjoy System Center App Controller !
Additional resources and further reading :
If you want to read more about System Center App Controller,here are some nice articles and references :
- Overview of App Controller : https://blogs.technet.com/b/server-cloud/archive/2011/10/28/app-controller-enabling-application-self-service.aspx
- Technical documentation of App Controller : https://www.microsoft.com/en-us/download/details.aspx?id=29694
- A series of short video on App Controller : https://technet.microsoft.com/en-us/video/Video/hh533278


