Creating an External Content Type based on SQL Azure
One thing I am interested in Windows Azure Platform is what this Cloud platform means to SharePoint. I know BPOS is there, and as one part of it, SharePoint Online, provides an option to users who wants to get the SharePoint capability in the public cloud. But what if users want to host a SharePoint environment by themselves but still be able to leverage the capability of the Cloud? Would Azure be a choice in terms of collaborating with SharePoint?
With these questions, I played with Windows Azure for quite a while and had some interesting findings. In this article, I am going to show you how we can consume data from SQL Azure with the External Content Type and the BCS of SharePoint 2010.
Preparation
First of all, you must create an account in Windows Azure Platform. With the account, you will be able to access Windows Azure, SQL Azure and AppFabric. Then you can provision the SQL Azure service and create a database in it. I am not going to cover the details about how to provision the SQL Azure database here. There are a series articles shared here which is a good start point to Windows Azure. The sample databases for SQL Azure can be downloaded here. In this article, I am going to use AdventureWorksLT as a sample db.
After you create the database in SQL Azure, please make sure you can connect to it with SQL server client tools, like SQL Server Management Studio 2008 R2.
Creating a Target Application in Secure Store Service
Before we can create any external content type, we have to create a target application in Secure Store Service to map to the SQL Azure account that we will use to connect to the database. Only when we have this target application, BCS can use the account information to make a connection.
- If there is no Secure Store service application in the farm, provision one.
- Manage the Secure Store service. The first thing you have to do is to generate a key if there is no one existed.
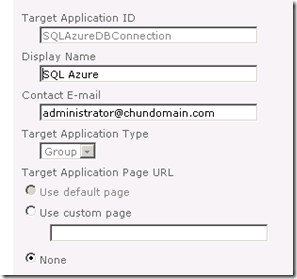
- Click New to create a new target application. The target application ID should be unique, and the target application type could be Group as I want to map multiple users to one SQL Azure account. The following is a screenshot for my target application.

- Click Next. There are two fields for us. Input User ID and Password as the fields’ name and the fields’ types are User Name and Password.
- Click Next. Choose the user accounts for administrators and members. Then click OK.
- Now we have a target application. Next step is to set the credential for this target application. Select the target application and click Set Credentials.
- On the Set Credentials dialog box, we can see the credential owners. They are a group of users who can use the credential we set here. In User ID field, input the user id of the SQL Azure. You can find it in the connection string generated by SQL Azure. Usually, it looks like username@hostname. In Password field, input the password of this user and confirm it. Then click OK.
More detailed information about how to configure Secure Store service can be found here: Configure the Secure Store Service
Now we’ve already got the target application ready to be used. Let us create an External Content Type with it.
Creating an External Content Type with SharePoint Designer 2010
- Open SPD 2010 and select External Content Type.
- Input the Name of the external content type and choose Office Item Type as Contact as I am going to use the Customer table in the database.
- Click the hyperlink to discover the data source and define the operations.
- Click Add Connect and then choose SQL Server in the popup window.
- In Database Server field, input the server name of the SQL Azure instance you provisioned. It is something like w0br4cs117.database.windows.net. Database Name is the name of the database you want to connect to. On my side, it is AdventureWorksLTAZ2008R2. For the user credential, Choose the option “Connect with Impersonated Custom Identity” and input the target application ID you created in Secure Store service. Here is a screenshot.

After clicking OK, if everything is configured well, a connection to the database in SQL Azure should have been established. Then follow the wizard to finish the creation of the External Content Type.
When creating the External Content Type successfully, go to Central Administration and manage BDC service. You will find the content type you created there. You can then configure it further like creating a profile page for it or managing its permissions. Here is a screenshot of my external content type.
Creating an External List with the External Content Type
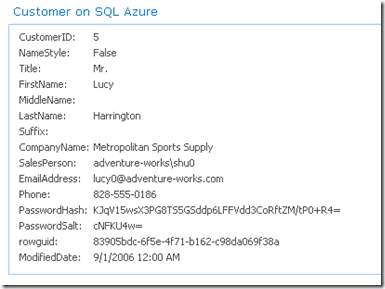
The final step is to consume the data. It is quite simple and straightforward. Just go to one of your SharePoint site, choose to create an External List with the External Content Type. Then you will see the data shown in the list. Here is a screenshot of the profile page of one of the record from SQL Azure.

