How to Build a Bootable USB Drive? or How to Install an Operating System from a USB Device?
It seems that I hear this question at least once a week. I heard the question at a user group meeting on Tuesday evening and promised that I would provide Detailed Step By Step instructions on how EXACTLY one might go about building a bootable USB device that can then be used to install an operating system to something like a netbook which has no DVD drive. So here we go.
First, and this is a really, really, really, big thing. There is more than one way to accomplish this task. You can do the whole process manually, (Which I will demonstrate and document in a moment.) or you can download a tool and automate the whole process and have the benefit of using .ISO images. The automated process does not warrant a blog post. Download the Windows 7 USB/DVD download tool follow the 4 step process and you are in business (at least with windows7, I have not honestly tested the tool to see if you can install other OS’s.)
The manual process for building a USB drive to be used for operating system installations is as follows.
1. Get a USB Drive of sufficient size to contain the OS installation files you desire to install. (If you were going to install Windows 7 this drive woul dneed to be at least 4 GB in size)
2. Make sure the drive is completely empty of its contents. (There should be absolutely nothing on it, if there is and you want to keep this stuff you need to move it elsewhere now.)
3. Plug your USB drive into a USB slot on your computer.
4. Make certain the drive is recognized, make a note of the drive letter. Mine happens to be E:\
5. Go to the start menu and USING ADMINISTRATOR CREDENTIALS open a command prompt. I right clicked on command prompt and chose to Run As Administrator.
6. Once your command prompt is open you are going to run a series of commands using the DiskPart utility.
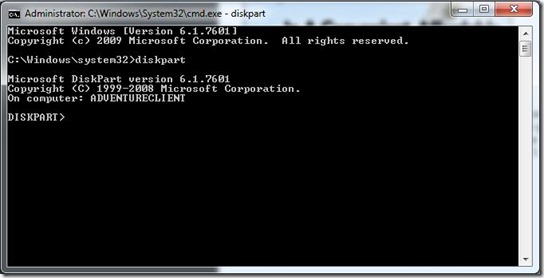
Type DISKPART and hit Enter
The output form disk part will look like the image on the left.
7. Once DiskPart is open you need to decide which Disk is your USB drive. By default your internal hard disk was assigned the first ordinal disk number which is 0. if you have any additional internal disks they will be assigned then ext ordinal numbers 1, 2 etc. In my system and probably yours too I only have one internal disk and so I’m pretty confident that my USB drive is going to be assigned DIsk1. however we need to be certain so we type the following command.
Type LIST DISK and hit Enter
As you can see the output of the List Disk command shows each of the assigned disks. In this case you can see my internal hard disk and the USB disk. Make sure you verify the label of the disk with the size of your USB drive. In my case the USB disk is in fact DISK 1.
8. Now that we have DiskPart running and we have identified the USB disk we are going to run a series of commands. Each command is entered and run until it is completed before executing the next command. For simplicity sake I will document each command in order of operation and then show the output of the commands in a single image.
Type Select Disk 1 and then hit Enter
Type Clean and then hit Enter
Type Create Partition Primary and then hit Enter
Type Select Partition 1 and then hit Enter
Type Active and then hit Enter
Type Format FS=NTFS and then hit Enter
Type Assign and then hit Enter
Type EXIT and then hit Enter
9. Keep the command prompt open because we aren’t finished quite yet. While we have the drive prepped we don’t actually have anything on it to install. At this point you need to put the DVD of whatever it is you want to install into your DVD drive. I am going to assume you are installing a windows operating system. If that is the case you will go back to you command prompt and change to the DVD drive to a directory called BOOT on the DVD.
Type D: cd boot and then hit Enter
Type Bootsect.exe /nt60 E: and then hit Enter
10. Now your USB drive is ready for action. Just one last step. Using Windows Explorer go to the DVD and copy ALL of the files to the USB drive.
In my case the file copy took about 23 minutes give or take a few. Once the file copy is complete you have a USB drive that is ready to install operating systems.
At this point you must be certain that the BIOS on the device that you are going to be installing to has been configured to boot from the usb device. I put it first in the boot order. Other than that one small change to the hardware you are ready to go. Happy installing!
Comments
Anonymous
January 01, 2003
This is a another nice way to do when you don´t have for example, a internet connection.Anonymous
October 06, 2011
I recommend changing the clean command to clean all. Clean will only catch the first couple of tracks. Clean all will write zeroes to all bytes. Makes sure that you aren't infected from the get go and that all defective areas are detected.


