Step-By-Step: Creating a DNS zone in Azure
Hello Folks,
We all know that DNS is responsible for resolving a website or service name to its IP address. Now, you can use Azure DNS. It’s a hosting service for DNS domains using Microsoft Azure infrastructure. By hosting your domains in Azure, you can manage your cloud environments AND your DNS zones using the same survice with the same credentials.
In Azure, the Azure DNS service is based on the ARM model and because of it you can leverage things like role-based access control, audit logs, and resource locking. You can manage your domains and records in the Azure portal, with Azure PowerShell, and with Azure CLI.
So, today i will setup a DNS zone in Azure for one of my domains. and to do so i will use Azure CLI so the steps are the same whether you are using a PC, a Mac or a Linux box.
Step 1 : Create a resource group
Azure Resource Manager requires that all resource groups specify a location. In our case this will be used as a default location for resources in that resource group. However, since all DNS resources are global, not regional, the choice of resource group location has no impact on Azure DNS.
azure group create -n WiredCanuckDNS --location "Canada East"
In this command the Resource Group name is WiredCanuckDNS and the location is “Canada East”
Step 2: Register the Network Provider
You may have already done this if you have been using CLI and working with Azure Networks in the pass, but if you have not, you need to register your Azure Subscription to use the Microsoft.Network resource provider.
azure provider register --namespace Microsoft.Network
Step 3: Create your DNS zone
To creates my DNS zone called wiredcanuck .com in the resource group called wiredCanuckDNS, i use the following command:
azure network dns zone create wiredCanuckDNS wiredcanuck.com
This will setup the zone. Please note the name servers since you will need to update your registrar with them.
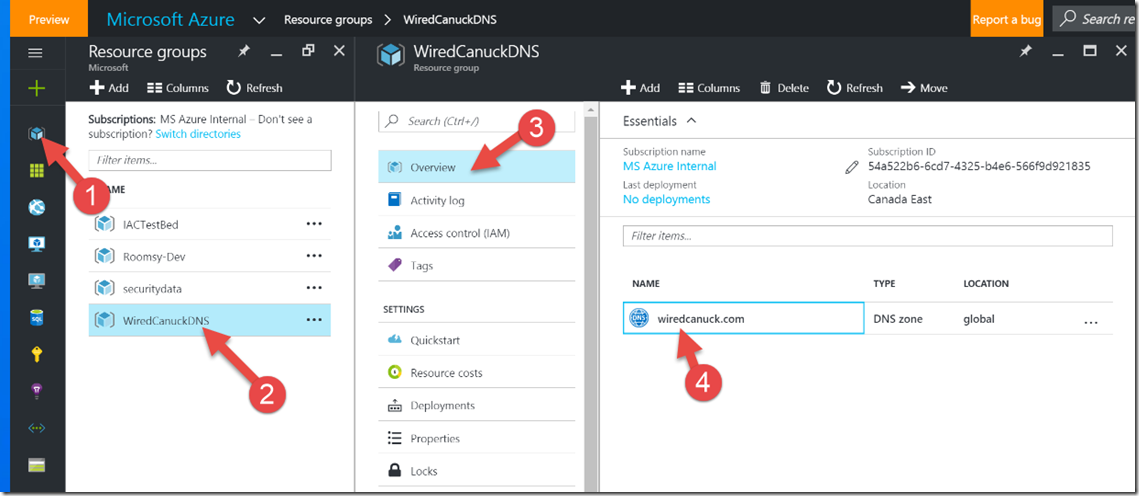
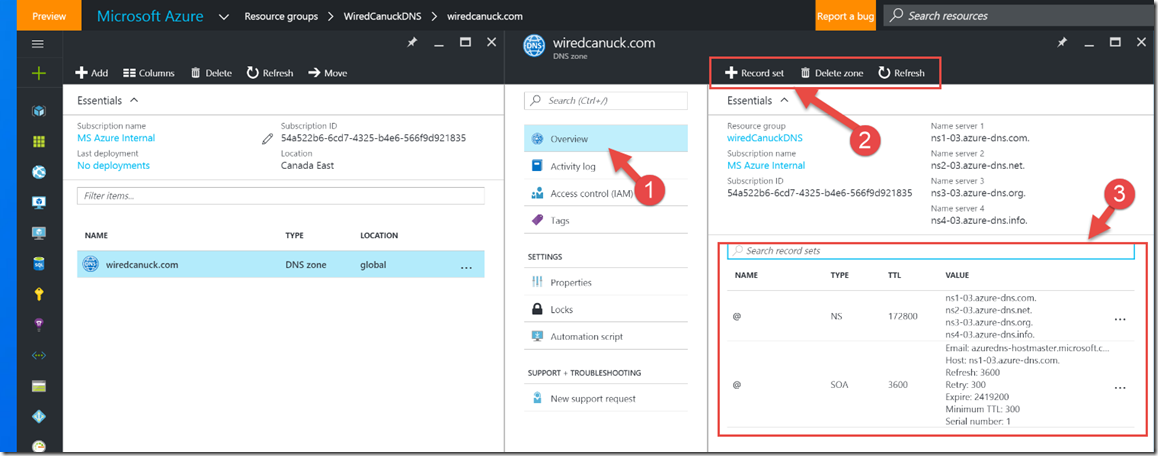
I went online and updated my registrar with the nameservers. After replication is complete, i can manage my DNS zone in the Azure Portal by navigating to (1) Resource Groups, (2) Select your Resource Group, (3) Overview and (4) select the zone you just created.
Once you have navigated to that location you can manage your DNS record for that zone.
Of course when you are done you should test your DNS zone by using DNS tools such as nslookup or the Resolve-DnsName powershell cmdlet or the “dig” command if you are on Linux
Here you go.
I hope this was useful.
Cheers!
Pierre Roman
@pierreroman

![SNAGHTMLd0f90e1[5] SNAGHTMLd0f90e1[5]](https://msdntnarchive.z22.web.core.windows.net/media/2016/10/SNAGHTMLd0f90e15_thumb.png)


