Note
Access to this page requires authorization. You can try signing in or changing directories.
Access to this page requires authorization. You can try changing directories.
Past Posts in this series |
The last post was about … |
In the last post I illustrated how to create a RESTful service using .NET technologies. Here is the diagram from the last post:  |
This post is to illustrate that you can go directly to the Storage Service with HTTP bypassing .NET |
Although it is not recommended for this particular application, it is possible communicate directly with the Storage Service. Direct communication with Azure tables requires some advanced techniques, working with request headers and request bodies. Later in this post you will learn what makes this technique somewhat challenging.  We need to able to: 1. Create a table 2. Insert into a table 3. Query a table We need do this using all standard http without any .NET whatsoever. We will use Fiddler to get this done. We can also use the Azure Storage Explorer. We need to able to: 1. Create a table 2. Insert into a table 3. Query a table We need do this using all standard http without any .NET whatsoever. We will use Fiddler to get this done. We can also use the Azure Storage Explorer. |
Azure Storage Explorer |
Azure Storage Explorer is a useful GUI tool for inspecting and altering the data in your Windows Azure Storage storage projects including the logs of your cloud-hosted applications. All 3 types of cloud storage can be viewed and edited: blobs, queues, and tables.
 Now you need your storage access keys. Now you need your storage access keys.  Copy the storage access keys to the clipboard. Copy the storage access keys to the clipboard.  Now are are ready to configure the Azure Storage Explorer. Now are are ready to configure the Azure Storage Explorer.  As expected, there are no tables and no data. That is the next step. As expected, there are no tables and no data. That is the next step.  |
Adding a Table Object with Storage Explorer |
Follow these steps to add a table object: 1. Click Tables 2. Click New 3. Enter a table name  |
Adding Entities |
Each table can have many Entities. You can think of an entity as a row in a table. But in reality an entity is a collection of name- value pairs. Notice under the Storage Type panel you can see the Tables button. Click tables before following the rest of the steps.  Notice that a PartitionKey and RowKey are required columns. Notice that a PartitionKey and RowKey are required columns. |
Querying the table |
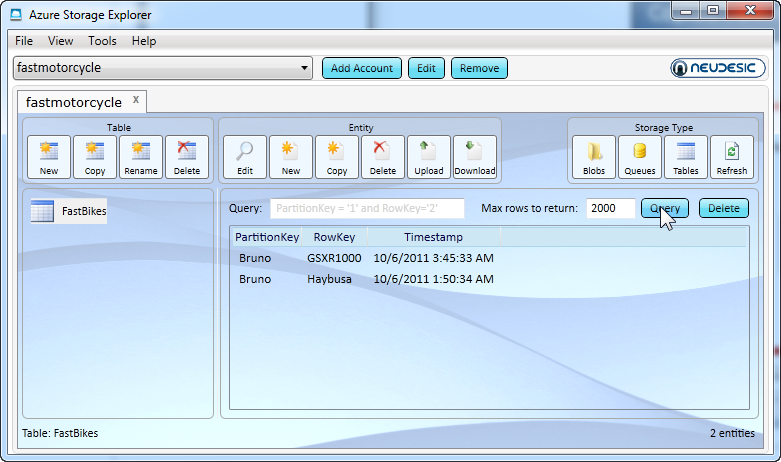
You can also hit the query button to see the entities in the table. Later, when we create the Android client, you will be able to use LINQ to query the entities.  |
Using http to interact with Azure Tables |
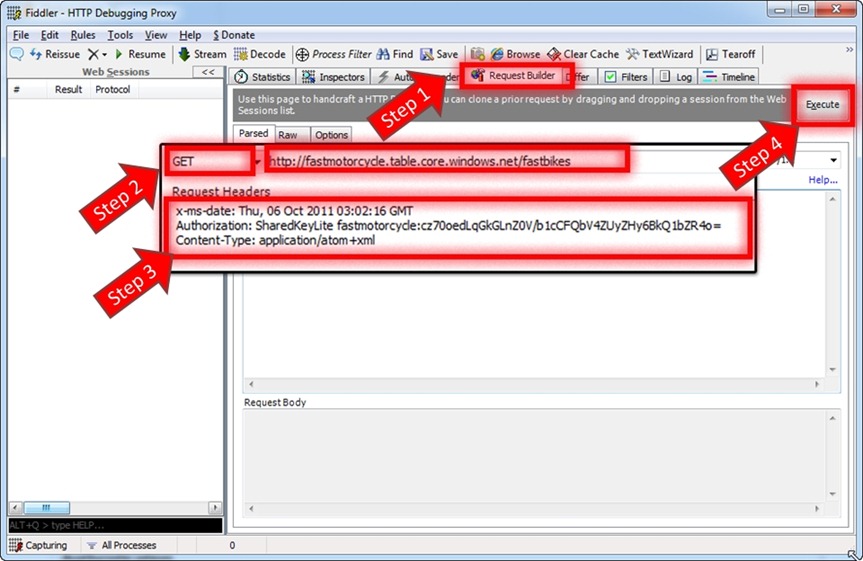
Http is the most generic way to interact with Azure tables. I will be using Fiddler add new records and to query the data in Azure tables.  You can download Fiddler here: You can download Fiddler here:
 The Request Header is going to require you to generate a Shared Key Lite. The Request Header is going to require you to generate a Shared Key Lite. |
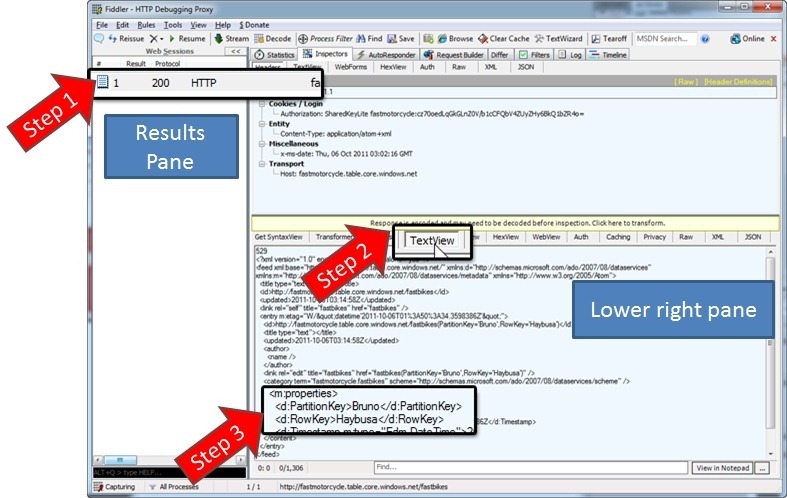
Viewing the Result in Fiddler |
After hitting Execute in Step 4 above, results will appear. 
|
Generating the Request Header  |
| If you look carefully, you will notice the SharedKeyLite authorization signature. This isn’t trivial to generate, since you need to compute a Hash-based Message Authentication Code (HMAC) using the SHA256 hash function. Luckily I’ve done that for you. |
A Simple Windows Forms Application  |
You are looking at a custom application that I wrote. I am providing the code below in case you want to do this yourself. You typically would use the ADO.NET Data Services library in C# or VB. But if you want to interact with Azure Tables from non-.NET clients, you will need to master the techniques I am illustrating here. You can learn more at the link below.
|
|
You can even add data using this technique |
Notice that this time I added a PartitionKey and RowKey in Steps 1 and 2 below.  Now we need to copy the Response Body in addition to the previous fields. The XML below was generated by my tool. Notice the partitionkey and rowkey from the form above. Now we need to copy the Response Body in addition to the previous fields. The XML below was generated by my tool. Notice the partitionkey and rowkey from the form above.

 Notice that we have added the data. You can see the GSXR1000 data in Azure Storage Explorer. Notice that we have added the data. You can see the GSXR1000 data in Azure Storage Explorer.  |
Conclusions |
This post was important for several reasons. First, it introduced the Windows Azure Portal and addressed the Hosted Service and Storage Account and how they related to your RESTful service and to your infinitely scaled Azure Table Service Storage.
Typically, you will access Azure Table Storage through the ADO.NET Data Services API, found inside the Azure SDK Download. But there may be situations where you want to access Azure table storage outside of a Windows environment, such as from Java or PHP or any other non-MS platform. Remember, Azure tables are incredibly scalable, cost-effective, and performant. And Azure tables are also available from a purely http world.
|
Comments
- Anonymous
January 08, 2012
Thanks for all the articles. I am new to Win Azure and Mobile domains. This was very helpful. Is there a link to download the Make Header win form app? Please share. I can be reached at prashant_ nerkar@hotmail.com
