How to upload publicly visible photos from a Windows Store Application to Windows Azure Storage version 2.1
Overview
In this module we learn about uploading photos to Windows Azure Storage using the latest version of the Windows Azure Storage SDK (version 2.1).
 |
Using Pre-Release Windows Azure Storage SDK
NuGet will be used to install the necessary assemblies and references. It represents the fastests and easiest way to support Windows Azure Storage from a Windows Store application.
Objectives
In this hands-on lab, you will learn how to:
- Upload images from a Windows Store application into Windows Azure Storage using Version 2 of the Windows Azure Storage Library.
Setup
In order to execute the exercises in this hands-on lab you need to set up your environment.
- Start Visual Studio
- Signed up with a Window Azure Account
Task 1 – Starting from the previous code base
The screen below is where we left off from the last post. You can download the code here: (https://sdrv.ms/1aOGgVQ).
The goal of this post is to upload images to a Microsoft data center from a Windows Store application. Once these images have been added, it is then possible for a user to view these uploaded photos using a browser.
High level view
Start Visual Studio 2013. From the File menu choose New Project.
Creating a new Windows 8 Project
Choose Windows Store project with C# . Provide a name of your choosing.
Creating a Windows Store, Blank App
The NuGet Console Manager will be used to add the Windows Azure Storage Client libraries to our Windows 8 project. We need to bring up the console for NuGet so we can type in a command to download the latest binaries for the Windows Azure Storage SDK and to set references to them in Visual Studio 2013.
Starting the NuGet Console Manager
Task 2 – Using NuGet to add the needed Windows Azure Storage Code
The NuGet command we want is: Install-Package WindowsAzure.Storage-Preview -Pre.
Issuing the NuGet Command
Notice that 4 references were added automatically with the NuGet command.
Verifying added references
MainPage.xaml 1 2 3 4 5 6 7 8 9 10 11 12 13 14 15 16 17 <Page x:Class="UploadPhotosWindows8.MainPage" xmlns="https://schemas.microsoft.com/winfx/2006/xaml/presentation" xmlns:x="https://schemas.microsoft.com/winfx/2006/xaml" xmlns:local="using:UploadPhotosWindows8" xmlns:d="https://schemas.microsoft.com/expression/blend/2008" xmlns:mc="https://schemas.openxmlformats.org/markup-compatibility/2006" mc:Ignorable="d"> <Grid Background="{ThemeResource ApplicationPageBackgroundThemeBrush}"> <Button HorizontalAlignment="Center" VerticalAlignment="Center" Content="Upload photos" Click="Button_Click" /> </Grid> </Page> Our application will be very simple. It will have just one button. That one button will execute code that: (1) Loops through the Pictures folder and uploads files to Windows Azure Storage.
Adding one button to the interface
Right mouse click on Click code and choose Go to Definition. This will create an event procedure for the click code.
Navigating to the code-behind for the click event
We can enter some code now. The full code listing for MainWindow.xaml.cs can be found below.
Entering some code for the code-behind
MainPage.xaml.cs 1 2 3 4 5 6 7 8 9 10 11 12 13 14 15 16 17 18 19 20 21 22 23 24 25 26 27 28 29 30 31 32 33 34 35 36 37 38 39 40 41 42 43 44 45 46 47 48 49 50 51 52 53 54 55 56 57 58 59 60 61 62 63 64 65 66 67 68 69 70 71 72 73 74 75 using Microsoft.WindowsAzure.Storage; using Microsoft.WindowsAzure.Storage.Auth; using Microsoft.WindowsAzure.Storage.Blob; using System; using System.Collections.Generic; using Windows.Storage; using Windows.Storage.Streams; using Windows.UI.Xaml; using Windows.UI.Xaml.Controls; namespace UploadPhotosWindows8 { public sealed partial class MainPage : Page { public MainPage() { this.InitializeComponent(); } async private void Button_Click(object sender, RoutedEventArgs e) { // Objects/variables for the account, client uploading // capability and the blob container CloudStorageAccount account; CloudBlobClient blobClient; CloudBlobContainer container; //You could use local development storage // account = CloudStorageAccount.DevelopmentStorageAccount; account = new CloudStorageAccount( new StorageCredentials("terkalyphotos", "??????????????????????????????????=="), true); // blobClient is used to upload photos blobClient = account.CreateCloudBlobClient(); try { // The container name in Windows Azure Storage is "mypictures" container = blobClient.GetContainerReference("mypictures"); await container.CreateIfNotExistsAsync(); // Make the photos publicly visible BlobContainerPermissions permissions = new BlobContainerPermissions(); permissions.PublicAccess = BlobContainerPublicAccessType.Blob; await container.SetPermissionsAsync(permissions); // Get a reference to the local machine's Pictures folder StorageFolder storageFolder = KnownFolders.PicturesLibrary; // Get all files in the pictures folder IReadOnlyList<StorageFile> storageFiles = await storageFolder.GetFilesAsync(); CloudBlockBlob blob = null; // Loop through pictures foreach (StorageFile storageFile in storageFiles) { using(IRandomAccessStream imageStream = await storageFile.OpenReadAsync()) { // Name the file in the cloud the same as on local files sytem blob = container.GetBlockBlobReference(storageFile.Name); // Upload file to Windows Azure Storage await blob.UploadFromStreamAsync(imageStream); } } } catch (Exception ex) { throw ex; } } } } This step is optional. We are choosing to upload our photos to Windows Azure Storage. We could have used the Storage Emulator, which lets you emulate Windows Azure Storage and lets you run all your code and data locally. You can skip this step for the purposes of this lab.
Starting a Command prompt for Windows Azure
See previous step for more details. The command that starts the Storage Emulator is csrun /devstore.
Starting the Storage Emulator
Task 3 – Enabling the local file system and creating a Windows Azure Storage Account
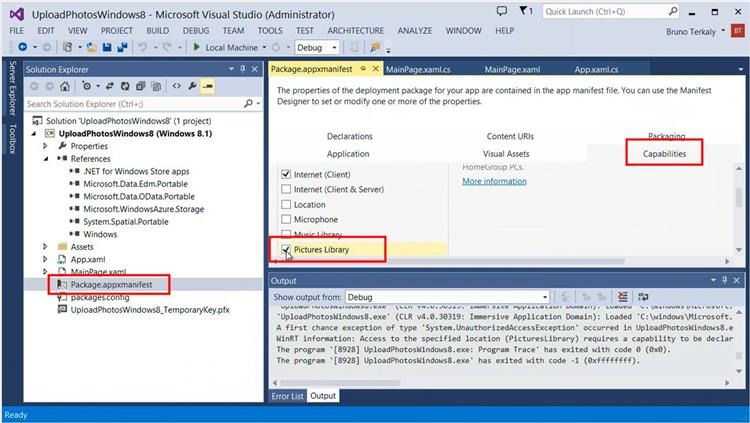
By default, Windows Store applications do not have access to the local file system. To provide access, you must follow these steps: (1) Double click on Package.appmanifest (2) Click on Capabilities (3) Set checkbox to enable for Pictures Library.
Changing Device Capabilities
Navigate to the Windows Azure Portal. This assumes you have signed up for an account. Once you have logged in, select Storage on the menu pane and choose New from the bottom menu bar.
Creating a new storage account
You will need to provide a unique URL that represents the location of your storage account. this needs to be globally unique. Next, choose the region for the desired data center. Notice I chose West US.
Providing a URL and a Location for the storage account
It may take a few moments, typicall 2-3 minutes.
Waiting for storage account creation
The access key will be needed by the Windows Store application to enable it access Storage. You will not be able to select Manage Access Keys until the Storage Account has been created.
Copying the access key for the storage account
Once the storage account has been created, you can select Manage Access Keys.
Copying the storage access key
Task 4 – Writing code to loop through the files in the Pictures folder and uploading to Windows Azure Storage
You will now return to the code behind for MainWindow.xaml.cs. You will need to enter in both the account name and the access key into the code. Typically, this would be place into a configuration file, not hard coded in to the application code.
Adding in the storage account information into the code
Visual Studio makes it possible to connect to the Windows Azure Storage Account. This makes it possible to view our to-be-uploaded photos from the convenience of Visual Studio.
Opening server explorer and connecting to our storage account
To connect Server Explorer to Windows Azure Storage you will need to use your login credentials.
Logging into the Windows Azure Portal
Notice that terkalyphotos is now visible. However, no files have been uploaded yet. That is the next step.
Viewing the details of the storage account using Server Explorer
Task 5 – Running the Windows Store App and uploading photos
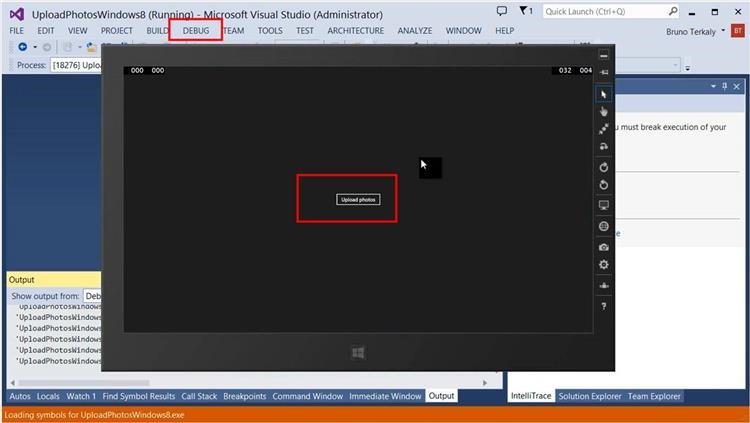
You can now Build the solution and Debug it. Once the Windows Store Emulator becomes visible, click on the Upload photo button that we added previously.
Starting the application and uploading photos
Chances are your code will just execute. You may have put a breakpoint as you see below.
Running the code
Note the for loop below. It uploads photos into Windows Azure Storage one photo at a time.
Viewing the code to upload photos
You may need to Refresh the terkalyphotos container in Windows Azure Storage.
Viewing the uploaded files
Task 6 – Viewing the uploaded files in Windows Azure Storage and in a Browser
By double clicking on the container name of mypictures you can see the images that have been uploaded in the main pane of Visual Studio.
Viewing the uploaded files
These photos are in a public container (see code). That means they are visible to the world through http. Any browser can view them.
Copying the photo URL
You can copy the Url. For example, ( https://terkalyphotos.blob.core.windows.net/mypictures/4th-of-july.jpg ) is one of the photos that I have uploaded.
Using a browser to view uploaded photos
Simply copy the URL of the blob into the browser address bar and you will be able to see the photo that was uploaded.
Viewing one of the photos
Summary
In this post, you learned a few things:
- How to upload files to Windows Azure Storage from a Windows Store application
- How to use the Windows Azure Portal to create a Storage Account
- How to use Server Explorer to view files in storage
- How to use NuGet to add support for Windows Azure Storage
Comments
- Anonymous
January 23, 2014
This is cool easy and useful. Thanks!


