Build Social Sentiment Analysis Solution using Microsoft Azure Services
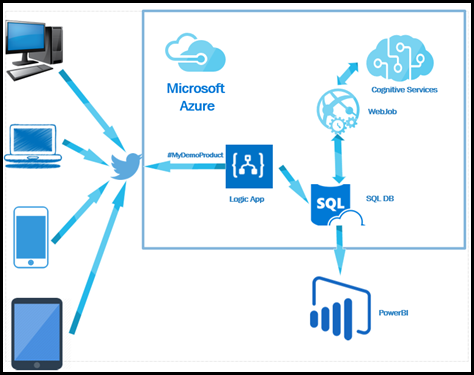
Now a days people express their opinion on social media. Company’s using such platform to capture honest and transparent opinion. This help company to enhance their product or services. In this blog, I am going to show case how quick and easily a solution can be build using Microsoft Azure.
Problem Statement:- After launching product in the market, a company want to capture users sentiment from social media.
There were two challenges here 1) capture tweets from twitter or comments from Facebook (assuming product has page listed) 2) Figure out the sentiment of the tweets.
Technologies Involved:- Microsoft Azure Logic apps, Azure SQL DB, Azure WebJob, Cognitive services and PowerBI.
Prerequisite :- Microsoft SQL Server Management Studio, Microsoft Visual Studio, Azure SDK for .NET (Visual Studio 2015), Microsoft Power BI Dashboard and download source code from GitHub and store it in local drive
As a first step, let’s set up Azure SQL database to store tweets.
1) Go to Azure Portal https://portal.azure.com
2) Once login to the Azure Portal, Click New, Databases, SQL Database
3) Provide Database name, Subscription, Resource group (recommend to Create new for this demo ) , Select source (as Blank database), Server (Create a new Server as mentioned below), Want to use SQL elastic pool? (Not now), Pricing tier (as Basic) and Collation. Check Pin to dashboard and click Create
*Note:- Please note down Server admin login and Password.
4) Once created, open database (Double click) from Azure dashboard.
5) Go to Properties and then SERVER NAME
6) Copy SERVER NAME.
7) Click Start (Windows sign on bottom left) and search for Microsoft SQL Server Management Studio. Click to open Microsoft SQL Server Management Studio.
8) Paste SERVER NAME (copied in step 6) in Server name, Login and Password
*Note:- Keep Server Name, Database Name, login and Password in a Notepad file. It will help through out this sample.
9) Click Connect. If you encounter below warning then need to setup firewall rule at Azure SQL level. It will allow SQL Server management studio installed on machine to connect SQL Server on cloud.
10) Click Sign in… login to Azure
11) Once successfully logged in, Select Add my client IP (XXXXXXX) and click OK
12) Once logged in, click New Query
*Note:- Please make sure to select the tweetdb/created earlier database from the drop down box.
13) Copy create table script from the folder (DB Script) downloaded from GitHub or copy it from here.
14) Paste query in query window, click Execute
Once Azure SQL DB is set up, now let’s move to next step which is capture tweets real time and store it in Azure SQL db.
Here I am using Microsoft Azure Logic App. With Logic apps one can easily design workflows on cloud. I created a workflow in logic apps which will capture tweets (contains #MyDemoProduct hashtag) after every 3 minutes. If interested read more about Microsoft Azure Logic Apps here.
Let’s go step by step and set up workflow on Microsoft Azure using Logic App.
1) Go to Azure Portal https://portal.azure.com
2) Click Enterprise Integration
3) Click Logic App
4) Enter Name, Subscription, Create/Select Resource group (select existing one which created in earlier step), Location
5) Click Pin to Dashboard and Create
6) Once validation done, Azure will setup new Logic App service and open designer to create the workflow
7) Click Blank LogicApp
8) Search for twitter connector in Show Microsoft managed APIs. Select Twitter – When a new tweet is posted
9) Login to Twitter account. If you don’t have twitter account please create it.
10) Enter #MyDemoProduct or any other text which you want to capture in *Search text. Set *Frequency is Minute and *Interval is 3. When we run this app it will capture tweets (based on *Search text) in every 3 minute. Click + New step and Select Add an Action
11) In Show Microsoft managed APIs, Search for SQL and select SQL Server – Insert row
12) Enter *CONNECTION NAME, *SQL SERVER NAME, *SQL DATABASE NAME, *USERNAME and *PASSWORD. If you haven’t copied these information in notepad as suggested earlier then get it from Azure portal. Click Create.
13) Select table name TweetFromTwitter from the *Table name drop down box
14) Next step to map table columns with twitter fields. Move to every column and click Add dynamic content and select twitter field as described below. Leave Score column as blank. Click Save
15) Close Logic App Designer. Click Run Trigger
16) For test purpose tweet with #MyDemoProduct or any other text you provided earlier (when setting up Logic Apps)
16) In status, notice Logic App execution
17) Click Disable as it will fill up Azure SQL database table quickly based on the frequency of tweet post
18) Switch to Microsoft SQL Server Management Studio and Execute query (Select * from TABLE_NAME). Notice Score column is NULL
*Note:- Since I tweet from dummy account, it capture same location. I changed manually Location column value for some records.
Next Step is to setup Cognitive Services to get sentiment of tweets captured in Azure SQL Database. Also let’s setup Azure web job.
1) Go to Azure Portal https://portal.azure.com. Click New, Intelligence + analytics, Cognitive Services APIs
2) Enter Account name, Subscription, API Type as Text Analytics (preview), Location as West US (only available region at present), Pricing tier as Free and Resource group as Use existing (choose one which is created earlier). Check Pin to dashboard and click Create
3) Once done, it will show below screen indicates Microsoft Cognitive Services is created successfully.
4) Click Keys. Copy Key 1 and paste in Notepad.
Microsoft Cognitive Service is setup. Next step is to make changes in code and deploy it as Azure webjob. If not already, please download the source code from https://github.com/rawatsudhir/ProductSentimentAnalysis
1) Open Microsoft Visual Studio 2015. Provide Azure SQL DB credential and Subscription key (of Microsoft Cognitive Service)
2) Click Start. This code took all tweets from Azure SQL DB and pass it to Microsoft Cognitive Services get sentiment of each tweets and store it
3) Switch to Microsoft SQL Server Management Studio. If not open already please go to Start menu and click Microsoft SQL Server Management Studio.
4) Connect to Azure SQL DB and run Select top (100) * from TABLE_NAME
Below steps are OPTIONAL. Next step is deploy code to Azure as webjob.
1) Go to Azure Portal https://portal.azure.com. Click Web+mobile, Web App, enter App name, Subscription, Resource group as Use existing (choose one which is created earlier), App Service plan/Location ( Create new app service plan, select Pricing tier as Free for this solution ), App Insights as off, check Pin to dashboard, click Create
2) Once created below screen will show up
3) Switch to Microsoft Visual Studio. Right click on project and click Publish as Azure WebJob
4) Provide following information (get information from App service created in earlier step)
5) Once published. switch to Azure portal, click App service (created earlier) and click WebJobs
6) Select WebJob which deploy in earlier step. Click Run
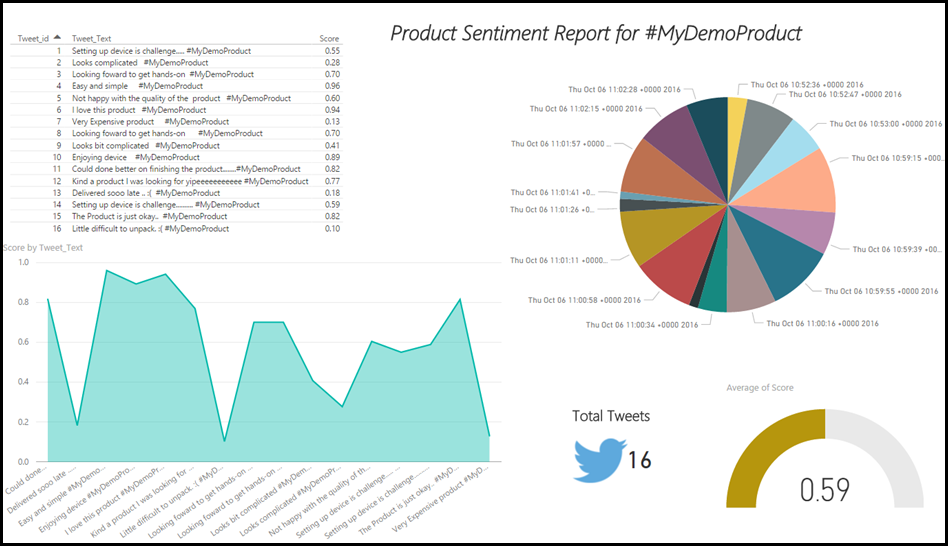
Next Step is build dashboard using Microsoft PowerBI desktop. 
1) Click windows button, search and click Power BI Desktop
2) Once Power BI dashboard opened, Enter Server and Database name. Click OK
3) Click Database, Provide Username, Password. Click Connect
4) Select TweetFromTwitter and click Load
5) Select Tweet_Text and Score. Select Table from Visualizations
6) Click somewhere in canvas. Select Location and Score. Select Pie Chart as Visualization. In Values click Score and choose Average.
7) Click on Publish if you have PowerBI account. Below is another report created with same dataset. 
Thanks for reading/trying it out.


![image[121] image[121]](https://msdntnarchive.z22.web.core.windows.net/media/2016/11/image121_thumb.png)