Implementing Multiple Identities in your .NET Core Web App - Part 1
Software developers have been dealing with the concept of users in their apps for many years, and many of us have implemented simple schemes for computing a hash of the password and rolling our own mechanisms and identity stores to support this. I don't think I have seen anyone recommend as a best practice that you should build your own identity system, and yet this is what people have been doing. Not saying it is impossible to do so, but even though you know what SQL injection is and have guarded your id database against those attacks there are probably a range of other vulnerabilities you aren't able to keep on top of unless you have more resources available to you than the average developer.
On the bright side, I have observed a push towards using Azure AD as the identity system many places in the past couple of years. Of course - this could be just me and the people/companies I run into. But in general people want SSO which requires some centralized component to be involved, and for corporate use Active Directory and/or Azure Active Directory frequently comes into play.
The basic single Azure AD tenant authentication scenario is something most developers should be able to implement fairly easily based on the samples provided by Microsoft. Call it the happy path scenario if you will. Unfortunately a lot of the use cases out there are not the basic single tenant setup. Maybe you want multi-tenant support. Maybe you need support for social identities like Facebook and Google. And maybe you want to provide different frontends for consumers, partners, etc. That's when things start to get more complicated :)
Even though I have my Microsoft goggles on I have no problem admitting there are great tools out there, made by other companies, for managing identities and securing resources. However since I have invested time and effort into the Azure technology stack it makes sense for me to try to implement this with MS tech, so I thought I would take a stab at building out my own sample using Azure AD B2C for Identity as a Service (IdaaS).
I have done a couple of posts on AAD B2C before, and of course you will also find info from Microsoft themselves on what Azure AD B2C is so I'm not going to do an introductory part on what the service can do. The name of the service does it no favors though since it seems to imply it's all about consumers. The identity teams in Redmond are now more often referring to "external identities" which is a better term in my opinion. (I would love to see it being a more generic "Azure AD Dev Edition" without a distinction between B2C and non-B2C, but it's not quite there yet. And maybe it needn't be either; that is however an entirely different discussion we will not go into now.)
If you want to learn the more basic parts of AAD B2C, and for that sake some more advanced things too, Microsoft has a thorough ebook you can go through: https://aka.ms/learnAADB2C
And thus there is no need for further explanations right?

Thing is - before you start hacking the necessary pieces of code into your solution you need a strategy of sorts so that is where we will start.
Which identity providers (IdPs) will you support?
Do you want to support primarily social identities like Facebook, Google, etc. or do you want to primarly support corporate identities? Or a mix? Only Azure AD tenants or other corporate-based ones as well?
The adding of IdPs is entirely independent of your code, so that should be done in the AAD B2C portal before you start. You don't need to add all at once, but with none defined things are not going to work so add at least one.
Google: /en-us/azure/active-directory-b2c/active-directory-b2c-setup-goog-app
Facebook: /en-us/azure/active-directory-b2c/active-directory-b2c-setup-fb-app
Microsoft: /en-us/azure/active-directory-b2c/active-directory-b2c-setup-msa-app
For adding corporate identities I would recommend using the OpenID Connect option if you can. Both Azure AD and ADFS can be added this way, and it is easier than using custom policies. (More on that topic later on.)
Custom OIDC: /en-us/azure/active-directory-b2c/active-directory-b2c-setup-oidc-idp
The third of the major options is local accounts - these are identities defined locally in Azure AD B2C and provisioned by the AAD B2C service natively. Some users will want to silo their different logins for various reasons. Should you cater for these users as well? Personally I like having this option, but this is a design point you need to consider specifically for your use case.
Technically speaking the local accounts are also AAD accounts, but in a B2C version. In a regular AAD tenant users are assumed to be working for the same company - this could of course include external consultants as well, but users are aware of each other and who the company entity owning the identities is. This means that you have things like a Global Address List (GAL) where you can look up the phone number of other users and similar things. In an system where users are all external and independent of each other this would not be ok, and would probably violate several privacy laws, so there are restrictions in place backend that prevents one user from looking up the details of another user.
Being AAD accounts means you as the tenant owner and app developer can still use things like the Graph API to query the records and other actions, so it's still better than rolling your own database for local accounts. (As a side note - the MS Graph is not supported yet, and you will need to use the Azure AD Graph.)
How will the landing page of the SignUp and/or SignIn experience be?
Will you leave the choice of identity entirely up to the user, or will you guide (with more or less force), towards specific options?
For instance you could have a page asking "Are you a partner or consumer" and direct partners towards corporate identities whereas consumers will only get to choose between different social identities. At the same time it could be you have one-man shops as partners that aren't using Office 365 and Azure AD, and prefer a Google account instead.
You could also have an automated flow once you know the email address of the user through a process called home realm discovery. In this case you could have users type in their email address first, and if it's joe@contoso.com send them directly to the Contoso login page. Do keep in mind to that there are some open-ended scenarios - just because an email address ends in gmail.com doesn't mean the identity has to be a Google account.
What needs to be customized, and what will work out of the box?
This is somewhat AAD B2C-specific since custom policies are an important part of achieving more advanced scenarios. You could however argue that some of the considerations would be valid even without AAD B2C. More specialized use cases will require more custom work with or without AAD B2C.
Take something like resetting passwords. This is a fairly common use case on web pages that rely on logging in. But if the user logs in with Facebook it's not like you can perform a reset - that would be something Facebook would need to provide. If you enable local accounts in AAD B2C you are responsible for that experience. Sure, you would "outsource" the task to Azure AD, but you would need to account for it in your UI. Luckily this is a simple feature that can be implemented in a standard policy in B2C, and as long as you send the user to the right page in the UI you might not need all the extras custom policies bring to the table.
This brings out a key point with Azure AD B2C - if the standard template provides what you need you should not build a custom policy "just because you can".
What would be a valid use case for a custom policy then? Maybe you need to validate some of the inputs the user types in when signing up and that validation needs to be done through an API call. That would require a custom policy. Maybe the user needs a code you have provided in advance to be able to sign up. That would require a custom policy. Basically, if you don't find it in the UI in the Azure Portal you need to think custom. Let's be realistic though - there are of course limits to what you can do in the custom space as well. You can do more, but you can't do everything :)
Authorization
Authentication is the easy part. Well, easy might be stretching it; there are as you can see plenty of considerations on how to acquire your golden ticket (aka token). But once the user has a token then what? If you have a setup with partners and end-users it's probably fair to assume that they should not be able to access the same content. You will probably need to have different roles, and use that as a filtering mechanism. Plan this out before you hack along. (Figuring out details like whether you need two roles on the partner level, say "Partner Admin" and "Partner User", isn't needed. You can do that later on.)
Our plan
With those considerations out of the way let's spec out what we want to implement.
We will build a web app that will provide services to employees, partners, and end-users/customers. For this we will support both Azure AD, social accounts, and local accounts. The web app will be implemented in .NET Core 2.1.
I will admit that I was inspired by a Microsoft demo:
https://github.com/Azure-Samples/active-directory-external-identities-woodgrove-demo
I don't intend to copy it outright though, fact is I didn't copy any of the source, and I will deliberately create a less polished version with regards to UI to focus on specific parts.
We will place as much of the authentication and authorization logic in AAD B2C as we can keeping the middleware configuration clean.
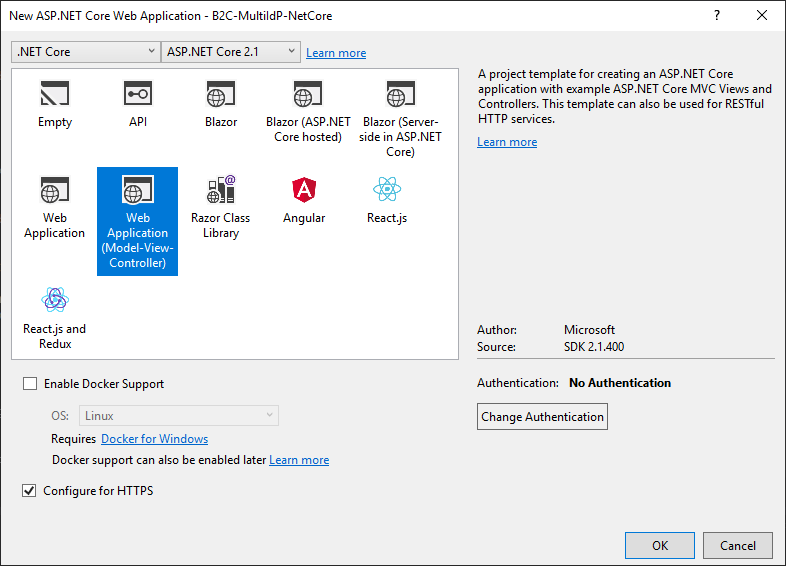
The first step is to create a new project in Visual Studio 2017 using the ASP.NET Core Web Application template.
Notice that authentication is set to No Authentication as we will build in that manually. Also make sure that Configure for HTTPS is checked - this is needed for authentication services.
As always, make sure the basics are working by hitting F5 and verify that the app builds and deploys without issues.
Before producing more code we will head over the Azure AD B2C Portal to create a few pieces and make sure things are working there.
Azure AD B2C Basics
If you don't have an AAD B2C tenant already that would be the first step. Microsoft details this here:
/en-us/azure/active-directory-b2c/tutorial-create-tenant
Make sure that you have Local accounts listed in the Identity providers section:

The tooltip explains that you can choose between Email and Username for these accounts - I will go with email.
Let's create a very basic set of policies. We just want to make sure that we can sign up and sign in first. Move down to Sign-up policies and click Add:

Check Email signup in the Identity providers section:

Sign-up attributes are the parameters we want to collect from the user when they create their account. You can check every one of them if you like, but that means more typing when testing :)
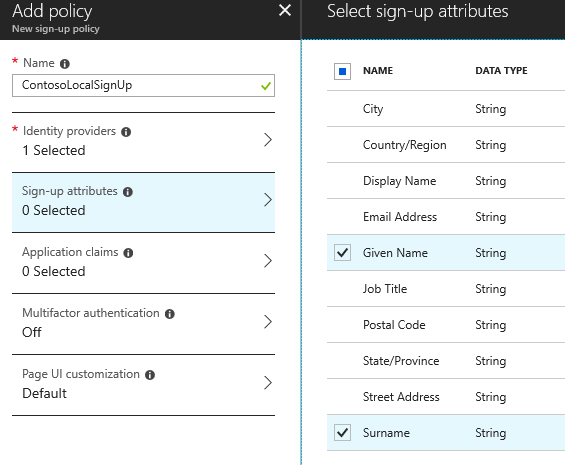
Application claims are the parameters you want to be part of the token you issue when someone signs in:
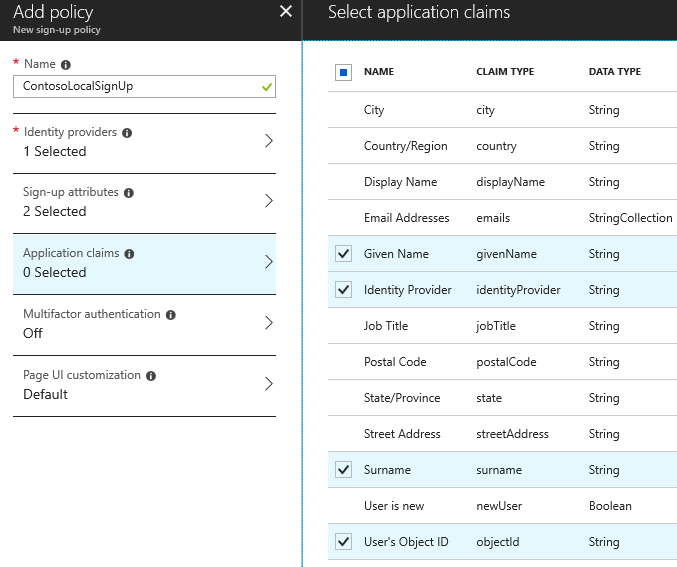
What is the difference? Well, some attributes does not make sense to collect from the user, but makes sense for the app. Other attributes are only relevant to have on file backend. The sign up attributes get persisted to the user object, but you can also have ephemeral attributes that only live in the context of a session.
You can add additional custom attributes if you like, but you're still somewhat limited until you go for custom polices. For now we don't need any extras.
We don't need Multifactor authentication or Page UI customization for now either so hit Create on the bottom of the page.
To use policies, or B2C in any way, you need to create an application. Move to Applications and click Add.
Check Yes to it being a Web App / Web API, and use https://jwt.ms as the reply url.
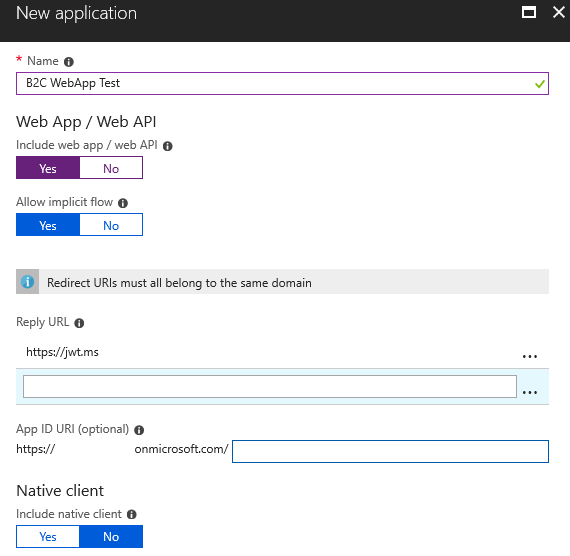
Go back to the Sign-up policies section and click the policy you created a couple of moments ago. Select the application you just created, and make sure jwt.ms is the reply url before clicking the Run now button.
Now you get to sign up for an account in your tenant:
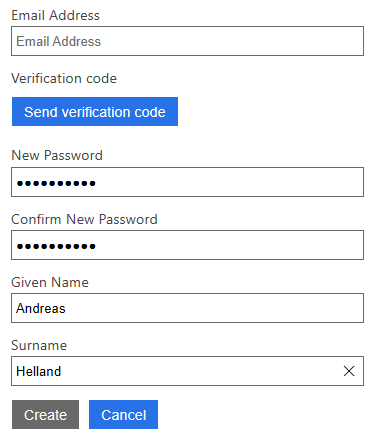
After creating the account you're automatically redirected to a page that shows you your token and the contents of it. (When you troubleshoot policies you will appreciate this feature.)
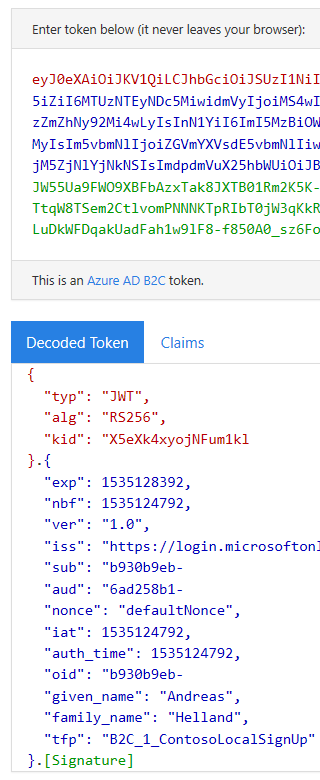
Wasn't that easy? You're creating identities and testing them without a single line of code written!
Next you should create a Sign-in policy, and a Password reset policy. I made the Sign-in more or less similar to Sign-up. With the password reset you don't really have that many options. Note that password reset only works with local accounts.
Actually, let's pull one more trick with the AAD B2C built-in policies. Head to Sign-up or sign-in policies and fill the forms out the same way. A "SuSi" policy produces a screen where the user chooses if they want to sign up or sign in thus sparing you a couple of calories as a coder when you're implementing your login links.
Configuring authentication in your web app
Now we can try to implement this in our own app. Go back to the app you registered in the B2C Portal. Copy the application id to Notepad or something.
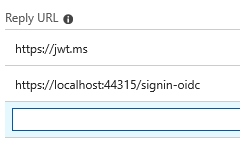
We also need to register our reply url for our app - so check with port your app runs on:

Mine is running on port 44315 as you can see. So register https://localhost:44315/signin-oidc as a reply url:
What I didn't show you when we created the web app was that there is actually a wizard very suited for Azure AD B2C in Visual Studio 2017:

However you wouldn't be able to actually fill it out had you not gone through the AAD B2C portal first. Let's add the code that would have been generated the manual way.
First you need to add the following NuGet package:
Microsoft.AspNetCore.Authentication.AzureADB2C.UI
The authentication is configured in Startup.cs.
Add two usings:
using Microsoft.AspNetCore.Authentication;
using Microsoft.AspNetCore.Authentication.AzureADB2C.UI;
Add the following to the ConfigureServices method:
services.AddAuthentication(AzureADB2CDefaults.AuthenticationScheme)
       .AddAzureADB2C(options => Configuration.Bind("AzureADB2C", options));
Add one line to the Configure method:
app.UseAuthentication()
Time to add the settings for our AAD B2C tenant - these can be found in appsettings.json.
  "AzureAdB2C": {
    "Instance": "https://login.microsoftonline.com/tfp/",
    "ClientId": "applicationId-from-portal",
    "CallbackPath": "/signin-oidc",
    "Domain": "yourtenant.onmicrosoft.com",
    "SignUpSignInPolicyId": "B2C_1_ContosoLocalSuSi",
    "ResetPasswordPolicyId": "B2C_1_ContosoLocalPasswordReset",
    "EditProfilePolicyId": ""
  },
We also need a UI with a button for signing in.
Add a file called _LoginPartial.cshtml with the following contents:
@using System.Security.Principal
@using Microsoft.AspNetCore.Authentication.AzureADB2C.UI
@using Microsoft.Extensions.Options
@inject IOptionsMonitor<AzureADB2COptions> AzureADB2COptions

@{
    var options = AzureADB2COptions.Get(AzureADB2CDefaults.AuthenticationScheme);
}

@if (User.Identity.IsAuthenticated)
{
    <ul class="nav navbar-nav navbar-right">
        @if (!string.IsNullOrEmpty(options.EditProfilePolicyId))
        {
            <li><a asp-area="AzureADB2C" asp-controller="Account" asp-action="EditProfile">Hello @User.Identity.Name!</a></li>
        }
        else
        {
            <li class="navbar-text">Hello @User.Identity.Name!</li>
        }
        <li><a asp-area="AzureADB2C" asp-controller="Account" asp-action="SignOut">Sign out</a></li>
    </ul>
}
else
{
    <ul class="nav navbar-nav navbar-right">
        <li><a asp-area="AzureADB2C" asp-controller="Account" asp-action="SignIn">Sign in</a></li>
    </ul>
}
Add a partial to _Layout.cshtml like this:
            <div class="navbar-collapse collapse">
                <ul class="nav navbar-nav">
                    <li><a asp-area="" asp-controller="Home" asp-action="Index">Home</a></li>
                    <li><a asp-area="" asp-controller="Home" asp-action="About">About</a></li>
                    <li><a asp-area="" asp-controller="Home" asp-action="Contact">Contact</a></li>
                </ul>
                <partial name="_LoginPartial" />
            </div>
If you hit F5 now you will see a Sign In button, and clicking it will take you to AAD B2C and return you to your web site afterwards. Nice and simple.
Hold on, it just says "Hello !" - there is no name there. Yes, due to how I configured my policies it doesn't line up with the claims expected to print out properly. This is purely a cosmetic issue that we will not care about right now. You are logged in.
In the web app as it is now this sign in action does not serve any purpose. You can browse everything whether you're authenticated or not.
While it is a silly example let's say only authenticated users can view our contact info.
Configuring authorization in your web app
Open up HomeController.cs and add an Authorize attribute to your Contact action:
[Authorize]
public IActionResult Contact()
{
  ...
}
And add using Microsoft.AspNetCore.Authorization; along with the other usings.
If you try to click Contact without being logged in you will be taken to the sign-in page to type in your credentials.
Ok, so now we have a very basic model for authentication (AuthN) and authorization (AuthZ) in our web app. We are however still a bit off with regards to our original plan - what now?
I'll add views for partners, customers and employees to my app.
Add methods in HomeController.cs:
public IActionResult Partner()
{
  ViewData["Message"] = "Howdy partner!";
  return View();
}

public IActionResult Customer()
{
  ViewData["Message"] = "Welcome dear customer. How may we help you today.";
  return View();
}

public IActionResult Employee()
{
  ViewData["Message"] = "Get back to work!";
  return View();
}
I use scaffolding to create views (right-click method, select Add View, and use the Empty template.)
Add a few menu items to _Layout.cshtml:
<ul class="nav navbar-nav">
  <li><a asp-area="" asp-controller="Home" asp-action="Index">Home</a></li>
  <li><a asp-area="" asp-controller="Home" asp-action="About">About</a></li>
  <li><a asp-area="" asp-controller="Home" asp-action="Contact">Contact</a></li>
  <li><a asp-area="" asp-controller="Home" asp-action="Partner">Partner</a></li>
  <li><a asp-area="" asp-controller="Home" asp-action="Customer">Customer</a></li>
  <li><a asp-area="" asp-controller="Home" asp-action="Employee">Employee</a></li>
</ul>
How to make sure only partners can access the partner page and so on?
We will use .NET Core Role-based authorization:
/en-us/aspnet/core/security/authorization/roles?view=aspnetcore-2.1
This approach will work, in the sense that you will get access denied even if you sign in. Having role checks doesn't work if you do not have a way to get users into those roles which sort of breaks the basic setup…
We're using claims-based authentication though, and have claims we are supposed to be able to check - so maybe we can do something with those?
Probably: /en-us/aspnet/core/security/authorization/claims?view=aspnetcore-2.1
If we can add the right claim we can make a policy for it. There doesn't seem to be a ready-made attribute for this, but luckily AAD B2C lets us customize this with little effort by adding custom attributes so go back to the AAD B2C Portal.
Navigate to the User attributes section and click Add. Add an attribute called Role:

Edit your policy to include this attribute as both a Sign-up attribute and Application claim.
This will not retroactively set a value for existing users, so when testing the easy thing to do is to delete your user account in the Users section, and run the sign up again.

Notice how there is a new textbox there? Type in "Partner" and create the user.
Since this is a custom attribute the name in the claim will be extension_Role since extension_ will be applied as prefix to claims that are not built-in.
Go back to your code and create the following policy in Startup.cs:
  services.AddAuthentication(AzureADB2CDefaults.AuthenticationScheme)
                .AddAzureADB2C(options => Configuration.Bind("AzureADB2C", options));

  services.AddAuthorization(options =>
  {
    options.AddPolicy("Partner", policy => policy.RequireClaim("extension_Role", "Partner"));
});
In HomeController.cs make sure the Partner method looks like this:
[Authorize(Policy ="Partner")]
public IActionResult Partner()
{
  ViewData["Message"] = "Howdy partner!";
  return View();
}
Do the same for "Customer" and "Employee" as well, and you have a working setup for handling different access levels to your web app.
This still leaves some open questions:
- We still only support one identity provider.
- Should we really have users typing in the role they want to have during registration?
Yeah, that might not be how we actually want it to be. First task to fix this would be registering more identity providers.
Adding Identity Providers (IdPs)
How about we offer local and social accounts for consumers, Azure AD for employees, and all types for partners.
Azure AD for employees can be configured by adding an OIDC-based provider:
/en-us/azure/active-directory-b2c/active-directory-b2c-setup-oidc-azure-active-directory 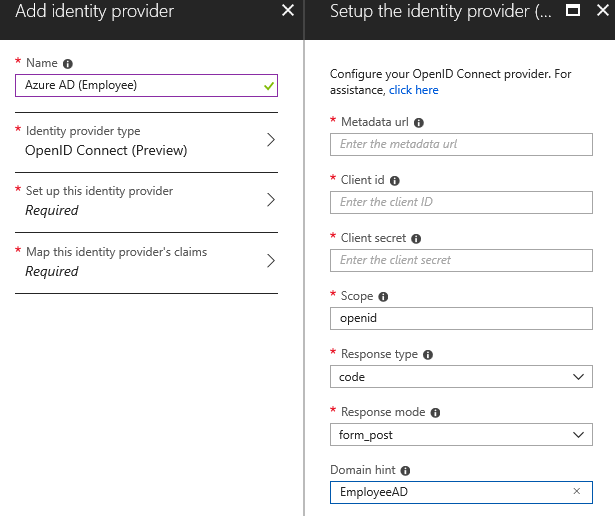
For customers I chose to add Google and Microsoft, but of course you can register others too if you like.
The partner logins are a different beast to tackle. Sure, we have covered social identities already, but what about Azure AD? We have already added one tenant, but we definitely don't want to add all our partner's tenants manually.
Azure AD exposes what we call a common endpoint that is used for such purposes. The metadata url for this is https://login.microsoftonline.com/common/.well-known/openid-configuration
Which would make you think that - let's just add that and we are good. Well, we are not, since the UI quite sternly informs us that this is not an allowed endpoint.
For readers familiar with Azure AD it would be tempting to suggest that we should attempt the v2 endpoint:
/en-us/azure/active-directory/develop/active-directory-appmodel-v2-overview
I'm not going to dive into all the details and derail what we are doing, but I tried, and even though it is possible to add the endpoint I can't actually get it working.
A little digging in the docs might lead you to this article which outlines the steps for this provider:
/en-us/azure/active-directory-b2c/active-directory-b2c-setup-commonaad-custom
The conclusion of this specific task is two-fold:
Bad news - we cannot add the multi-tenant Azure AD component in the nice UI we have used so far.
Good news - it is possible to solve it through other means.
Those other means are called custom policies, and since they are a mouthful we'll take a break until next week before we tackle those.
When part 2 comes along code will go up on GitHub - https://github.com/ahelland
Comments
- Anonymous
September 05, 2018
Excellent Andreas! Very helpful.- Anonymous
September 05, 2018
Thanks!While custom policies can be real tricky I hope to show off why it makes AAD B2C very flexible in the next installment.
- Anonymous
- Anonymous
September 06, 2018
We do have an existing ASP.NET MVC application with Microsoft Identity setup. This application uses local account which are stored in our SQL database. Are there any migration path?Thankx Harry- Anonymous
September 06, 2018
The comment has been removed
- Anonymous
- Anonymous
January 11, 2019
This is a gift that keeps on giving. Thanks, Andreas! - Anonymous
February 05, 2019
Sorry, but where is the account Controller?- Anonymous
February 16, 2019
I was wondering about that too. If I haven't misunderstood it is provided from the AzureADB2C.UI nuget. If it doesn't show up you might need to look into the network developer tools and check the return value from Azure AD.
- Anonymous
