Azure Storage服务动手实验
准备
OS:Windows7/8, windows server 2008/2012
拥有一个Azure账户
创建一个Azure存储账号
1. 登录Azure管理门户
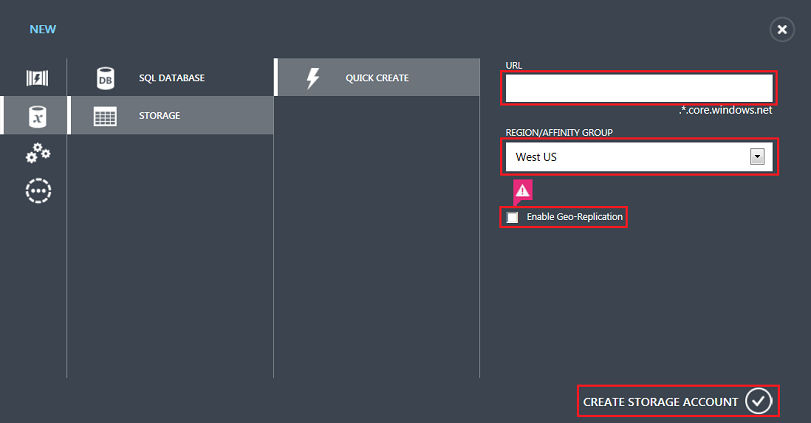
2. 在左下角点击新建
3.选择data service->storage新建一个存储账户。为其起个名字,这个名字不能跟其他存储账户重名。Region可以任意选一个,建议选East Asia(香港)
4.下面的Enable Geo-Replication如果选中,则Azure会进行异地存储复制。否则只会在本地进行复制。这二者的成本不同。这个选项在存储创建后也可以更改。现在保持缺省值即可。
5.点击Create Storage Account
6.等待账户建立完毕
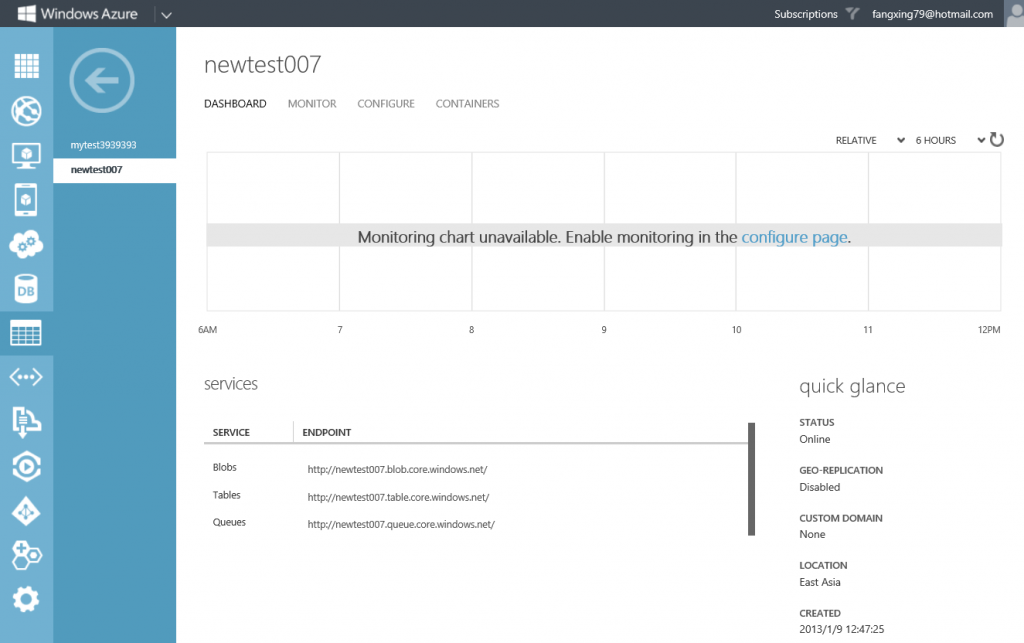
8.在存储账户的管理视图中,可以看到Blob/Table/Queue三种服务的URL,还可以看到Geo-Replication的状态以及该账户的主存储位置(East Asia)。中间的监控视图是空的,因为还没有配置监控策略。
9.点击Configure,可以对其进行配置。配置项包括:是否启用异地复制;是否打开监控;是否记录日志。打开异地复制后,可以看到目标数据中心。打开监控后,就可以在主界面和Monitor界面看到监控数据了,包括可用性、性能等。打开日志后,客户端的访问请求就会被记录下来,Azure会在当前存储账户的Blob里建立一个container来存储这些日志。
10.进入containers,可以浏览现有Blob服务的container。目前是空的,可以创建一个
11.创建以后可以看到这个container的路径,还可以点击进去看里面的Blob。目前是空的。
12.目前不支持从管理界面直接上传Blob,我们可以通过一些工具对Blob进行存取。
13.打开Visual studio,打开服务器资源管理器(Server Explorer)。在里面可以看到“Windows Azure 存储”这一项
14.右键Windows Azure,选择“添加新存储账户”
15.在对话框中选择“手动输入凭据”
16.账户名和秘钥可以在Azure管理门户上找到(点击底部的Manage Keys,对话框中第一行是账户名,第二行是主Key,第三行是备用Key。点击Key右侧的按钮可以拷贝)
17.添加账户后就可以看到账户里面的信息了
18.右键Blob,创建一个Container,然后双击打开它
19.在这里可以进行文件的上传、下载和查询。现在上传一个图片试试。点击顶部的箭头按钮,选择一个图片上传。
20.在下面的状态栏里可以看到上传进度。
21.上传完毕后,可以右键另存或者直接打开。
22.也可以复制URL,在浏览器里打开,(如果无法访问,需在Azure界面里面把该container的属性改为Public container)
23.另外,通过Visual studio,还可控制Azure Storage本机的一个模拟器。这个模拟器可以用来开发测试,不需要真正连接Azure
24.这个模拟器需要先启动才能从Visual studio访问
编程访问Blob
1.下面创建一个Visual Studio项目对Blob进行控制。Visual studio中,文件->新建项目->C#->Windows->控制台应用程序,项目名为StorageTest
2.项目建好后,加载storage库到项目。在解决方案资源管理器中展开,右键引用->添加引用
3.查找storage,选中microsoft.windowsazure.storage后安装
3.用Nuget加载OData库,在Visual studio->工具->库程序包管理器->控制台。在PM> 提示符下执行
Install-Package Microsoft.Data.OData -Version 5.0.2
4.打开Program.cs,添加类引用
 01.using Microsoft.WindowsAzure;
 02.using Microsoft.WindowsAzure.Storage;
 03.using Microsoft.WindowsAzure.Storage.Blob;
 04.using System.IO;
5.在Program类中,增加如下变量
public CloudStorageAccount storageAccount;
6.在Main方法中添加如下内容,其中CloudStorageAccount.DevelopmentStorageAccount是Azure存储服务本地模拟器的账户名
 01.Program test = new Program();
 02.test.storageAccount = CloudStorageAccount.DevelopmentStorageAccount;
 03.test.TestBlob();
 04.Console.ReadKey();
7.增加testBlob方法。该方法首先创建一个container,然后上传一个文件,最后列出所有文件
 01.public void TestBlob()
 02. {
 03. //Create blob client
 04. CloudBlobClient blobclient = storageAccount.CreateCloudBlobClient();
 05.
 06. //Create container if not exist
 07. CloudBlobContainer container = blobclient.GetContainerReference("testcontainer");
 08. container.CreateIfNotExists();
 09.
 10. String myfile = "test.txt";
 11. // Retrieve reference to a blob named "myblob".
 12. CloudBlockBlob blob = container.GetBlockBlobReference(myfile);
 13.
 14. // Create or overwrite the "myblob" blob with contents from a local file.
 15. using (var fileStream = System.IO.File.OpenRead(myfile))
 16. {
 17. blob.UploadFromStream(fileStream);
 18. }
 19.
 20.
 21. // Loop over items within the container and output the length and URI.
 22. foreach (IListBlobItem item in container.ListBlobs(null, false))
 23. {
 24. if (item.GetType() == typeof(CloudBlockBlob))
 25. {
 26. CloudBlockBlob blockBlob = (CloudBlockBlob)item;
 27.
 28. Console.WriteLine("Block blob of length {0}: {1}", blockBlob.Properties.Length, blockBlob.Uri);
 29.
 30. }
 31. else if (item.GetType() == typeof(CloudPageBlob))
 32. {
 33. CloudPageBlob pageBlob = (CloudPageBlob)item;
 34.
 35. Console.WriteLine("Page blob of length {0}: {1}", pageBlob.Properties.Length, pageBlob.Uri);
 36.
 37. }
 38. else if (item.GetType() == typeof(CloudBlobDirectory))
 39. {
 40. CloudBlobDirectory directory = (CloudBlobDirectory)item;
 41.
 42. Console.WriteLine("Directory: {0}", directory.Uri);
 43. }
 44. }
 45. }
8.在源代码的Debug目录里,建立一个test.txt,作为上传的测试文件
9.在Visual studio里面按F5,运行该程序,应该可以获得类似下面的输出
10.在Visual Studio的服务器资源管理器里面,找到Windows Azure Storage->开发->blob,应该可以看到testcontainer,打开后可以看到blob列表
编程访问Table
1.继续基于上面的项目开发。添加类引用
 01.using Microsoft.WindowsAzure.Storage.Table;
 02.using Microsoft.WindowsAzure.Storage.Table.DataServices;
2.添加类定义,这个类会作为Table要存储的对象结构
 01.public class CustomerEntity : TableEntity
 02. {
 03. public CustomerEntity(string lastName, string firstName)
 04. {
 05. this.PartitionKey = lastName;
 06. this.RowKey = firstName;
 07. }
 08.
 09. public CustomerEntity() { }
 10.
 11. public string Email { get; set; }
 12.
 13. public string PhoneNumber { get; set; }
 14. }
3.添加testTable方法。该方法首先建立一个table,然后加入一个对象,最后查询该表
 01.public void TestTable()
 02. {
 03. // Create the table client.
 04. CloudTableClient tableClient = storageAccount.CreateCloudTableClient();
 05.
 06. String tableName = "Customer";
 07.
 08. // Create the CloudTable object that represents the table.
 09. CloudTable table = tableClient.GetTableReference(tableName);
 10.
 11.
 12. // Create a new customer entity.
 13. CustomerEntity customer1 = new CustomerEntity("Harp", "Walter");
 14. customer1.Email = "Walter@contoso.com";
 15. customer1.PhoneNumber = "425-555-0101";
 16.
 17. // Create the TableOperation that inserts the customer entity.
 18. TableOperation insertOperation = TableOperation.Insert(customer1);
 19.
 20. // Execute the insert operation.
 21. table.Execute(insertOperation);
 22.
 23. // Construct the query operation for all customer entities where PartitionKey="Smith".
 24. TableQuery<CustomerEntity> query = new TableQuery<CustomerEntity>().Where(TableQuery.GenerateFilterCondition("PartitionKey", QueryComparisons.Equal, "Harp"));
 25.
 26. // Print the fields for each customer.
 27. foreach (CustomerEntity entity in table.ExecuteQuery(query))
 28. {
 29. Console.WriteLine("{0}, {1}\t{2}\t{3}", entity.PartitionKey, entity.RowKey,
 30. entity.Email, entity.PhoneNumber);
 31. }
 32. }
4.在Main方法中加入对该方法的调用
 01.static void Main(string[] args)
 02.{
 03. Program test = new Program();
 04. test.storageAccount = CloudStorageAccount.DevelopmentStorageAccount;
 05. //test.TestBlob();
 06. test.TestTable();
 07. Console.ReadKey();
 08.}
5.按F5运行,应该获得类似下面的结果
6.在Visual Studio的服务器资源管理器里面,找到Windows Azure Storage->开发->table,应该可以看到这个表,打开后可以看到表内容
编程访问Queue
1.添加类引用
 01.using System.Threading;
 02.using Microsoft.WindowsAzure.Storage.Queue;
2.添加TestQueue方法。该方法创建一个队列,然后创建一个线程用于接收消息,同时主线程发送10个消息
 public void TestQueue()
 02. {
 03.
 04. CloudQueueClient queueClient = storageAccount.CreateCloudQueueClient();
 05. CloudQueue cq = queueClient.GetQueueReference("testqueue");
 06. cq.CreateIfNotExists();
 07.
 08. //Receive
 09. Thread td = new Thread(new ThreadStart(() =>
 10. {
 11. Thread.Sleep(3000);
 12. CloudQueueMessage msg1 = cq.GetMessage();
 13. while (msg1 != null)
 14. {
 15. Console.WriteLine(string.Format("{0} Receive:{1}", DateTime.Now, msg1.AsString));
 16. cq.DeleteMessage(msg1);
 17. msg1 = cq.GetMessage();
 18. Thread.Sleep(3000);
 19. }
 20. Console.WriteLine("Receive Completed.");
 21. }));
 22. td.Start();
 23.
 24. //Send
 25. for (int i = 0; i < 10; i++)
 26. {
 27. CloudQueueMessage msg = new CloudQueueMessage(i.ToString());
 28. cq.AddMessage(msg);
 29. Console.WriteLine(string.Format("{0} Send:{1}", DateTime.Now, i));
 30. Thread.Sleep(2000);
 31. }
 32. Console.WriteLine("Add Completed.");
 33.
 34. }
 35.}
3.在Main方法中加入对该方法的调用
 01.static void Main(string[] args)
 02.{
 03. Program test = new Program();
 04. test.storageAccount = CloudStorageAccount.DevelopmentStorageAccount;
 05. //test.TestBlob();
 06. //test.TestTable();
 07. test.TestQueue();
 08.
 09. Console.ReadKey();
 10.}
4.按F5运行,应该获得类似下面的结果
5.在Visual Studio的服务器资源管理器里面,找到Windows Azure Storage->开发->queue,应该可以看到这个队列,双击后可以看到队列内容
将本地存储模拟器切换为Azure存储
以上的测试是在本地模拟器上测试的,要将测试对象切换为真正的Azure存储,只需将Main方法的这句
test.storageAccount = CloudStorageAccount.DevelopmentStorageAccount;
变更为
test.storageAccount = CloudStorageAccount.Parse
("DefaultEndpointsProtocol=https;AccountName=mytest3939393;AccountKey=sZjfJiETVsXCZEmDq8fKNQszlRPCvm4yfjdajf;dajfdjwiPvcU3fvxVHqGmJhIcaVaX3g==");
后面的字符串是Azure存储账户的地址。该地址可以这样获得:在Visual Studio的服务器资源管理器里面,找到Windows Azure Storage,找到最开始添加的Azure存储账户,右键,然后复制红色框里的内容
然后,再运行程序试试
本文转载自:https://blog.csdn.net/shaunfang/article/details/8486009


