Handling data in a converted desktop app with the Desktop Bridge
It’s hard to find an application that doesn’t requires to store, in some ways, some local data, from the simplest type (like the settings of the app) to the most complex one (like a database). A desktop app doesn’t make any exception, but when it comes to a converted desktop app there are two important key pillars to keep in mind: how to handle the installation folder and the user generated content. Let’s see both of them in details, with the goal to identify the best strategies to store the data for our application.
Interacting with the installation folder
If you have read the official page of the documentation about preparing a desktop app to be converted, you will find the following blocker:
Your app writes to the install directory for your app. For example, your app writes to a log file that you put in the same directory as your exe. This isn't supported, so you'll need to find another location, like the local app data store.
If you’re working with Windows applications since the release of Windows Vista, this requirement shouldn’t sound unfamiliar to you: Microsoft is suggesting as a best practice, since many years, to not use the installation folder of an application to store data that can be generated at runtime or created / updated by the user, like a log file, a database, a configuration file, etc. The reason is that an application should always work (unless in specific scenarios) in user mode and it shouldn’t required the logged user to have an administrator role to be able to use it. This requirement isn’t specific for Desktop Bridge apps, but it’s a best practice for every Windows app: in fact, traditional desktop installers usually installs the app in the C:\Program Files or C:\Program Files (x86) folder, which are both protected with administrative rights (in all these cases, in fact, you’ll notice the UAC prompt appearing before the installation starts). This can be a normal behavior, especially in enterprise environments, since typically applications are installed by an administrator of the computer. However, the final user could be, instead, a regular user and, as such, writing files in the installation folder would block him to complete his work.
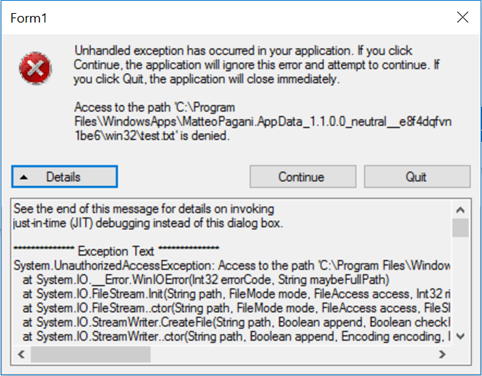
The Desktop Bridge simply enforces this requirement: if, in a traditional desktop app, it’s just a best practice but, in the end, the developer is still free to use the installation folder to write files if he really wants (in the worst case scenario, he would need to invoke the UAC prompt to ask the credentials of an user with admin rights if the app detects that it’s running in a folder for which the user doesn’t have the proper rights), in a converted app this approach is prohibited and you will get an error like the following one (the access to the path is denied):
Does it means that we can’t use the installation folder at all, other than for storing the executable, the DLL or every other file required for the application to run? No, because we still have read access to any file that is part of the app package and that is deployed in the installation folder. If, for example, we need to include a configuration file that, however, it will never be modified by the user (for example, because it contains a fixed set of parameters that can’t be customized), you can continue to keep it in the installation folder and access to it just in read mode.
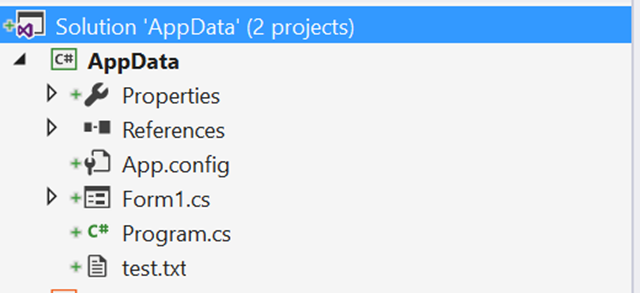
Let’s do a real test to demo this scenario, by creating a simple Windows Forms app that includes, inside the project, a text file called test.txt with a sample content and a button to read its content. Here is how the project looks like:
Here is the code to read the text file:
 private void OnReadFileFromInstallationFolder(object sender, EventArgs e)
{
    string location = System.Reflection.Assembly.GetExecutingAssembly().Location;
    int index = location.LastIndexOf("\\");
    string path = $"{location.Substring(0, index)}\\test.txt";
    string result = File.ReadAllText(path);
    MessageBox.Show(result);
}
If you’re wondering why I’m using the reflection APIs to get the location of the installation folder and I’m not simply passing, as parameter of the File.WriteAllText() , the name of the file or using the .NET API Environment.CurrentDirectory, you can find again the answer in one of the points of the official documentation:
Your app uses the Current Working Directory. At runtime, your converted app won't get the same Working Directory that you previously specified in your desktop .LNK shortcut. You need to change your CWD at runtime if having the correct directory is important for your app to function correctly.
As such, without using an alternative approach (like the one I used based on the Reflection APIs), the converted version of the app would try to read the file not in the installation folder, but in the C:\Windows\System32 or C:\Windows\SysWOW64 folder (based on the architecture of your Windows installation).
With this code, no matter if your app will run as native or converted, you’ll always be able to read the context of the text file and to see it inside a MessageBox, since we’re accessing to the file in read-only mode. If, by any chance, we would try to change the content of the test.txt file, instead, we would get an error, because in this case we would try to get access in write mode.
This concept, other than for long time Windows developers which are following the best practices provided by Microsoft, should be familiar also to UWP developers, since it’s applied also to regular UWP apps: you can leverage the API Windows.ApplicationModel.Package.InstalledLocation to get access to the files included in the installation folder, but only in read-only mode. For everything else, you need to leverage the APIs included in the Windows.Storage namespace to get access to the local storage dedicated to the app, where you are free not just to read but also to create files and directories.
To wrap up this paragraph, let’s remember which is this installation folder in case of converted apps: app packages, when side loaded or installed from the Store, are deployed in the hidden folder C:\Program Files\WindowsApps. Every application will be stored in a specific folder, which name is a combination between the publisher, the app name, the CPU architecture, the version number and a randomly generated string. For example, if you install the Desktop App Converter from the Store, it will be deployed in the following path:
C:\Program Files\WindowsApps\Microsoft.DesktopAppConverter_1.0.6.0_x64__8wekyb3d8bbwe
So, where do I store my data?
Windows contains a special hidden folder in the root of the user’s folder called AppData. By default it’s hidden, but you can see it by opening the Run dialog (press on your keyboard the combination Start + R) and by writing the following path:
C:\Users\<yourusername>\AppData
This folder contains three sub folders:
- Local, which is mapped with the Windows variable %LOCALAPPDATA% and it contains all the data generated by installed applications that should remain local on the current machine.
- Roaming, which is mapped with the Windows variable %APPDATA% and it contains all the data data generated by installed applications that should roam across different machines (it’s a typical enterprise scenario, where multiple computers are joined to the same domain and a user can login on any of them with his set of credentials).
- LocalLow, which is dedicated to low-integrity apps, like Internet Explorer add-ons.
The first two folders are the right place where a desktop application should write any user-generated data or any content created at runtime. Since the AppData folder is included in the user’s folder, there are no permission problems: the application is free to read and write files inside these folders without requiring the user to be an administrator of the machine.
If you’re application is based on the .NET framework, it’s even simpler to get access to these folders, thanks to an enumerator called SpecialFolder included in the System.Environment object. Here are two examples on how to retrieve the path of these two folders:
 //local app data
string localPath = Environment.GetFolderPath(Environment.SpecialFolder.LocalApplicationData);

//roaming app data
string roamingPath = Environment.GetFolderPath(Environment.SpecialFolder.ApplicationData);
If we leverage one of these paths to store every content generated at runtime, we won’t have any access problem. Here is, for example, how we can make our application compliant to the Windows guidelines, by creating our text file inside the roaming app data folder:
 private void OnCreateTextFileInAppDataFolder(object sender, EventArgs e)
{
    string roamingPath = Environment.GetFolderPath(Environment.SpecialFolder.ApplicationData);
    string fullPath = $"{roamingPath}\\AppDataSample";
    if (!Directory.Exists(fullPath))
    {
        Directory.CreateDirectory(fullPath);
    }

    string filePath = $"{fullPath}\\test.txt";
    File.WriteAllText(filePath, "This is a sample text file");
}
The only peculiar concept to highlight in the previous code is that the Environment.SpecialFolder.ApplicationData folder is simply a pointer to the root of the C:\Users\<username>\AppData\Roaming folder. As such, it’s up to us (to keep the structure of our application better organized) to create a specific directory for our app and to store our content in it. This can be an unfamiliar concept for a UWP developer, since when you use the UWP API Windows.Storage.ApplicationData.Current, you automatically access to a specific local directory that is created just for your app.
With the previous code, no matter if our app will run as native or converted, the writing operation will always succeed and we will have reached our goal of handling content generated at runtime in a desktop application in the proper way. What I’ve explained so far is a common best practice for Windows apps, no matter if they’re released as native with a traditional installer or downloaded from the Store. Which is the strength of the Desktop Bridge? That, in a converted app, the AppData folders are automatically remapped to a special isolated folder specific for our application. This time, instead, the concept will be familiar if you have experience with UWP development, because it’s the same folder where UWP apps keep the local storage:
C:\Users\<username>\AppData\Local\Packages\<PackageFamilyName>
The PackageFamilyName is a string generated as a combination of publisher, app name and a random value. For example, the local storage of the Desktop App Converter is stored in the following path:
C:\Users\<username>\AppData\Local\Packages\Microsoft.DesktopAppConverter_8wekyb3d8bbwe
The advantage of this redirection is that it helps to reach the goal to improve the install / uninstall / update experience compared to a traditional desktop app:
- In case of a traditional installer (like a MSI), it’s up to the uninstaller tool to clean the files left in the C:\Users\<username>\AppData folder.
- In case of a converted app, Windows will take care of automatically deleting the folder inside the C:\Users\<username>\AppData\Local\Packages path when the user will choose to uninstall the application from the Start menu or from its tile.
The power of the Desktop Bridge is that this redirection will be automatically done by Windows, you won’t have to change a single line of code: it’s enough that, in your application, you don’t refer to the AppData folders using a fixed string, but using one of the Windows environment variables (like %APPDATA%) or the specific .NET APIs (in case it’s a Windows Forms or WPF app, like in the previous sample).
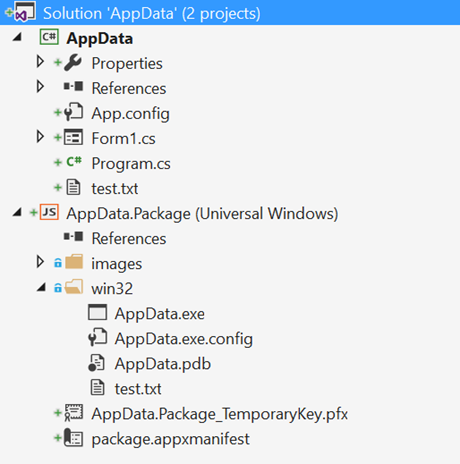
If you want to test it for yourself, it’s enough to add a WinJS project (like explained in this post) to your solution, so that you can run your app as converted with the Desktop Bridge. At the end of the process, your solution will look like the following one:
Try to run first the standard desktop app (in my sample, the AppData one) and press the button connected to the code that creates the text file: you will find it in the path C:\Users\<username>\AppData\Roaming\AppDataSample\test.txt.
Now repeat the same experiment but, as explained in the just mentioned conversion post, set the WinJS project (AppData.Package) as startup and, from the Visual Studio menu, choose Debug –> Start without debugging. In my case, based on the identity I assigned to my converted app in the manifest , the file has been created in the following path:
C:\Users\<username>\AppData\Local\Packages\MatteoPagani.AppData_e8f4dqfvn1be6\LocalCache\Roaming\AppDataSample\test.txt
As you can see, Windows has automatically remapped the C:\Users\<username>\AppData folder inside the LocalCache folder of the local area assigned to my converted app. As such, when a user will decide to uninstall it, Windows will simply delete the MatteoPagani.AppData_e8f4dqfvn1be6 folder with all its content, without leaving any leftover behind.
What if I need to deploy some files in the installation folder and some others in the AppData folder?
Some applications may have the requirement to deploy some files not just in the installation folder, but also in the AppData folder. Let’s say, for example, that the text file we have previously created is, in a real world scenario, a configuration file. It should be part of the installation process, because the app comes with a default configuration, but it should be placed in the AppData folder, not in the installation folder, because the user has the chance to customize the settings of the app at runtime. Another common scenario is a database: the application stores its data in a SQLite or a Realm Mobile database which, however, isn’t created at startup, but it must be deployed with some prepopulated data, that the user later can change, add, delete, etc.
This scenario is supported by traditional installers, but unfortunately not by the Desktop Bridge. Everything you place in the app package and that gets packaged in an AppX file is automatically installed inside the C:\Program Files\WindowsAppsfolder: there’s no way to specify that some files should be deployed in the local storage of the app, so that the user can have immediately read and write access.
Is there a workaround? Yes, but it requires some code changes in our application. Specifically, we need to:
- Include the file we want the user to be able to modify inside the package.
- At the first launch of the application, copy it in the AppData folder.
- Start performing any operation against the copy of the file in the AppData folder.
To demo this scenario, as first step I have added in my desktop project a new text file called config.txt with the following sample content:
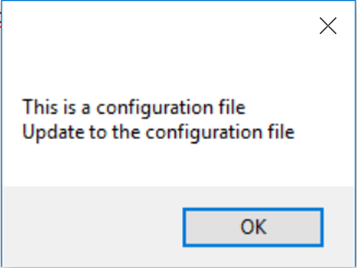
This is a configuration file
First make sure that, in Visual Studio, you select it and, in the Properties panel, you change the Copy to output directory option to Copy if newer (otherwise, since it’s a content file and not a code file, it won’t be included in the build output). Then build the project and, this time, repeat the same operation in the WinJS project. Expand the win32 folder, click on the Show all files button in Solution Explorer and make sure to:
- Right click on the config.txt file and choose Include in project, so that it can become a part of the app package.
- Always in the Properties panel, also in this case set the Copy to ouput directory option to Copy if newer, to make sure that we always include the most up-to-date version in the app package.
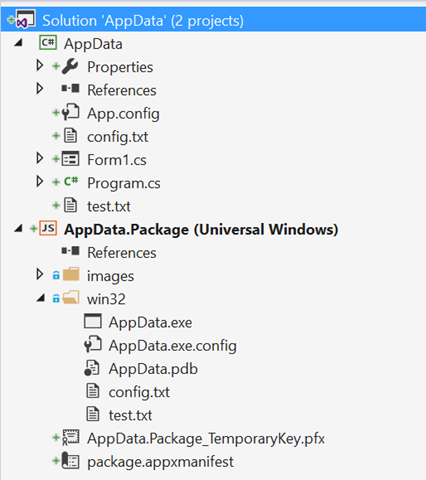
This is how your updated solution should look like:
As you can see, there’s a new file called config.txt both in the root of the desktop project (AppData) and in the win32 folder of the WinJS project (AppData.Package).
And here is the code that I have connected to the Load event of the main form of the application:
 private void OnFormLoaded(object sender, EventArgs e)
{
    string roamingPath = Environment.GetFolderPath(Environment.SpecialFolder.ApplicationData);
    string fullPath = $"{roamingPath}\\AppDataSample";
    string destination = $"{fullPath}\\config.txt";
    if (!Directory.Exists(fullPath))
    {
        Directory.CreateDirectory(fullPath);
        string location = System.Reflection.Assembly.GetExecutingAssembly().Location;
        int index = location.LastIndexOf("\\");
        string source = $"{location.Substring(0, index)}\\config.txt";

        File.Copy(source, destination);
    }

    //show the content of the original file
    string beforeUpdate = File.ReadAllText(destination);
    MessageBox.Show(beforeUpdate);

    //show the content after the update
    File.AppendAllText(destination, "\r\nUpdate to the configuration file");
    string afterUpdate = File.ReadAllText(destination);
    MessageBox.Show(afterUpdate);
}
As you can see, everything is based on the standard .NET APIs (included in the System.IO namespace) to work with files. As first step, we check if we already have a folder called AppDataSample in the local AppData: if the answer is no, it means that it’s the first launch of the application, so we need to copy our configuration file from the installation folder to the AppData one. Then, using the same code we’ve seen at the beginning, we leverage the Reflection APIs to get access to the config.txt file stored in the installation folder and, by using the static Copy() method of the File class, we copy it in the AppData/Roaming/AppDataSample folder specific for our application.
Since the file is now outside the installation folder, we are free not just to read its content (like we do with the ReadAllText() method right after having completed the copy) but also to update it. In this sample scenario, we’re just adding a new line of text by calling the AppendAllText() method of the File class, passing as parameter:
- The new path of the config.txt file inside the AppData folder.
- The new line.
In the end, just to double check we did everything correct, we use again the ReadAllText() method on the same file to display to the user the updated content. If we did everything well, this time the message dialog should display the following message:
Again, the code we have just written will work in the same way no matter if the app is running as native or converted. The difference is that, in the first case, the file will be copied from whatever folder the installer has installed our application (like C:\Program Files\AppDataSample) to the local AppData folder (so C:\Users\<username>\AppData\Roaming\AppDataSample). If, instead, the app is running as converted, the original config.txt file would be deployed in the AppX installation folder (C:\Program Files\WindowsApps\MatteoPagani.AppData_1.1.0.0_neutral__e8f4dqfvn1be6) and then copied in the dedicated local storage at first launch (C:\Users\<username>\AppData\Local\Packages\MatteoPagani.AppData_e8f4dqfvn1be6\LocalCache\Roaming).
As you can see, compared to a traditional installer, we have a small disadvantage (we need to change the code of the application to manully copy the files we need in the AppData folder at first launch, we can’t rely on the AppX deployment to do it for us), but the uninstall experience will be much cleaner: the configuration file will be automatically deleted when the app will be uninstalled, it’s not up to the uninstaller tool to remember to do that.
Wrapping up
In this post we have seen how to deal with the data of our application in a desktop app and how to leverage the special AppData folder in order, at the same time, to follow the guidelines that every Windows developer should follow to handle user generated content in the proper way and to respect the requirements of a desktop app converted using the Desktop Bridge. As a key point to highlight before wrapping up, remember that the AppData folder is meant for all the user generated content data which is strictly connected to your app and that wouldn’t make sense without it (like a configuration file or a SQLite database). If the application is capable of generating data that can be opened and reused by other applications (like images or documents), in this case you should leverage the standard Windows libraries (like Documents or Pictures) or use the Windows pickers to allow the uses to save the file in the location he prefers. These kind of files, in fact, shouldn’t be removed together with the application.
As usually, you can find the sample project used in this post on my GitHub repository: https://github.com/qmatteoq/DesktopBridge/tree/master/Extras/AppData
Happy conversion and, if you have a desktop app you would like to bring on the Store, don’t forget to fill the nomination form!
Comments
- Anonymous
May 18, 2017
Thanks for a great article. If i want to use System.Diagnostics.Process.Start(GetLogFileName()); to open a csv log fil which is located in AppData folder it wont work in a Desktop Bridge app. Process.Start will try to open the location of a tradistional desktop app.- Anonymous
May 21, 2017
Hello Mattias, which is the value returned by the GetLogFileName() method?
- Anonymous
- Anonymous
June 08, 2017
var currentDirectory = Path.GetDirectoryName(System.Reflection.Assembly.GetExecutingAssembly().Location);var deployedMyDB = Path.Combine(currentDirectory, "MyDB.sdf");string localPath = Environment.GetFolderPath(Environment.SpecialFolder.LocalApplicationData);string MyDB = Path.Combine(localPath, "MyDB.sdf");// only first app startupif (File.Exists(deployedMyDB ) && !File.Exists(MyDB )){ File.WriteAllBytes(MyDB , File.ReadAllBytes(deployedMyDB));} - Anonymous
June 15, 2017
Hello Matteo,Thanks for your detail article. I want to know how about the regedit data. If my win32 app write some regedit data in current user registry tree, and want to change some config value by developers, in order to reference it. So how to change the registry value after converting to Desktop Bridge?Thanks- Anonymous
June 15, 2017
Hello Shirley-cheng,a Desktop Bridge app can read from the system registry, but can't write. Every writing operation is redirected to the local registry.dat file. So, if the classic desktop version of your application has written something in the registry that you need to edit later from the Desktop Bridge app, you can't do it directly. A solution would be to read the value from the registry from the converted desktop app, store it somewhere else (like in a text file) and then start reading from there instead from the registry. If it can help, the Desktop Bridge team has wrote some documentation on how to transition your users from the win32 version to the Desktop Bridge version of your app: https://docs.microsoft.com/en-us/windows/uwp/porting/desktop-to-uwp-extensions#transition-users-to-your-appI hope it helps!
- Anonymous
- Anonymous
November 08, 2017
Hello Matteo,Is there any API to get the expanded/resolved LocalCache path? For example, I want this file 'C:\Users\AppData\Roaming\AppDataSample\test.txt' to be opened in its assocatiated program. I cannot just pass this path because that program would find no file there. Instead, I need to pass the path 'C:\Users\AppData\Local\Packages\MatteoPagani.AppData_e8f4dqfvn1be6\LocalCache\Roaming\AppDataSample\test.txt'. How can I get the latter path?Thanks!- Anonymous
November 08, 2017
Hello levie,if you can integrate UWP APIs, you can get this path using the Windows.Storage.ApplicationData.LocalCacheFolder class. Would it work for your scenario?- Anonymous
November 09, 2017
Thank you Matteo! That's exactly what I am looking for. I use cppwinrt to access the UWP APIs.
- Anonymous
- Anonymous
