Lab Ops part 11 – Server Core
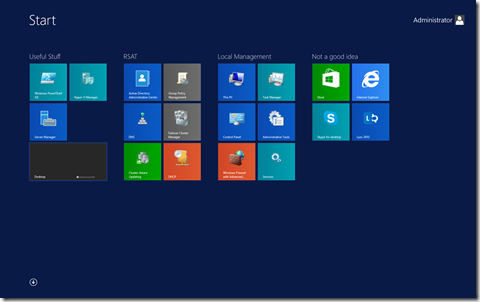
My laptop running Windows Server 2012R2 looks like this when it starts:
This is a good thing and a bad thing. It’s a good thing if:
- You have a server you want to connect to from a device with touch on that may have a smaller form factor and you have big fingers so you can get to the task you want in a hurry as you can pin web sites, MMC snap-ins etc. to the Start Menu and organise them as I have done.
- If you use your server for Remote Desktop Session Virtualization (Terminal Services as was) your users will see the same interface as their Windows 8.1 desktop, and will get a consistent experience.
- You are an evangelist at Microsoft, who has to lots of demos and isn’t allowed near production servers!

However if you are managing production servers at any kind of scale this is a bad thing as you don’t need all the tools and interfaces on every server you deploy. All those tools expose interfaces like File and Internet explore so if your servers are in the wild (so not in managed data centres) then curious local admins might wish to use those tools to surf the net or reconfigure your servers. Also these interface require patching and can consume resources.
This is why Server Core was introduced in Windows Server 2008 and in Windows Server 2012R2 Server Core is the default installation option. All you get if you install Windows Server with this option is:
- Task Manager
- Registry Editor
- Notepad!
- Command Line
- SConfig a lightweight menu of scripts to do basic configuration tasks.
- and with Windows Server 2012 and later you also get PowerShell
Server Core wasn’t a popular choice in Windows Server 2008 for a number of reasons:
- It was too limited. For example there was no ability to run the .Net framework and so it couldn’t run things like asp.Net websites or SQL Server and it didn’t include PowerShell by default because PowerShell is also built on .Net.
- 2008 wasn’t setup for remote management by default, and patching was problematic, and unless you paid for System Center there wasn’t a tool to manage these servers at any sort of scale.
- It was an install only option, so the only way to get back to a full interface was to do a complete reinstall.
That has all been fixed in Windows Server 2012 and later and so Server Core should be your default option for all your servers except those used for Remote desktop Session Virtualization Hosts. You could achieve nearly the same result by doing an install and rip out all the interfaces once your server is configured they way you want in which case you would go to the menu remove features in Server Manager and in the features screen uncheck each of the options..
where:
- The Server Graphical Shell has IE and File Explorer the start button and Start Screen.
- The Desktop Experience gives you the Windows Store and makes Windows Server behave like Windows 8.1 (complete with the Windows Store).
- The Graphical Management Tools have Server Manager and MMV snap-ins.
If you remove all of these from here or use PowerShell to do this:
Remove-WindowsFeature –Name Desktop-Experience, Server_Gui-Mgmt-Infra, Server-Gui-Shell
you essentially get Server Core. If you leave behind the Graphical Management Tools ..
Remove-WindowsFeature –Name Desktop-Experience, Server-Gui-Shell
You’ll get what’s known as “MinShell” all the management tools, but no extra fluff like IE and the Start menu, so this is also a popular choice.
If you do elect do a Server Core install and want then later decide to put the management user interface back in, you need to remember that the binaries for these aren’t on the server so when you add the features in you’ll need to specify a source switch, and before that you’ll need to have access to the source for these features by mounting the appropriate .wim file using the Disk Image Servicing Management command (DISM):
MD C:\WS2012install
DISM /Mount-WIM /WIMFile:D:\sources\install.wim /Index:4 /MountDir:C:\WS2012Install /ReadOnly
Add-WindowsFeature –Name Server-GUI-Mgmt-Infra –Source c:\ws2012install\Windows\SxS
shutdown /r /t 0
DISM /Unmount-WIM /MountDir:C:\WS2012Install /Discard
Notes:
- This turns Server Core in to a MinShell installation
- D: is the install media for Windows Server 2012R2
- Index is the individual installation on the media and for the evaluation edition 4 corresponds to the full install of Datacenter edition (You can run DISM /Get-WIMInfo /WIMFile:D:\sources\install.wim to see what there is)
- shutdown /r restarts the server
This is actually quite a useful template as doesn’t have the binaries needed to put IE etc. back in but is still easy to manage. You could then use this as the the basis for creating VMs for your labs and evaluations by sysprepping it:
sysprep /generalize /shutdown /oobe
and if you wanted to save space you could then use it as a parent for the differencing disks behind the various VMs in your lab environment.
There is a free version of Windows Server 2012R2 specifically designed for Hyper-V, called Hyper-V Server 2012R2. This is very like Server Core, but you can’t add the UI back in and it only has a few roles in it specifically for Hyper-V, clustering and file servers as that’s all that is included in the license.
To finish up Server core is really useful, and much easier to manage remotely than it was, as Windows Server is setup by default for remote management within a domain. Just as importantly you might have dismissed a feature in Windows when it first shows up in a new version, but it’s worth checking back to how it’s changed in each new versions, be that Server Core, Hyper-V, storage or those big squares!
Comments
- Anonymous
December 23, 2013
Pingback from Windows Server 2012 R2: Lab Ops–Building a VDI environment with powershell | MS Tech BLOG

