Lab Ops Part 10–Scale Out File Servers
In my last post I showed how to build a simple cluster out of two VMs and a shared disk. The VMs are nodes in this cluster..
and the shared “quorum” disk is used to mediate which node owns the cluster when a connection is lost between them..
However this cluster is not actually doing anything; it isn’t providing any service as yet. In this post I am going to fix that and use this cluster as a scale out file server. This builds on top of what I did with a single file server earlier in this series. To recap I am essentially going to build a SAN, a bunch of disks managed by two controllers. The disks are the shared VHDX files I created last time and the controllers are the file server nodes in my cluster.
First of all I need to add in the the Scale out File Server role into the cluster..
Add-ClusterScaleOutFileServerRole -Name HACluster -Cluster HAFileServer
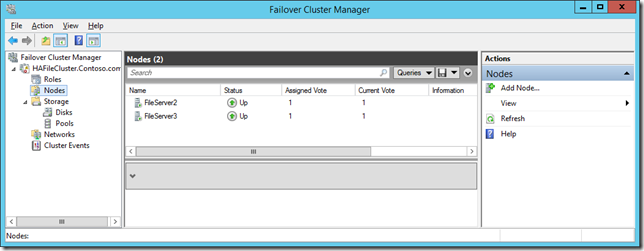
If I go back to cluster manager I can see that the role is now installed..
This time the pool will be created on the cluster, and while I could expand pools under storage in cluster manager and create a new storage pool via the wizard, it’s more interesting to look at the equivalent PowerShell. If I look at the storage subsystems on one of my nodes with
Get-StorageSubSystem | Out-GridView
I get this..
I need to use the second option so that my new pool gets created on the cluster rather than the on the server I am working on. The actual script I have is..
$PoolDisks = get-physicaldisk | where CanPool -eq $true
$StorageSubSsytem = Get-StorageSubSystem | where FriendlyName -Like "Clustered Storage Spaces*"
New-StoragePool -PhysicalDisks $PoolDisks –FriendlyName “ClusterPool” -StorageSubSystemID $StorageSubSsytem.UniqueId
Here again is an example of the power in PowerShell comes out:
- $StorageSubSsytem is actually an instance of a class as you can see when I reference it’s unique ID as in $StorageSubSsytem.UniqueId
In the same way $PoolDisk is an array of disks showing that we don’t need to declare the type of object stored in a variable it could be a number, string collection of these or in this case a bunch of disks that can be put in a pool!
- The use of the pipe command to pass objects along a process, and the simple where clause to filter objects by anyone of its/their properties. BTW we can easily find the properties of any object with get-member as in
#if you try this on your windows 8 laptop you’ll need to run PowerShell as an administrator
get-disk | get-member
I said earlier that I am building a SAN, and within this my storage pool is a just a group of disks that I can manage. Having done that my next task on a SAN would create logical units (LUNs). Modern storage solutions are making more and more use of hybrid solutions where the disks involved are a mix of SSD and hard disks (HDDs), and intelligently placing the most used or ‘hot’ data on the SSD. Windows Server 2012R2 can do this and this is referred to as tiered storage. Because I am spoofing my shared storage (as per my last post) the media type of the disks is not set and so tiered storage wouldn't normally be available. However I can fix that with this PowerShell once I have create the pool..
#Assign media types based on size
# Use (physicalDisk).size to get the sizes
Get-PhysicalDisk | where size -eq 52881784832 | Set-PhysicalDisk -MediaType HDD
Get-PhysicalDisk | where size -eq 9932111872 | Set-PhysicalDisk -MediaType SSD
#Create the necessary storage tiers
New-StorageTier -StoragePoolFriendlyName ClusterPool -FriendlyName "SSDTier" -MediaType SSD
New-StorageTier -StoragePoolFriendlyName ClusterPool -FriendlyName "HDDTier" -MediaType HDD
#Create a virtualDisk to use some of the space available
$SSDTier = Get-StorageTier "SSDTier"
$HDDTier = Get-StorageTier "HDDTier"
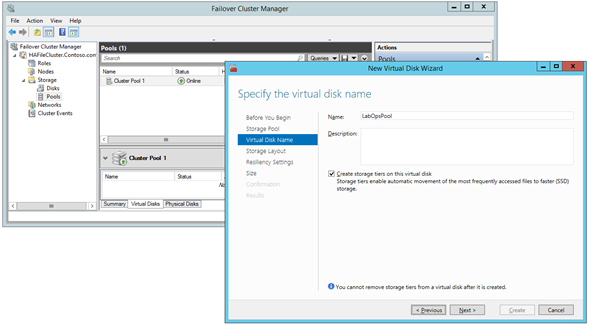
In the world of Windows Server storage I create a storage space which is actually a virtual hard disk and if I go into Cluster Manager and highlight my pool I can create a Virtual Disk...
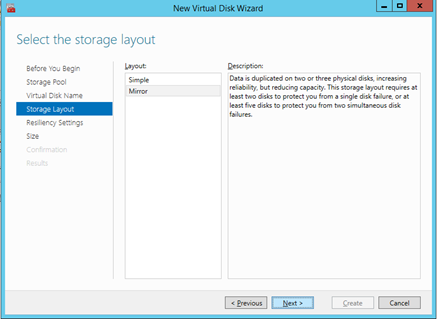
Foolishly I called my disk LabOpsPool, but it’s a storage space, not a pool. Anyway I did at check the option to use storage tiers (this only appears because of the spoofing I have already don to mark the disks as SSD/HDD), Next I can select the storage layout.
and then I can decide how much of each tier I want to allocate to my Storage Space/Virtual Disk..
Note the amount of space available is fixed - we have to use thick provisioning with storage tiers. and I could thin provision if I wasn’t. BTW my numbers are more limited than you would expect because I have been testing this, and also the SSD number will be lower than you would think because the write cache also gets put on the SSDs as well. Having done that the wizard will allow me initialise the disk put a simple volume on it and format it.
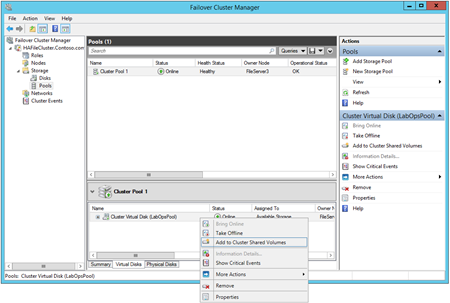
Now I need to add the disk I created to Clustered Shared Volumes as I want to put application data (VM’s and databases) on this disk. Then I need to navigate to the ScaleOut File Server role on the left pane and create a share on the disk so it can be actually used..
This fires up the same share wizard as you get when creating shares in Server Manager..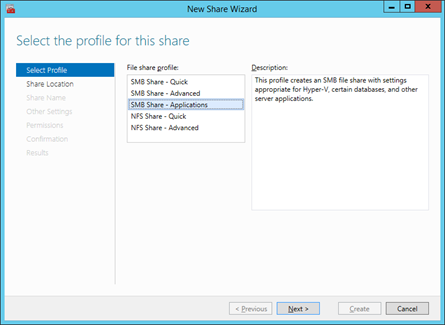
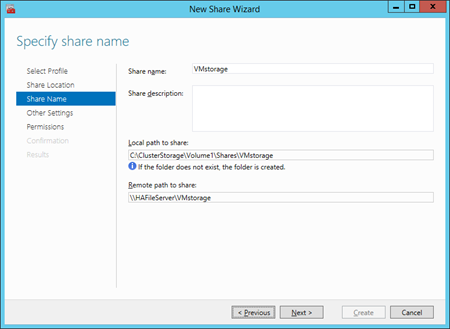
I am going to use this for storing application data,
it’s going to be called VMStorage
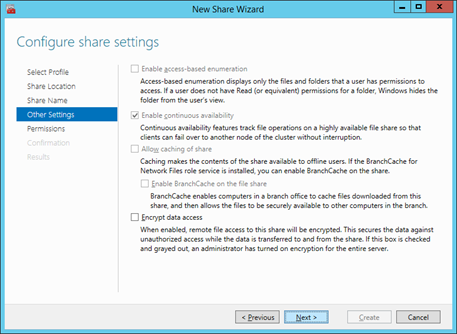
my options are greyed out based on the choices I already made, but I can encrypt the data if I want to, and I don’t need to do any additional work other than check this.
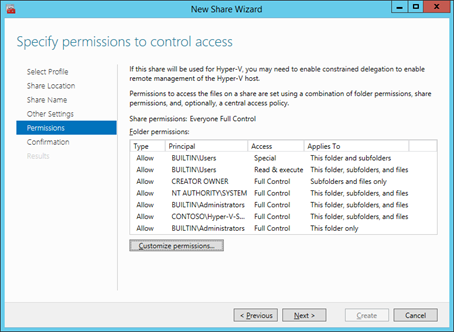
I then need to setup file permissions. You’ll need to ensure your Hyper-V hosts, database servers etc. have full control on this share to use it. In my case my Hyper-V server are in a group I created imaginatively titled Hyper-V Servers.
The last few steps can of course be done in PowerShell as well so here’s how I do that, but note that this is my live demo script so some of the bits are slightly different
#create two Storage spaces on with tiering and one without
New-VirtualDisk -FriendlyName $SpaceName1 -StoragePoolFriendlyName $PoolName -StorageTiers $HDDTier,$SSDTier -StorageTierSizes 30Gb,5Gb -WriteCacheSize 1gb -ResiliencySettingName Mirror
New-VirtualDisk -FriendlyName $SpaceName2 -StoragePoolFriendlyName $PoolName -StorageTiers $HDDTier,$SSDTier -StorageTierSizes 30Gb,5Gb -WriteCacheSize 1gb -ResiliencySettingName Mirror
#create the dedup volume and mount it
#First we need to put the disk into maintenance mode
$ClusterresourceName = "*("+ $SpaceName1 + ")*"
Get-ClusterResource | where name -like $ClusterResourceName | Suspend-ClusterResource
$VHD = Get-VirtualDisk $SpaceName1
$Disk = $VHD | Get-Disk
Set-Disk $Disk.Number -IsOffline 0
New-Partition -DiskNumber $Disk.Number -DriveLetter "X" -UseMaximumSize
Initialize-Volume -DriveLetter "X" -FileSystem NTFS -NewFileSystemLabel "DedupVol" -Confirm:$false
#note -usagetype Hyper-V for use in VDI ONLY!
Enable-DedupVolume -Volume "X:" -UsageType HyperV
#Bring the disk back on line
Get-ClusterResource | where name -like $ClusterResourceName | Resume-ClusterResource
#create the dedup volume and mount it
#First we need to put the disk into maintenance mode
$ClusterresourceName = "*("+ $SpaceName2 + ")*"
Get-ClusterResource | where name -like $ClusterResourceName | Suspend-ClusterResource
$VHD = Get-VirtualDisk $SpaceName2
$Disk = $VHD | Get-Disk
Set-Disk $Disk.Number -IsOffline 0
New-Partition -DiskNumber $Disk.Number -DriveLetter "N" -UseMaximumSize
Initialize-Volume -DriveLetter "N" -FileSystem NTFS -NewFileSystemLabel "NormalVol" -Confirm:$false
#Bring the disk back on line
Get-ClusterResource | where name -like $ClusterResourceName | Resume-ClusterResource
#Add to Cluster Shared Volumes
$StorageSpaces = Get-ClusterResource | where Name -Like "Cluster Virtual Disk*"
ForEach ($Space in $StorageSpaces) { Add-ClusterSharedVolume -Cluster $ClusterName -InputObject $Space }
#create the standard share directory on each new volume
$DedupShare = "C:\ClusterStorage\Volume1\shares"
$NormalShare = "C:\ClusterStorage\Volume2\shares"
$VMShare = "VDI-VMs"
$UserShare = "UserDisks"
md $DedupShare
md $NormalShare
$Share = "Dedup"+$VMShare
$SharePath = $DedupShare + "\" + $VMShare
MD $SharePath
New-SmbShare -Name $Share -Path $SharePath -CachingMode None -FullAccess contoso\Orange$,contoso\administrator -ScopeName $HAFileServerName -ContinuouslyAvailable $True
$Share = "Dedup"+$UserShare
$SharePath = $DedupShare + "\" + $UserShare
MD $SharePath
New-SmbShare -Name $Share -Path $SharePath -CachingMode None -FullAccess contoso\Orange$,contoso\administrator -ScopeName $HAFileServerName -ContinuouslyAvailable $True
$Share = "Normal"+$VMShare
$SharePath = $NormalShare + "\" + $VMShare
MD $SharePath
New-SmbShare -Name $Share -Path $SharePath -CachingMode None -FullAccess contoso\Orange$,contoso\administrator -ScopeName $HAFileServerName -ContinuouslyAvailable $True
$Share = "Normal"+$UserShare
$SharePath = $NormalShare + "\" + $UserShare
MD $SharePath
New-SmbShare -Name $Share -Path $SharePath -CachingMode None -FullAccess contoso\Orange$,contoso\administrator -ScopeName $HAFileServerName -ContinuouslyAvailable $True
I know this can be sharpened up for production with loops and functions but I hope it’s clearer laid out this way. Note I have to take the disk into maintenance mode on the cluster while I format them etc. where the storage spaces wizard takes care of that. This script is part of my VDI demo setup and so I have enabled deduplication on one storage space and not on the other to compare performance on each of these.
Once I have created my spaces and shares I am ready to use it, and a quick way to test all is well is to do a quick storage migration of a running VM to this new share. Just right click on a VM in Hyper-V Manager and select move to bring up the wizard.
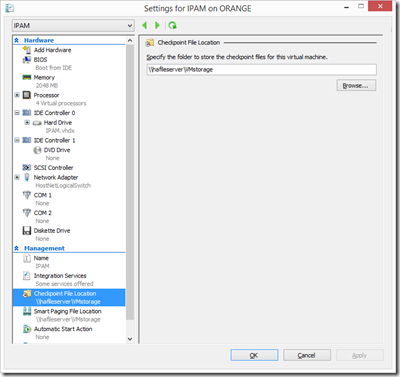
after about 30 seconds my VM arrived safely on my File Server as you can see from its properties..
Hopefully that’s useful - it certainly went down well in London, Birmingham & Glasgow during our recent IYT Camps and if you want the full script I used I have also put it on Skydrive. Not that this script is designed to be run from FileServer 2 having already setup the cluster with the cluster setup script I have already posted
Comments
- Anonymous
December 23, 2013
Pingback from Windows Server 2012 R2: Lab Ops–Building a VDI environment with powershell | MS Tech BLOG
