Installing ODBC drivers into Windows containers and calling into database systems that are hosted on a Linux VM
Containerized Applications that need access to relational database systems typically leverage ODBC drivers to do so. This means that if you want to connect to Postgres from an IIS web application, you must install the appropriate ODBC drivers as well as creating the appropriate data source name or DSN. in a Windows environment this is typically achieved by going into the control panel and clicking through a set up program, thus leveraging the user interface of the operating system.
Typically installed on virtual machines
Generally speaking, ODBC drivers get installed on VMs, making them available to all apps that run on the VM.
But in the world of containers, that is different because each container needs to be self-contained with zero dependencies on the host OS on top of which it runs. This means we need to figure out a way to get the ODBC drivers to install on image, not on its host operating system running on the virtual machine.
What is post is about
Just to be clear what we mean by image is, in fact, a Docker image. building a darker image is achieved by running a build command and using a text file to act as a blueprint when building the image.
This post is about how you would automate the installation of ODBC drivers onto a Docker image. to build a darker image using the docker build command along with a Dockerfile is a completely automated process with no ability for a user interface to be used to install programs onto that image. Thus, we need a fully automated way to install the necessary ODBC drivers along with the creation of a data source name.
I had to build my own tooling
Unfortunately, I could not find a solution to programmatically perform the tasks needed here. So I wrote my own and that's what this post is about - just to be clear.
In a nutshell, all this post will show you how to do is to create a commandline utility that programmatically installs an ODBC driver without any user intervention whatsoever. This is exactly what is needed we are building up your Docker images.
The metadata needed to connect to PostGres
This metadata includes:
- The driver type (Postgres will be the example in this post)
- The server domain name or IP address
- The port number
- The database name
- Username and password
Must be 100% programmable
Dockerfiles are text files that are used to build up an image that will eventually become a running container. Dockerfiles represents the blueprint that takes a base image and adds the appropriate software layers upon this base image.
Notice in the code below that there's a section that states that commands are needed to install the ODBC drivers.
The challenge - I provided code that is needed
The problem is that there does not exist some easy to use commands to do this and that's what this post is about.
Questions that need answering (Imagine that you want to install Postgres):
- What binaries are needed on the Docker host to begin the process?
- what code do we need to write to automate the provisioning of not just the ODBC driver, but also the creation of the data source name
- The data source name will be needed by the code we write for our IIS web application
Sample Dockerfile
Note the dockerfile below. it's a very simple Docker file that begins with a core Windows server operating system. It then uses dism.exe to install IIS. From there it creates a simple index.html file which represents a "Hello World" webpage
What you don't see in this file is an implementation of installing an ODBC driver. That's the purpose of this post - to show you how to do that.
 # Sample Dockerfile

# Indicates that the windowsservercore image will be used as the base image.
FROM windowsservercore

# **************************************************************************************
# NEEDED COMMANDS TO INSTALL ODBC DRIVERS AND CONFIGURE DSNs IS WHAT THIS POST IS ABOUT
# [commands go here]
# **************************************************************************************

# Metadata indicating an image maintainer.
MAINTAINER bterkaly@microsoft.com

# Uses dism.exe to install the IIS role.
RUN dism.exe /online /enable-feature /all /featurename:iis-webserver /NoRestart

# Creates an html file and adds content to this file.
RUN echo "Hello World - Dockerfile" > c:\inetpub\wwwroot\index.html

# Sets a command or process that will run each time a container is run from the new image.
CMD [ "cmd" ]
Dockerfile
Building an image
Assuming that you are in a directory that contains this Dockerfile, you typically issue a command like this to build an image:
docker build .
The docker build will construct an image using the declarative syntax within a Dockerfile. There is no user interface to perform this operation. This means that when you build an image it must be 100% programmable, without any user interface whatsoever.
The figure below depicts the workflow needed to get a running container. As explained previously, the combination of the docker build command along with the corresponding Dockerfile is how you produce a docker image. From there, you can use the Docker run* command along with that image to finally get to your running container**.
Click image for full size
Figure 1: dockerbuild.png
Creating a commandline utility in Visual Studio
Let's begin building out our command line utility that we can use inside of our Dockerfile. We will start up Visual Studio. You can use the version I'm using, 2015, but practically any version will work here. We will create a console application that leverages the Win32 API. I was going to write this in C (because of the Win32 API) but figured that C# might be more accessible to most.
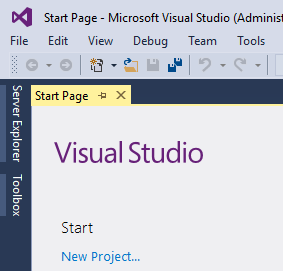
You can begin by clicking New project from the Start page.
Click image for full size
Figure 2: Creating a new project
At this point you will be able to select from the available project types. we are going to choose Console application.
Click image for full size
Figure 3: Selecting a console application as a project type and specifying a project name
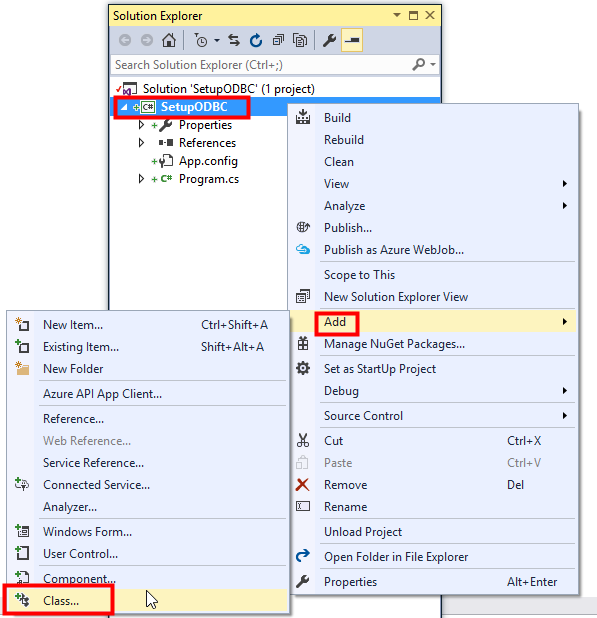
At this point we are going to add a class module that will do all the heavy lifting. It will be called ODBCManager and will contain all the necessary code to modify the Windows registry in addition to the ODBC.ini file.
Click image for full size
Figure 4: adding a class
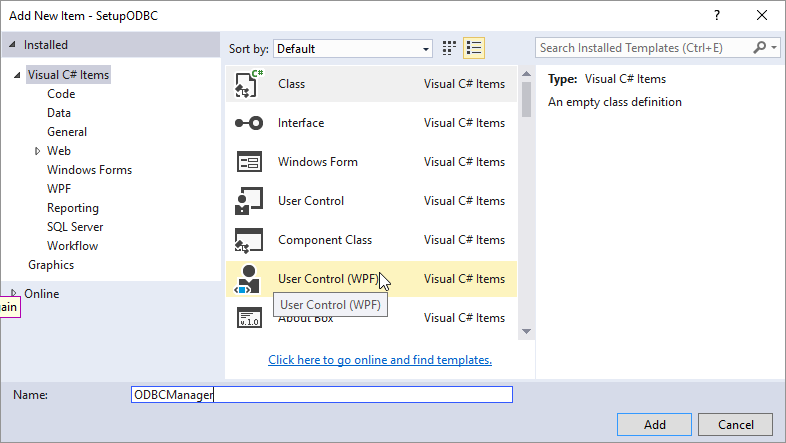
Our class module will need a name. It is called ODBCManager.
Click image for full size
Figure 5: Naming the class
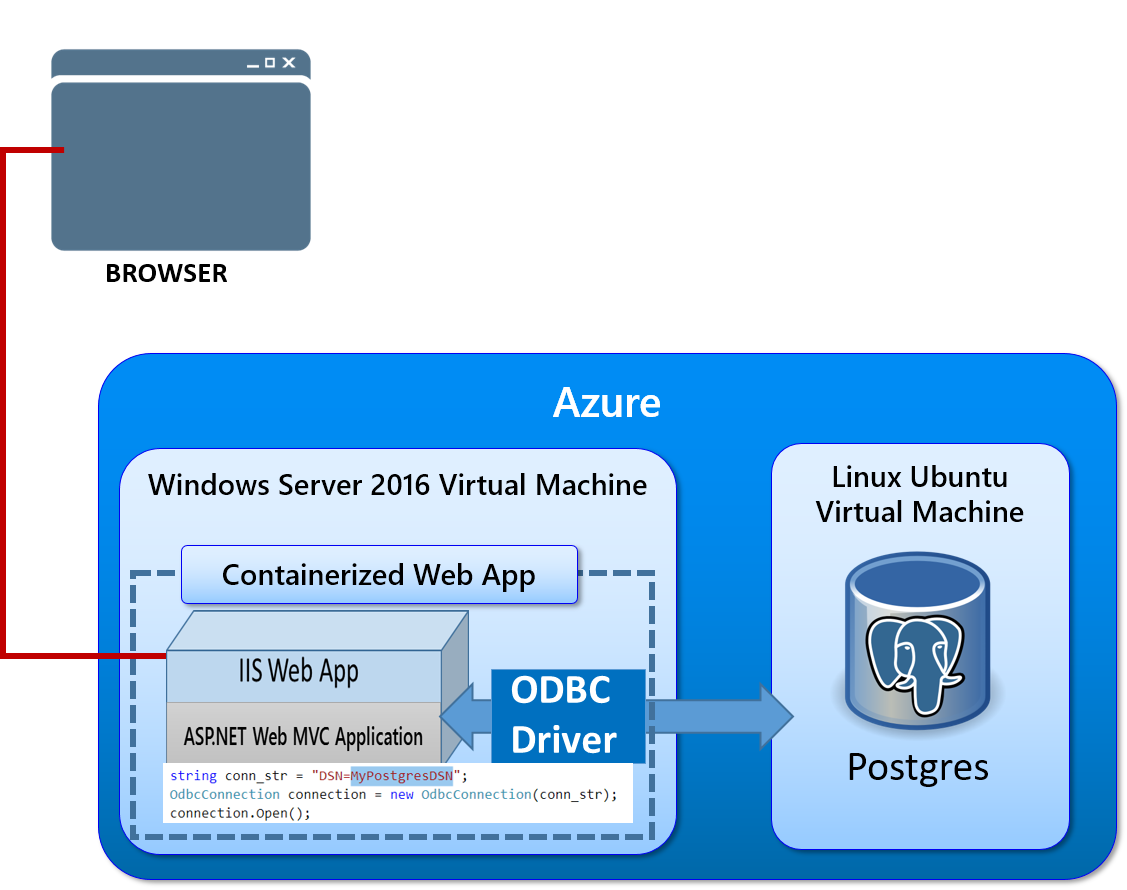
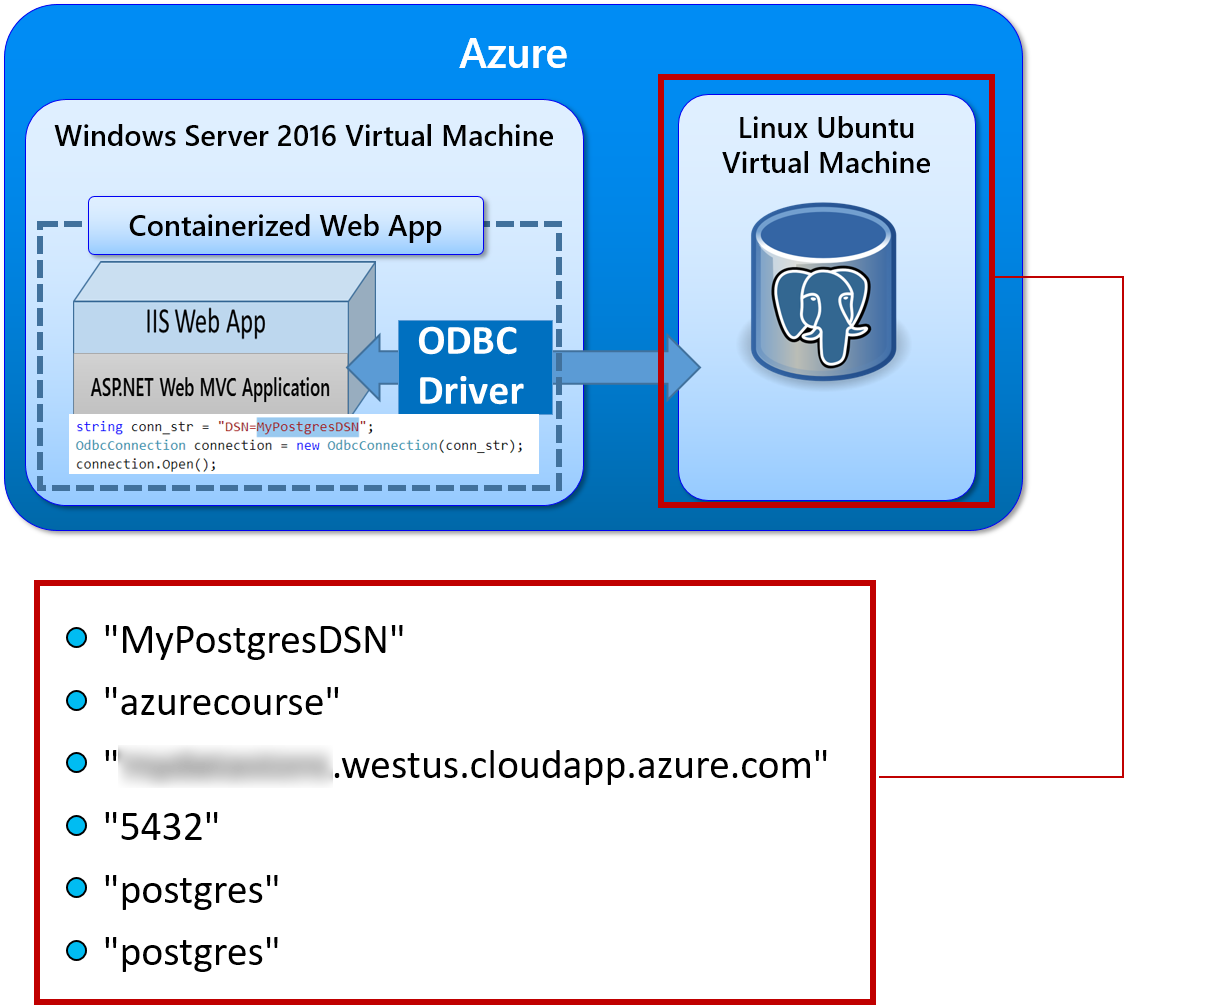
The key take away and this diagram is the fact that the ODBC driver resides within the containerized web application, not at the virtual machine that is hosting the container. This is a great example of the power of containerization, the fact that the containerized web application includes all its dependencies.
Containers can be run practically anywhere because they contain all of their dependencies. whereas previously the virtual machine needed to have the ODBC drivers installed to be able to support applications that access relational databases, now the container comes fully self-contained, capable running on a generic virtual machine or even a bare metal machine.
Click image for full size
Figure 6: Showing that the ODBC driver exists inside the container
Paste in this code to ODBCManager.cs
At this point we are ready to paste in the code that does the setting up of a data source name. The data source name is an abstraction that allows other code to connect up to a data source, which, as stated earlier, will be Postgres in our case.
In the figure below you will note that the code is connecting to PostGres by leveraging the data source name.
Click image for full size
Figure 7: Example of a client application using a data source name to connect up to PostGres
Code to create the data source name
In the code snippet below we actually do a few things. At a physical level we are modifying the registry as well as a ODBC.ini file.
When you add a data source name those of the two things that get modified on a Windows system.
 using Microsoft.Win32;
using System;
using System.Runtime.InteropServices;

namespace SetupODBC
{
    public static class SetupODBC
    {
        [DllImport("ODBCCP32.DLL")]
        private static extern bool SQLConfigDataSource(IntPtr hwndParent, RequestFlags fRequest, string lpszDriver, string lpszAttributes);
        [DllImport("Kernel32.dll", SetLastError = true)]
        public static extern long WritePrivateProfileSection(string strSection, string strValue, string strFilePath);
        [DllImport("Kernel32.dll", SetLastError = true)]
        public static extern long WritePrivateProfileString(string strSection, string strKey, string strValue, string strFilePath);
        private enum RequestFlags : int
        {
            ODBC_ADD_DSN = 1,               // Add a new user data source.
            ODBC_CONFIG_DSN = 2,            // Configure (modify) an existing user data source.
            ODBC_REMOVE_DSN = 3,            // Remove an existing user data source.
            ODBC_ADD_SYS_DSN = 4,           // Add a new system data source.
            ODBC_CONFIG_SYS_DSN = 5,        // Modify an existing system data source.
            ODBC_REMOVE_SYS_DSN = 6,        // Remove an existing system data source.
            ODBC_REMOVE_DEFAULT_DSN = 7     // Remove the default data source specification section from the system information.
        }
        public static bool Add(string DSName, string DB, string Server, string Port, string uid, string password)
        {
            // Clean up ODBC.ini file
            WritePrivateProfileString(DSName, null, null, @"c:\windows\odbc.ini");
            Console.WriteLine(@"Cleaning up c:\widnows\odbc.ini");

            // Delete registry entry for DSN
            var software = Registry.CurrentUser.OpenSubKey("Software");
            if (software == null) return false;
            using (var odbc = software.OpenSubKey("ODBC", true))
            {
                using (var odbcini = odbc.OpenSubKey("ODBC.INI", true))
                {
                    using (var subkey = odbcini.OpenSubKey(DSName, true))
                    {
                        if(subkey != null) odbcini.DeleteSubKey(DSName);
                    }
                    Console.WriteLine(@"Cleanup the registry HKEY_CURRENT_USER\SOFTWARE\ODBC\ODBC.INI\{0}", DSName);
                }
            }

            // Create DSN from scratch
            string strAttributes = "Dsn=" + DSName + "\0Server=" + Server + "\0Port=" + Port + "\0Database=" + DB +
                      "\0Uid=" + uid + "\0pwd=" + password + "\0";
            bool lngRet = CreateDataSource((IntPtr)0, 1, "PostgreSQL ANSI\0", strAttributes);
            lngRet = CreateDataSource((IntPtr)0, 2, "PostgreSQL ANSI\0", strAttributes);
            Console.WriteLine("Created data source = {0}", DSName);
            return lngRet;
        }

        [DllImport("ODBCCP32.dll")]
        private static extern bool SQLConfigDataSource(IntPtr hwndParent,
        int fRequest, string lpszDriver, string lpszAttributes);

        public static bool CreateDataSource(IntPtr hwndParent,
        int fRequest,
        string lpszDriver,
        string lpszAttributes)
        {
            return SQLConfigDataSource(hwndParent,
            fRequest,
            lpszDriver,
            lpszAttributes);
        }
    }
}
ODBCManager.cs
The main Program.cs looks like this. as you can see parameters will be passed in the defined the necessary metadata.
As explained previously, the metadata that will be passed in includes:
- The driver type (Postgres will be the example in this post)
- The server domain name or IP address
- The port number
- The database name
- Username and password
Completing the code
 namespace SetupODBC
{
    class Program
    {
        static void Main(string[] args)
        {
            string dsnName = args[0];
            string db = args[1].Trim();
            string port = args[2].Trim();
            string ip = args[3].Trim();
            string uid = args[4].Trim();
            string pwd = args[5].Trim();
            SetupODBC.Add(dsnName, db, port, ip, uid, pwd);
        }
    }
}
Program.cs
Building the ODBC installation and configuration application
Now that we've created a project with all the necessary code, all we have to do next is compile the application and tested on our local laptop. We can prove that it works by verifying that the ODBC driver isn't on the system and that our web application is unable to connect to the database.
Clearly, we can't connect to Postgres.
Click image for full size
Figure 8: Proof that we cannot connect up to the database
Downloading the driver for PostGres
There are two aspects to the work we are doing here. The first task is to actually install the ODBC driver itself. The second task is to define a data source name (DSN) . The data source name is where we actually enter the specific connection metadata that is needed to connect to our specific instance of Postgres.
Downloading the Postgres ODBC Driver
Here is the URL for the downloads:
https://www.postgresql.org/ftp/odbc/versions/msi/
Below you can see the appropriate zip file. Notice that I am installing the x86 version. I had difficulty getting the x64 to work but it may work on other systems.
Click image for full size
Figure 9: Downloading the ODBC driver in zip format
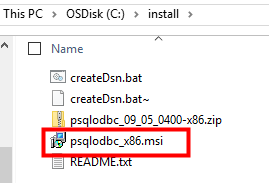
Once the download is complete you may want to unzip the contents into some type of install folder for testing.
We are testing on an ordinary laptop right now. Testing within the context of the container and a Dockerfile can be found in other posts. the purpose of this post is simply right the install script and demonstrate its correct use.
Click image for full size
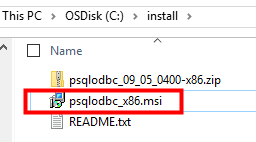
_Figure 10: The MSI file for the ODBC/PostGres installation.
Now you are ready to begin the install. Notice in the image below that I am executing with the /passive flag. you can also use the /quiet flag.
Click image for full size
Figure 11: Installing the PostGres ODBC Driver
To verify correct installation you can go into control panel and see that the psqlODBC driver has been installed.
Click image for full size
Figure 12: Verifying correct installation
Compiling our console application and testing it
We have accomplished the following:
- Created our console application that will create a data source name
- Installed our ODBC driver for PostGres
The work that remains is:
- To compile our console application
- To retrieve the necessary metadata for our Postgres database that is running in Azure on the Ubuntu Linux virtual machine
- To run our console application and physically create the data source name
- Test that everything is working by connecting up to post grass from a web application
To compile our console application
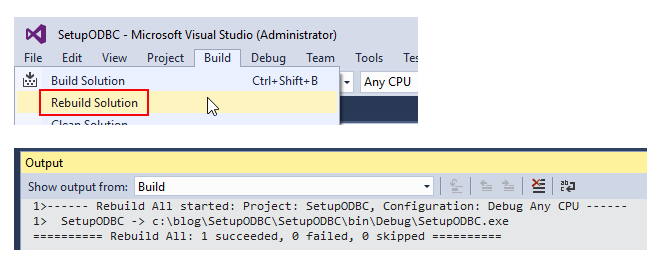
We will begin by rebuilding our solution which will produce SetupODBC.exe.
Click image for full size
Figure 13: Compiling SetupODBC.exe
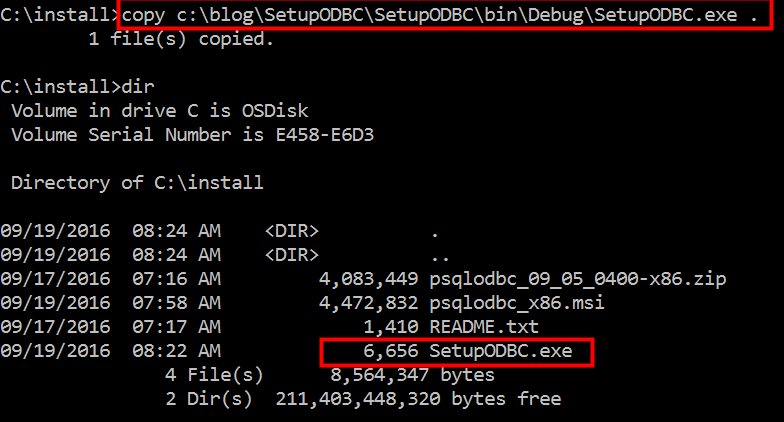
For convenience sake let's copy the SetupODBC.exe into our local install folder.
Click image for full size
Figure 14: Copying ODBCSetup.exe to the c:\install folder
To retrieve the necessary metadata for our Postgres database that is running in Azure on the Ubuntu Linux virtual machine
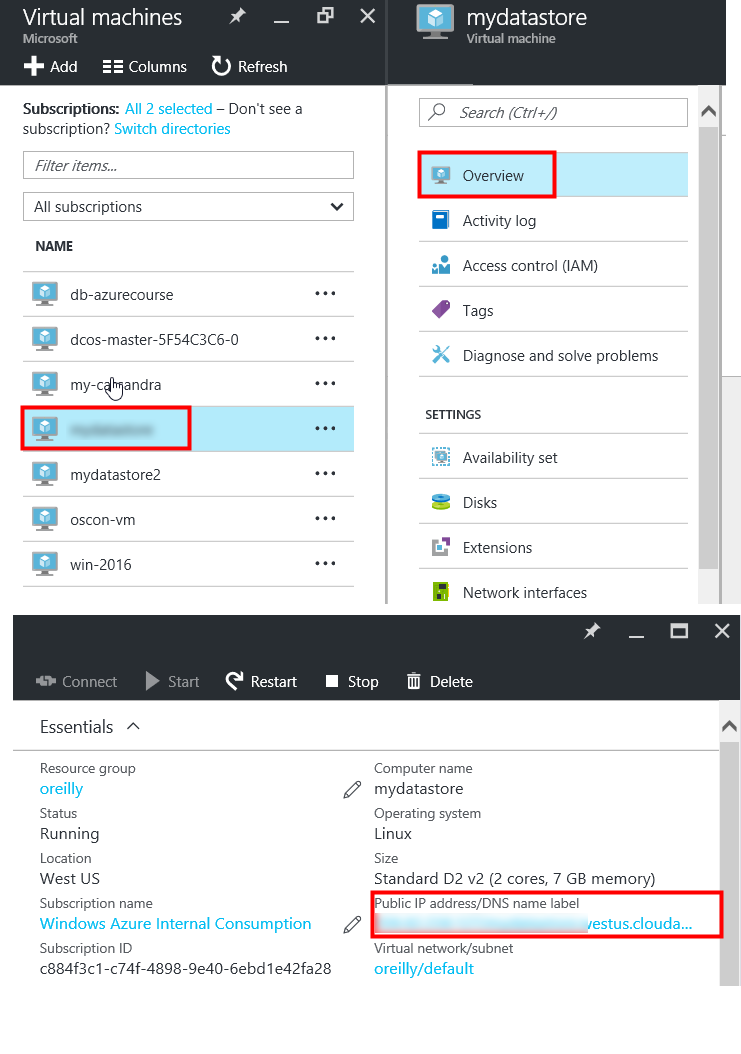
In order for the ODBC driver to connect a web application to the underlying Postgres database, we will need to understand some information about the virtual machine that runs on, as seen below.
Click image for full size
Figure 15: Information needed to create a data source name
Click image for full size
Figure 16: Using the portal to collect the necessary metadata about PostGres
The assumption that you've installed on a VM somewhere so in my case it is on a VM called VMNAME.
To run our console application and physically create the data source name
Running our console application can be seen below. Notice that the metadata that describes the connection information to our PostGres database.
Click image for full size
Figure 17: Running SetupODBC
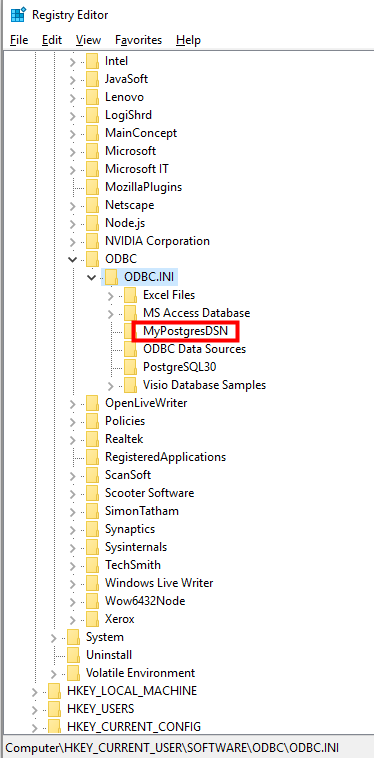
You can verify that the correct entries took place.
Click image for full size
Figure 18: Locating the place in the registry for the Data Source Name
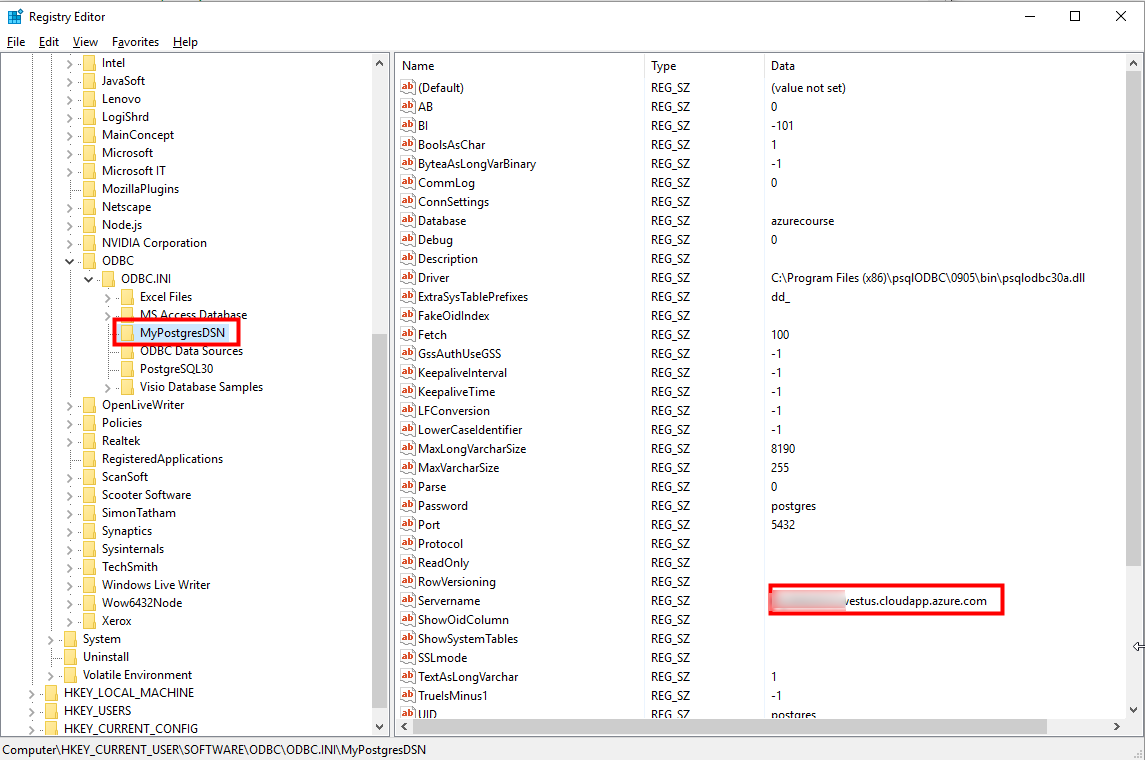
You can validate all the attributes here.
Click image for full size
Figure 19: The details on the command line properly in place
Test that everything is working by connecting up to PostGres from a web application
We are now ready to test our connection.
We successfully passed the connection.Open(); command.
Click image for full size
Figure 20: Successful test of connecting to PostGres
Conclusion
This post showed you had to overcome one of the core challenges when working with containers. It addressed the need to support dependencies that an application needs to run. These dependencies should be part of the container itself, not part of the virtual machine in which the container runs.
By putting dependency directly in the container it is now possible to run the container anywhere, as all the dependencies are bundled up along with the application.
But the challenge is automating the installation of the dependency in the imager container. Because of the way the building of images is highly automated, it is necessary to install dependent functionality without any user interaction.
In the case of this post we showed you how to deploy ODBC drivers in an automated fashion. And what made this post very useful is the fact that sometimes you need to build your own tooling to accomplish this. Installing dependencies doesn't always come with the ability for automated and silent installation.

