Creating Visual Studio Templates
This article explains how to create Visual Studio project and item templates not from scratch, but starting from prototypes that model the things we want to create with those templates.
For more info, go here.
1. Creating Prototype Projects or Items
First of all, create the piece (project or item) that resembles the thing you want to get created starting from the template we are going to create.
That’s simply like
Then, export the template (we are going to use the exported template as a shortcut to build our Visual Studio template package):
You can also start from an existing project you consider suitable as a starting point.
Now, depending on whether a project or item template is going to be created, follow the appropriate instructions for Project or Item Templates below.
2. Creating Visual Studio Project Templates
Choose Project template,
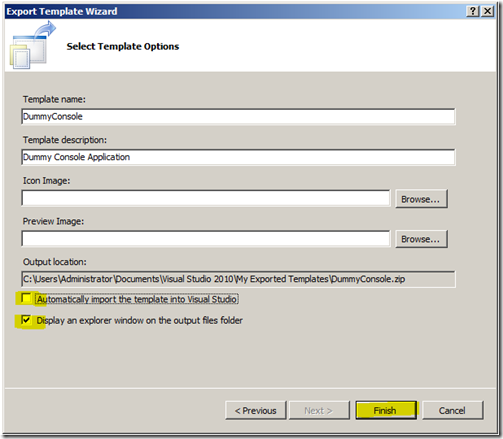
Then complete desired data and make sure that template is NOT imported into Visual Studio, and an explorer windows is opened in the output files folder:
Keep that window opened:
The generated template is a project template, and as such, it includes all the files of the prototype project. Regardless, we will be using it as a starting point for both Item and Project templates, because it is easier to remove items than adding them manually if we had exported as an item template.
3. Creating Template Project
Time to create our template project. Go to File | New | Project…, then choose the highlighted options in the picture , plus an appropriate name for the template:
Next step is to delete all the files from the just generated project. Select and delete them all:
Go to the template .zip generated before, select those files, copy them,
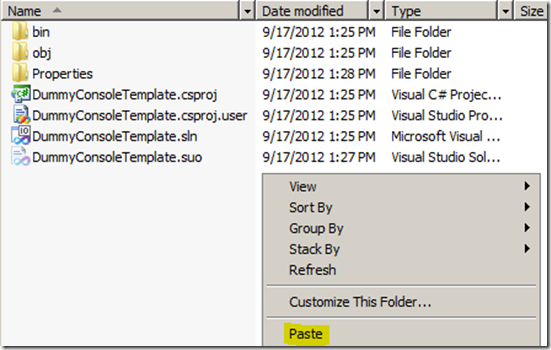
Then navigate to the project template’s folder and paste them:
To add files into the project template (that is, to the project whose files we deleted before), go to Visual Studio, click on “Show All Files”, select the files copied from the .zip and include them in the project:
Now, delete those files that we are not interested to include in the project (remember, we started from an Project template export, therefore it may include extra items we may not want to be part in the case of an item template).
Then, select all files but the .vstemplate, and set their Build Action to “Content”:
Select the .vstemplate and select its Build Action to “VSTemplate”:
As a verification step, build the project. You should end up with a Visual Studio template’s .zip file:
4. Customizing Template Files
Now, it’s time to customize the files in the template project.
.vstemplate
The .vstemplate file defines the attributes of the template, plus where the files will be copied when an item is created based on the template, among other things. Customizations are made based on the VSTemplate element schema here: https://msdn.microsoft.com/en-us/library/31cdwx28(v=vs.100).aspx
Main things to customize in this file are:
- Name, Description, etc: TemplateData
- Template type: <VSTemplate … Type="Item"> or <VSTemplate … Type="Project">, depending on the type of template being created.
- ProjectItem’s to be created in the project that adds this item: <ProjectItem ReplaceParameters="true" TargetFileName="$fileinputname$\Elements.xml">Elements.xml</ProjectItem>
o Beware that the ReplaceParameters attribute both controls whether parameters are replaced in the file and in the TargetFileName attribute.
- References to be added to the project that adds this item: References
Couple tips here:
- Try to not use folders in here, <ProjectItem …>NO FOLDER HERE</ProjectItem>, because it creates that folder’s name in the project that is adding the item.
- Different .vstemplate’s files that are referenced from the same .vsixmanifest must be named differently. Otherwise, last one added wins and that’s the only one that shows up.
.csproj
To customize the .csproj file (the .csproj that defines the template project) right click on the template project, unload the project,
Then edit the project,
Main things to customize in this file are:
- Folder in which templates will appear in the “New project” or “Add new item” dialogs: <VSTemplate …>
<OutputSubPath>My Company\SharePoint 2010</OutputSubPath>
<SubType>Designer</SubType>
</VSTemplate>
Content Files
The files that are generated when an item or project is created are those that were referenced as ProjectItem in the .vstemplate file.
As we saw it, those files were marked as Content, and ReplaceParameters="true" was set for them.
That implies that Visual Studio will generate those files replacing parameters specified in here: https://msdn.microsoft.com/en-us/library/eehb4faa(VS.80).aspx
What to customize in each content file, is up to you. You can go from hard-coding namespaces, item names, classes etc, to, more recommended, customize those items so newly created project or item gets along well with other items and projects in the solution.
Typically, these are the parameters that are to be used for this task:
- $safeitemname$
- $safeprojectname$
- $rootnamespace$
- $GUIDN$ (for ex. $GUID1$, $GUID2$, etc)
5. Creating Visual Studio Package Project
Finally, it’s time to create the project that generates de Visual Studio extension that imports the templates to Visual Studio.
To do that, first create a VSIX solution:
In order to make sure VSIX and its dependencies build correctly, we are going to add the existing template project to the extension project. To do so, right click on the extension solution and add the existing project,
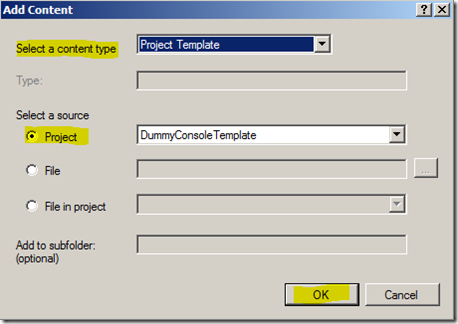
In the extension solution, double-click the manifest, so designer opens, and click “Add Content” on that designer view,
Now reference the template project added just added to the solution, referencing the right project and its right type (Project or Item Template, whatever corresponds):
As a verification step, build the solution, you should see have a .vsix being generated after its dependency project:
6. Debugging
When a extension project is opened, and debugging is started (Debug | Continue, or F5), Visual Studio launches an instance of itself but called “Experimental Instance”,
This allows debbuging of components that run in Visual Studio, as extensions or add-ins.
We need now to check whether the template is actually available. So go to create a new project and see if it’s there:
Use the template by creating a project or adding a new item, depending on the template type to be verified, and check whether it is correct or needs to be fixed.
7. Installing the Extension
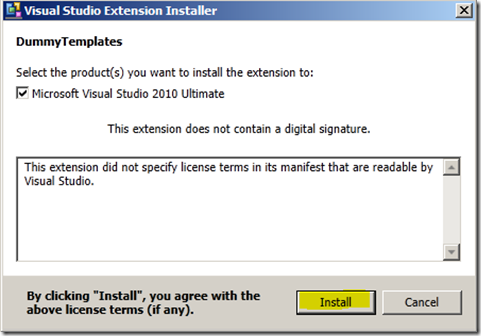
Now the the extension was verified, it’s time to install it. Execute the .vsix file from an Administrator command prompt, then when prompted, install,
And make sure it installed correctly, and restart Visual Studio,
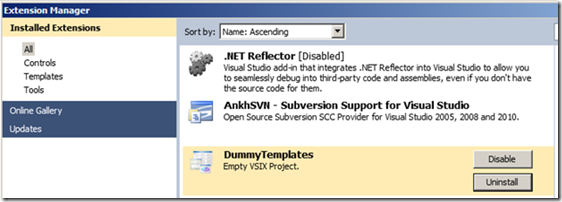
Launch Visual Studio again and in Tools | Extension Manager…, you should see the extension being installed,
Now, you are ready to use the templates in Visual Studio, not only in an Experimental Instance of it.
Comments
- Anonymous
June 11, 2014
Hey Ariel - thanks for this - any plans to update this for VS 2013? - Anonymous
September 09, 2014
Greatings, great blog about Templates.I have a problem, I did the step 1 to 3, but Visual Studio shows an error: unexpected character $, this error show in the clases, in $safeprojectname$ and others.Thanks.


