Installing a Read Only Domain Controller(RODC) In SBS 2008 and Essential Business Server 2008 Environment
Read Only Domain Controller is an additional domain controller for a domain that hosts read-only partitions of the Active Directory database. An RODC is designed primarily to be deployed in a branch office environment. Branch offices typically have relatively few users, poor physical security, relatively poor network bandwidth to a hub site, and limited IT knowledge.
Prerequisites for Deploying an RODC
- The forest and domain functional level must be Windows Server 2003
- At least one writable domain controller running Windows Server 2008 for the same domain as the RODC
- The <DVD drive>:\sources\adprep\Adprep /rodcprep must have been run on the writeable domain controller
The default setting for the forest and domain functional Level in Small Business Server2008 is “Windows Server 2003” However in Essential Business Server 2008 the domain and forest functional level “Windows 2000”, so we must raise the forest and domain functional level in an Essential Business Server 2008 By following the following article https://support.microsoft.com/kb/322692 on the Management or Messaging Server and restart Active Directory Domain services on the server.
Small Business Server 2008 is a writable windows 2008 domain controller and so are management and messaging server in an Essential Business Server 2008. It is advisable to have RODC in same site in Active Directory site as one of the writeable domain controller in domain.
The default installation of Small Business Server 2008 and Essential Business Server 2008 does have the forest prepared for an Read Only Domain controller. The administrator must prepare the forest by running “Adprep /Rodcprep “ command on a writeable domain controller. Small Business Server 2008 is a primary domain controller and in an Essential Business Server 2008 we run the Adprep command on the Management or Messaging server.
Run the Adprep command with elevated permissions using the a windows 2008 media or Small Business Server 2008 Disc 1 and after the command has executed restart the Active Directory Domain Services.
Example: <DVD drive>:\ Sources\Adprep> Adprep /rodcprep
Once the prerequisites for deploying an RODC in domain and fulfilled, the administrator is ready to install their first RODC in their environment. There are two methods of installing a RODC in domain:
Method 1: Non-administrator user to run the RODC Setup
Method 2: Administrator user to run RODC Setup
__________________________________________________________________________________
Method 1: Non Administrator user to run the RODC Setup
__________________________________________________________________________________
In this method a Pre created Read-only Domain Controller Account is used to connect windows 2008 Server to domain and promote it to Read Only Domain Controller
Pre Create Read Only Domain Controller Account
Click Start, click Administrative Tools, and then click Active Directory Users and Computers in SBS 2008 or EBS 2008 domain controller.
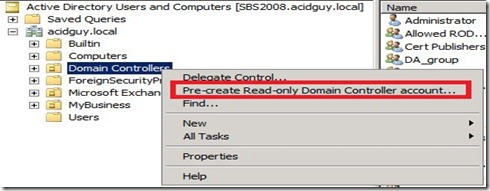
Double-click the domain container, then you can either right-click the Domain Controllers container or click the Domain Controllers container, and then click Action.
Click Pre-create Read-only Domain Controller account, as shown in the following figure.
On the Welcome to the Active Directory Domain Services Installation Wizard page, if you want to modify the default the Password Replication Policy, select Use advanced mode installation, and then click Next.
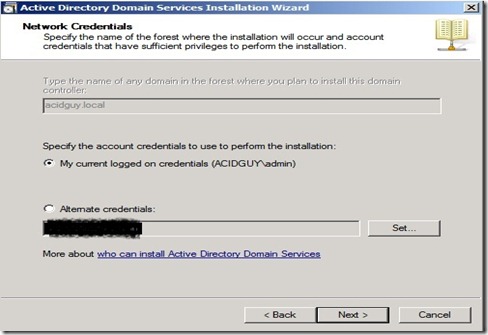
On the Network Credentials page, under Specify the account credentials to use to perform the installation, click My current logged on credentials, as shown in the following figure, or click Alternate credentials, and then click Set. In the Windows Security dialog box, provide the user name and password for an account that can install the additional domain controller. To install an additional domain controller, you must be a member of the Enterprise Admins group or the Domain Admins group. When you are finished providing credentials, click Next.
On the Specify the Computer Name page, type the NetBIOS computer name of the server that will be the RODC.
On the Select a Site page, select a site from the list or select the option to install the domain controller in the site that corresponds to the IP address of the computer on which you are running the wizard, and then click Next.
On the Additional Domain Controller Options page, make the following selections, as shown in the following figure, and then click Next:
DNS server: This option is selected by default so that your domain controller can function as a DNS server. If you do not want the domain controller to be a DNS server, clear this check box. However, if you do not install the DNS server role on the RODC and the RODC is the only domain controller in the branch office, users in the branch office will not be able to perform name resolution when the WAN to the hub site is offline.
Global catalog: This option is selected by default. It adds the read-only directory partitions of the global catalog to the domain controller, and it enables global catalog search functionality. If you do not want the domain controller to be a global catalog server, clear this option. However, if you do not install a global catalog server in the branch office or enable universal group membership caching for the site that includes the RODC, users in the branch office will not be able to log on to the domain when the WAN to the hub site is offline.
Read-only domain controller. When you create an RODC account, this option is selected by default and you cannot clear it.
11. If you selected the Use advanced mode installation check box on the Welcome page, the Specify the Password Replication Policy page appears. By default, no account passwords are replicated to the RODC, and security-sensitive accounts (such as members of the Domain Admins group) are explicitly denied from ever having their passwords replicated to the RODC. To accept the default setting, click Next.
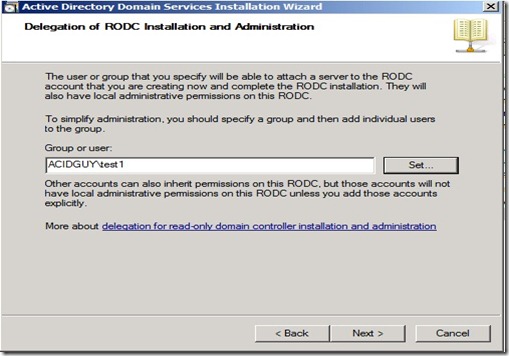
12. On the Delegation of RODC Installation and Administration page, type the name of the user or the group who will attach the server to the RODC account that you are creating, as shown in the following figure. You can type the name of only one security principal.(This user or group will also have local administrative rights on the RODC after the installation. If you do not specify a user or group, only members of the Domain Admins group or the Enterprise Admins group will be able to attach the server to the account.) Click Next
13. On the Summary page, review your selections. Click Back to change any selections, if necessary.To save the settings that you selected to an answer file that you can use to automate subsequent AD DS operations, click Export settings. Type a name for your answer file, and then click Save. When you are sure that your selections are accurate, click Next to create the RODC account.
14. On the Completing the Active Directory Domain Services Installation Wizard page, click Finish.
After you create the account for the RODC, the user or group to whom you delegated installation and administration of the RODC (in step 12 in the previous procedure) can run the Active Directory Domain Services Installation Wizard on the server that will become the RODC to complete the RODC installation. Make sure that the server is not joined to the domain before you start the wizard
Running RODC Setup
On the Server that has to be setup as an RODC logged in as the local Admin launch Active Directory Domain Services Installation Wizard.
1. Start Run “Dcpromo” this will launch the Active Directory Domain Services Installation Wizard Click on Next on this page and the following page
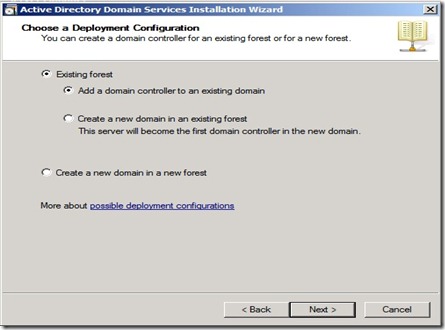
2. On the “Choose a Deployment Configuration” page, Select the “Existing Forest “ option and below verify that “Add a domain controller to an existing domain” option is selected (as shown below) Click on Next
3. On the “Network Credential” page Choose thePre Create Read Only Domain Controller Account created in (Step 12 In the Pre Create Read Only Domain Controller Account ) Under “Alternate Credential” Enter in password for the user. Click on Next we get the Message as shown bellow
4.Click on Yes on the warning message
5. On “Select Site” select the site where the RODC will be placed Click on Next
6. On “Additional Domain Controller” page verify the option for Read-only Domain Controller(RODC) is selected Click Next
7.To use the default folders that are specified for the Active Directory database, the log files, and SYSVOL, click Next.
8. Type and then confirm a Directory Services Restore Mode password, and then click Next.
9. Confirm the information that appears on the Summary page, and then click Next to start the AD DS installation. You can select the Reboot on completion check box to make the rest of the installation complete automatically.
_______________________________________________________________________________
Method 2: Administrator user to run RODC Setup
_____________________________________________________________________
This method involves running the Active Directory Domain Services Installation Wizard as Domain administrator and join an additional domain controller(RODC) to the domain
1. Start Run “Dcpromo” this will launch the Active Directory Domain Services Installation Wizard Click on Next on this page and the following page
2. On the “Choose a Deployment Configuration” page, Select the “Existing Forest “ option and below verify that “Add a domain controller to an existing domain” option is selected (as shown below) Click on Next
3. On the “Network Credential” page Enter in a Domain Admin account Under “Alternate Credential” Enter in password for the admin user. Click on Next
4. On “Select Site” select the site where the RODC will be placed Click on Next
5. On “Additional Domain Controller” page verify the option for Read-only Domain Controller(RODC) is selected Click Next
6.To use the default folders that are specified for the Active Directory database, the log files, and SYSVOL, click Next.
7. Type and then confirm a Directory Services Restore Mode password, and then click Next.
8. Confirm the information that appears on the Summary page, and then click Next to start the AD DS installation. You can select the Reboot on completion check box to make the rest of the installation complete automatically.
Reference
https://technet.microsoft.com/en-us/library/cc771024(WS.10).aspx


